Introduction
- Thank you for choosing the Growly app. We are pleased to have you with us. Enclosed is the documentation to help you set up and launch the app easily. Please read it carefully, as it contains important information. If you need any assistance or have questions, our support team is just a message away.
Extract Project Zip
- All setup is performed using Terminal (SSH).
- Connect to your AWS server using:
ssh ubuntu@YOUR_SERVER_IP
- Upload the backend zip file using WinSCP or SCP.
- Navigate to your project directory and extract:
cd /home/ubuntu/growly
unzip backend.zip -d backend
Create Instance In AWS
- Launch an AWS EC2 Instance.
- Instance Type: t3a.medium
- Operating System: Ubuntu 24.04 LTS
- Enable ports in Security Group:
- 22 – SSH
- 80 – HTTP
- 443 – HTTPS
- Attach key pair and launch the instance.
Setup Nginx
- Install Nginx:
sudo apt install nginx -y
- Check Nginx version:
nginx -v
nginx/1.18.0 (Ubuntu)
- Start and enable Nginx:
sudo systemctl start nginx
sudo systemctl enable nginx
Setup Node.js And PM2
- Update Existing Pacakages
sudo apt update && sudo apt upgrade -y
- Install Required Dependencies:
sudo apt install -y curl ca-certificates build-essential
- Install NVM (Node Version Manager):
curl -o-
            https://raw.githubusercontent.com/nvm-sh/nvm/v0.39.7/install.sh |
            bash
- Reload terminal:
source ~/.bashrc
- Check NVM version:
nvm -v
- Install Node.js version v20.19.4:
nvm install 20.19.4
nvm use 20.19.4
nvm alias default 20.19.4
- Verify Node and npm:
node -v
v20.19.4
npm -v
10.8.2
- Move Node and NPM to /usr/bin:
sudo ln -s ~/.nvm/versions/node/v20.19.4/bin/node
            /usr/bin/node
sudo ln -s ~/.nvm/versions/node/v20.19.4/bin/npm /usr/bin/npm
- Install PM2 globally:
npm install -g pm2
Setup MongoDB (Cloud – MongoDB Atlas)
- Create a MongoDB Cloud account:
Go to https://www.mongodb.com/cloud/atlas and sign up or log in.
- Create a new cluster:
- Select Shared Cluster (Free / M0) or paid plan as required.
- Choose your preferred Cloud Provider (AWS / GCP / Azure).
- Select the nearest Region for better performance.
- Click Create Cluster.
- Create a database user:
- Username: growly_user
- Password: growly_user_pass
- Role: Read and Write to any database
- Whitelist IP Address:
- Add your server IP address.
- For development/testing, you can allow 0.0.0.0/0 (not recommended for production).
- Get MongoDB connection string:
- Click Connect → Connect your application.
- Select Node.js driver and copy the connection URI.
mongodb+srv://growly_user:[email protected]/growly?retryWrites=true&w=majority
- Update backend backend\config\database.js file:
dbURI=mongodb+srv://growly_user:[email protected]/growly
Setup Project In Server
- Navigate to project directory:
cd /home/ubuntu/growly/backend
- Setup and configure the .env file:
mv .env.example .env
- Edit the .env file and update database, server, and app settings.

- Install project dependencies:
npm install
- Notification Setup (Firebase)
- Go to Firebase Console → Project Settings → Service Accounts.
- Click Generate new private key and download the JSON file.
- Upload the downloaded file to the backend config folder:
/home/ubuntu/growly/backend/config
- Rename the downloaded file to firebase.json:
mv firebase-adminsdk-xxxxx.json firebase.json
- Start backend using PM2:
pm2 start index.js --name growly
pm2 save
pm2 startup
- Restart backend after Firebase setup:
pm2 restart growly
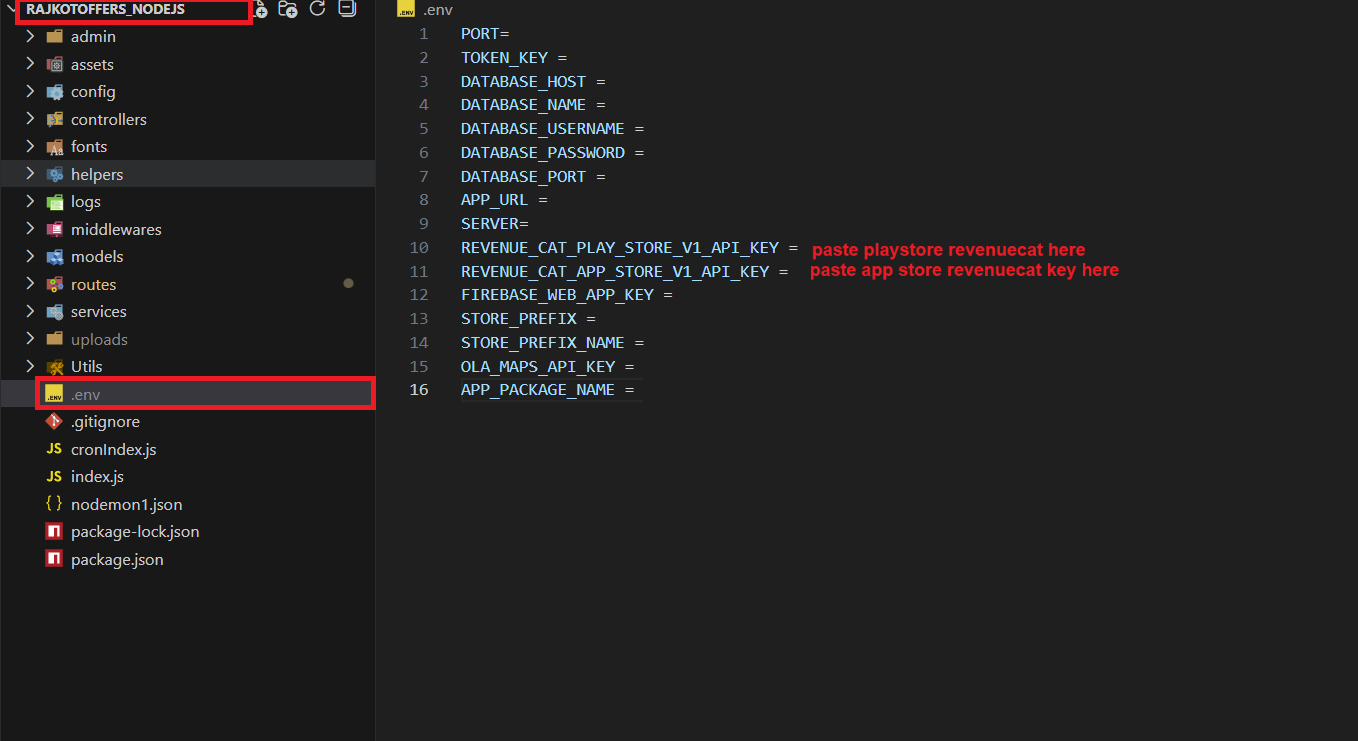
Env File Explanation
- PORT: The port on which your Node.js server will run (e.g., 3000, 4000, 5000).
- TOKEN_KEY: Secret key for JWT-based authentication and secure API token generation.
- DATABASE_HOST: Hostname or IP address of your SQL server (e.g., localhost or a remote server).
- DATABASE_NAME: Name of the SQL database to which your application connects.
- DATABASE_USERNAME: Username required to authenticate and access your SQL database.
- DATABASE_PASSWORD: Password for the database user.
- DATABASE_PORT: The port number used by your SQL server (commonly 3306 for MySQL/MariaDB).
- APP_URL: Backend base URL that will be used by frontend/mobile apps to interact with APIs.
- SERVER: Defines the running environment of the application, such as development or production.
- REVENUE_CAT_PLAY_STORE_V1_API_KEY: RevenueCat API key for Google Play Store integration (Android in-app purchases).
- REVENUE_CAT_APP_STORE_V1_API_KEY: RevenueCat API key for Apple App Store integration (iOS in-app purchases).
- FIREBASE_WEB_APP_KEY: Firebase Web API key, used for authentication or handling dynamic links in your application.
- STORE_PREFIX: A prefix used to differentiate store-related data, typically helpful for multi-store setups.
- STORE_PREFIX_NAME: The readable name for your store prefix, used for identification in app logic.
- OLA_MAPS_API_KEY: API key for Ola Maps (or any mapping service) used for location, routing, and map-based operations.
- APP_PACKAGE_NAME: Your Android application package name required for certain store validations and integrations.

Configure Nginx Reverse Proxy (Without SSL)
- All steps are performed using Terminal (SSH).
- Create a new Nginx configuration file for your domain:
sudo nano /etc/nginx/sites-available/growly.yourdworld.com
- Paste the following configuration (WITHOUT SSL):
            server {
            listen 80;
            server_name growly.yourdworld.com;

            access_log /var/log/nginx/growly.access.log;
            error_log /var/log/nginx/growly.error.log;

            # Main application proxy
            location / {
                proxy_pass http://127.0.0.1:7722;
                proxy_http_version 1.1;

                proxy_set_header Upgrade $http_upgrade;
                proxy_set_header Connection "Upgrade";
                proxy_set_header Host $host;
                proxy_set_header X-Real-IP $remote_addr;
                proxy_set_header X-Forwarded-For $proxy_add_x_forwarded_for;

                access_log off;
            }

        }
- Save and close the file:
- Press CTRL + O → press Enter (to save)
- Press CTRL + X (to exit nano)
- Enable the site:
            sudo ln -s /etc/nginx/sites-available/growly.yourdworld.com
            /etc/nginx/sites-enabled/
- Test Nginx configuration:
sudo nginx -t
- Expected output:
          nginx: the configuration file /etc/nginx/nginx.conf syntax is ok
          nginx: configuration file /etc/nginx/nginx.conf test is successful
- If you see the above message, your configuration is valid.
- Restart Nginx:
sudo systemctl restart nginx
- Verify your application is accessible at:
http://growly.yourdworld.com
SSL Certificate Setup (Let’s Encrypt + Certbot)
Step 1: Install Certbot
- Update package list:
sudo apt update
- Install Certbot with Nginx plugin:
sudo apt install certbot python3-certbot-nginx -y
Step 2: Generate SSL Certificate (Let’s Encrypt)
- Run the following command to generate SSL for your domain:
sudo certbot --nginx -d growly.yourdworld.com
- During the process:
- Enter your email address for renewal notifications
- Agree to the Let’s Encrypt terms
- Select the option to redirect HTTP to HTTPS
Step 3: Verify Auto-Renewal
- Test automatic renewal:
sudo certbot renew --dry-run
Final Access URL
https://growly.yourdworld.com
Admin Panel Setup
- Open Admin Code in Vs studio code
- Rename .env.example to .env
- Edit env file in admin
- update backend url to https://growly.yourdworld.com
- install Node modules

npm i
- Create production build:
npm run build
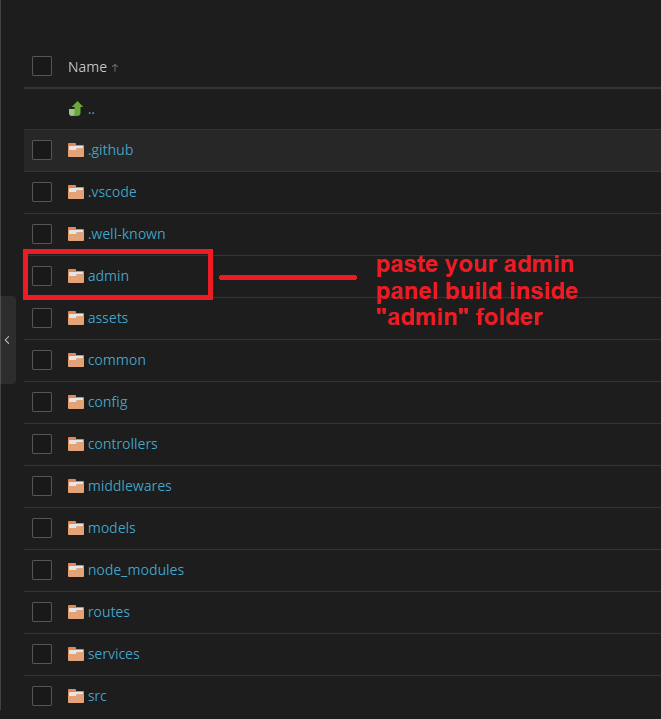
- Upload build files into backend admin directory.
- Access admin panel via configured domain.
RevenueCat Configuration
- Navigate to https://www.revenuecat.com/.
- Log in using your RevenueCat credentials.
- Next, you need to add the App Store Key and Play Store Key to code. You can get these keys by going to the RevenueCat dashboard > API Keys > Secret Api Keys. Copy and paste these keys into the respective fields of code.
- Copied key paste to config > .env.

Dynamic Link
- Begin by visiting the Firebase website through the following link: https://firebase.google.com/
- If you do not already have a Firebase account, kindly sign up for one. Otherwise, proceed to sign in with your existing account credentials.
- Navigate to the "Project Overview" section and click the setting icon.


Category Plugin
The Category Plugin allows administrators to create, manage, and organize main categories and their related sub-categories. This structure is used across the application to classify services, listings, or content in a clean and scalable way.
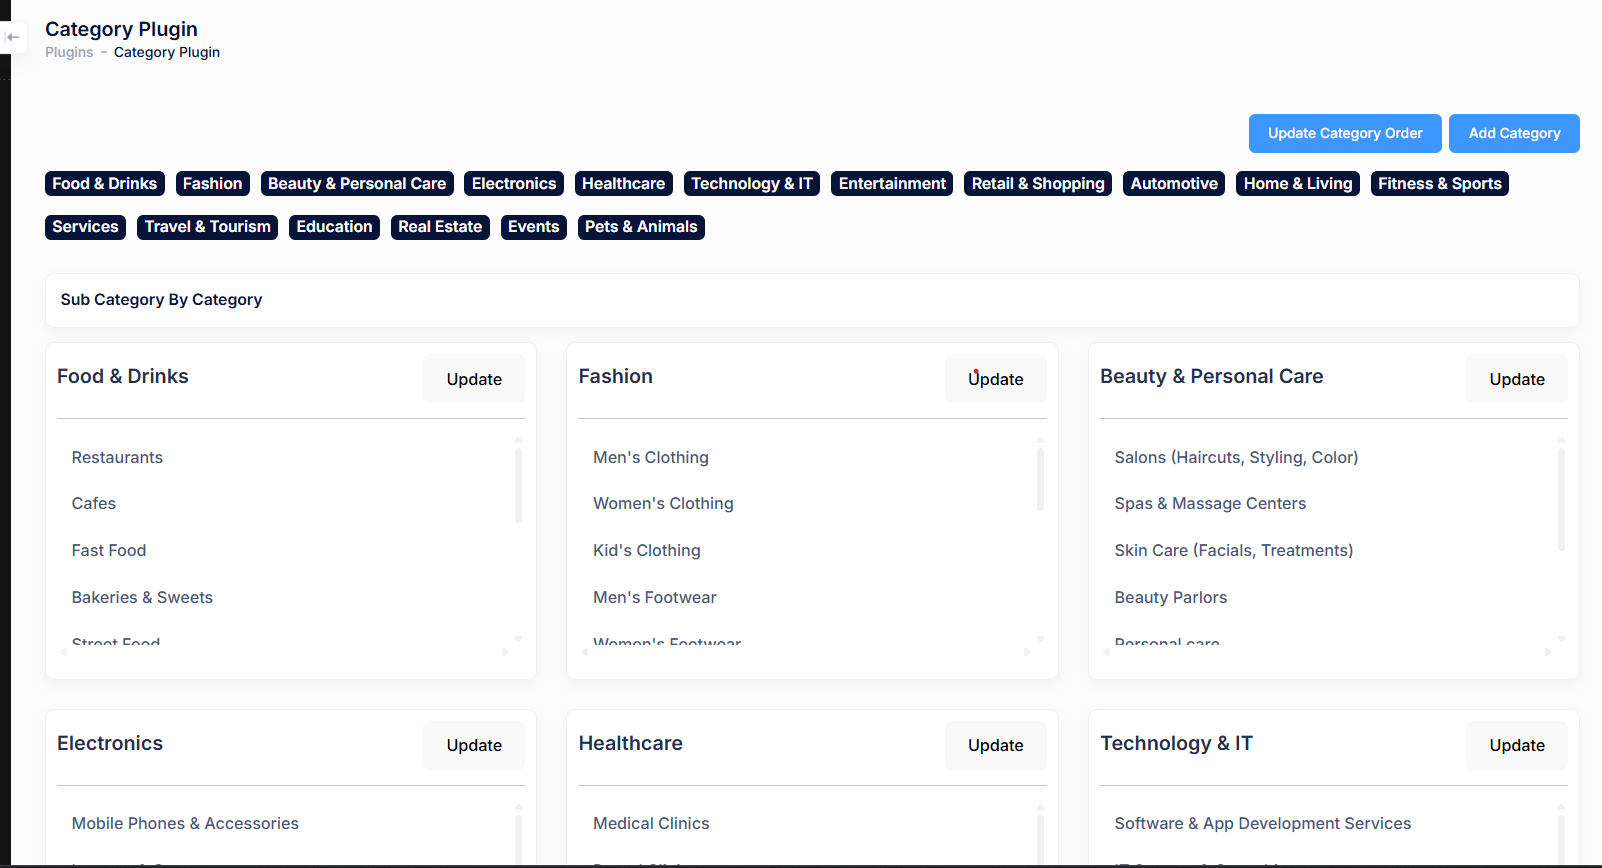
Main Features
- Create and manage multiple main categories such as Food & Drinks, Fashion, Healthcare, and more.
- Add, edit, and organize sub-categories under each main category.
- Update category order to control how categories appear in the application.
- Quick access buttons to add new categories or update existing ones.
- Scrollable category panels for easy management of large category lists.
Use Case
This plugin is useful for applications that require structured classification of services or products, enabling better navigation, filtering, and user experience on the frontend.
Reward Plugin
The Reward Plugin allows administrators to manage user incentives by enabling rewards and offering free benefits to newly registered users. This helps improve user engagement and onboarding experience.

Settings Overview
- Enable Rewards Plugin: Toggle to enable or disable the rewards system across the application.
- New Accounts Free Offers: Define the number of free offers or rewards granted automatically to new users upon registration.
Purpose
This plugin is commonly used to encourage new user signups, retain users, and promote engagement by offering initial free rewards or benefits.
Site Pricing
The Site Pricing section allows administrators to configure pricing plans for purchasing offers. You can define multiple packages with different offer counts, prices, and descriptions, and mark a plan as most popular.
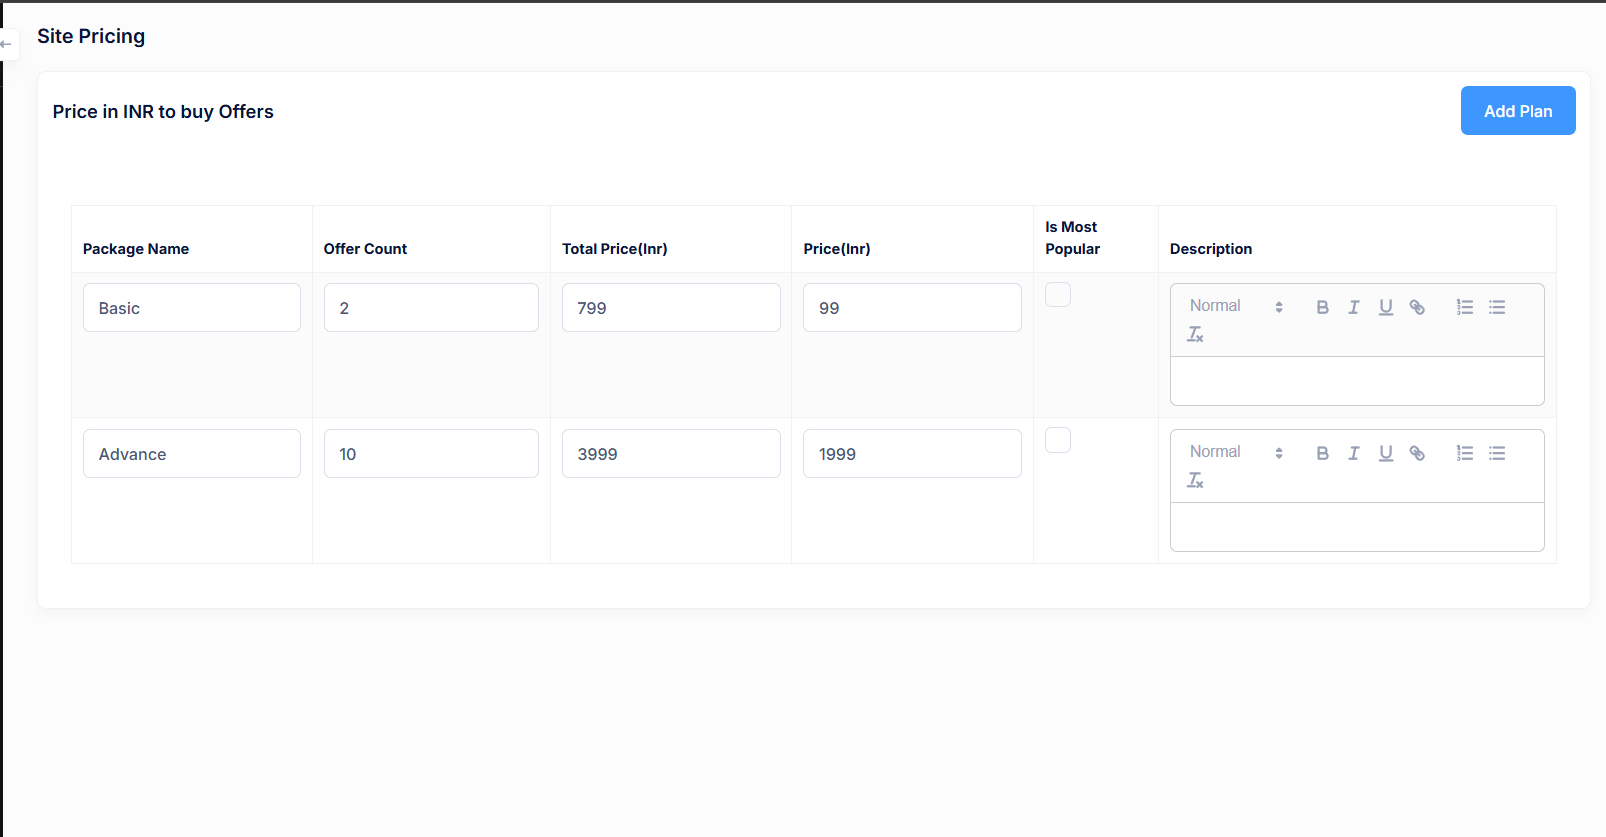
Pricing Plan Fields
- Package Name: Name of the pricing plan (e.g., Basic, Advance).
- Offer Count: Number of offers included in the package.
- Total Price (INR): Original or total value of the package.
- Price (INR): Final selling price for the package.
- Is Most Popular: Highlight this plan as the most popular option.
- Description: Rich-text description explaining the benefits of the plan.
Actions
- Add Plan: Create a new pricing plan.
- Save: Persist all pricing changes.
General Settings
The General Settings section controls core application behavior, onboarding rules, payment availability, support options, and system-level toggles.
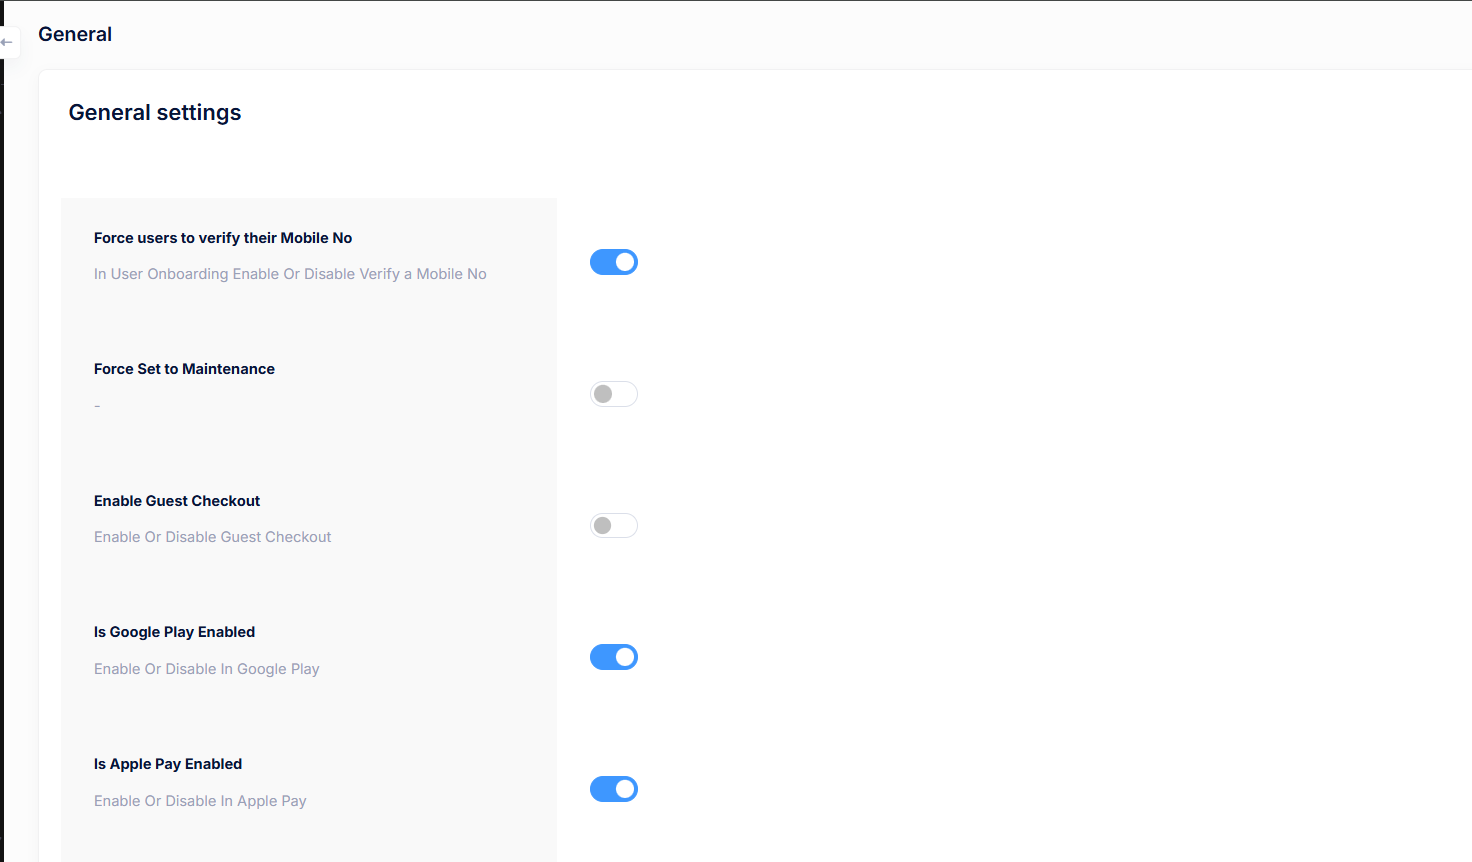
Available Settings
- Force users to verify their Mobile No: Require mobile number verification during user onboarding.
- Force Set to Maintenance: Enable maintenance mode to temporarily restrict user access.
- Enable Guest Checkout: Allow users to place orders without creating an account.
- Is Google Play Enabled: Enable or disable Google Play related features.
- Is Apple Pay Enabled: Enable or disable Apple Pay support.
- Is WhatsApp Enabled in Support: Allow WhatsApp as a customer support channel.
- Update WhatsApp Number in Support: Configure the WhatsApp number shown for support queries.
- Is Invoice Module Enabled: Enable or disable invoice generation within the system.
- Is Include Tax: Decide whether tax is included in pricing calculations.
Legal Information
The Legal Information section allows administrators to manage all legal and policy-related content displayed in the application. This content is shown to users across the app wherever legal compliance is required.
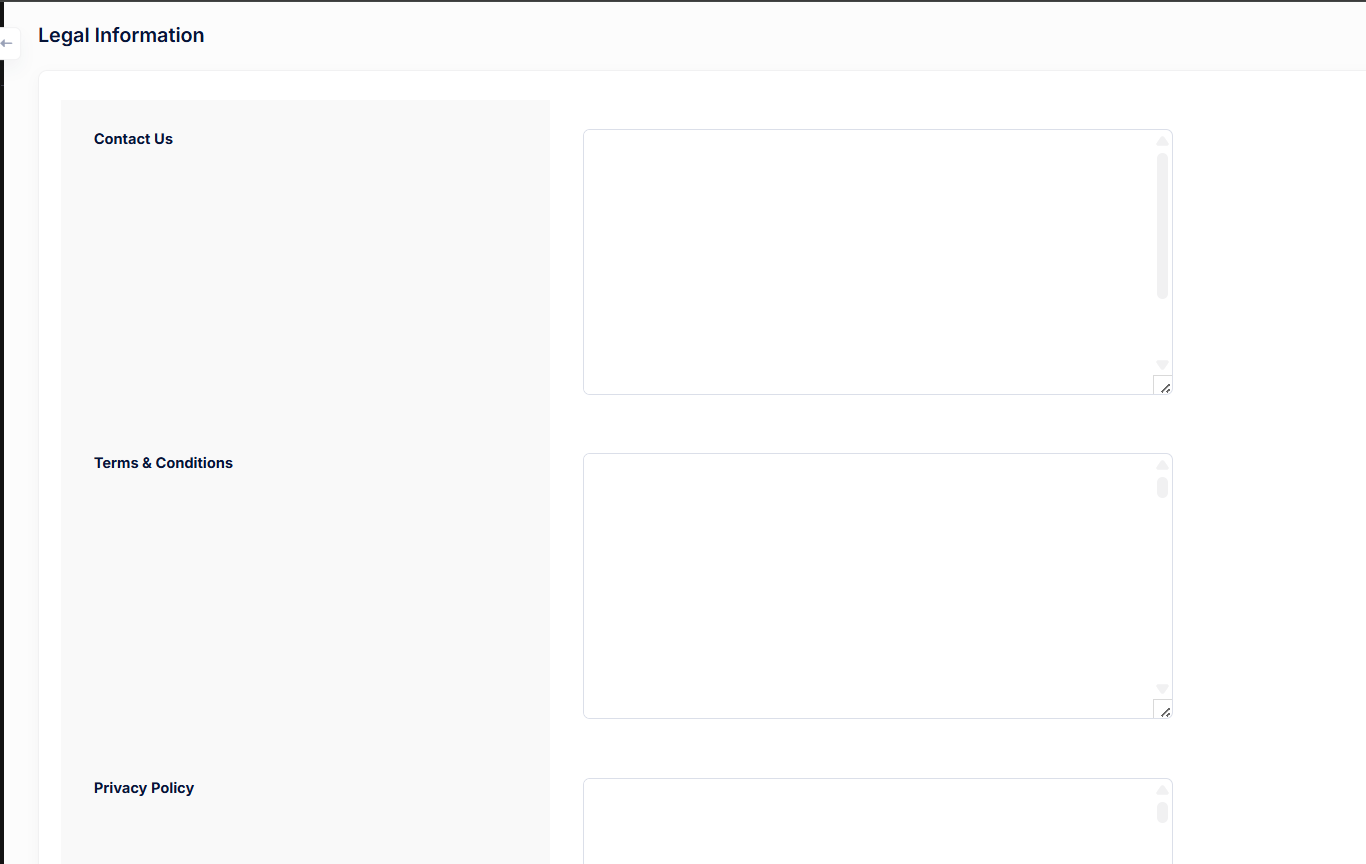
Available Legal Sections
- Contact Us: Define official contact information such as support email, phone number, or address that users can reach out to.
- Terms & Conditions: Enter the terms governing the use of the application. This typically includes user responsibilities, usage rules, and limitations.
- Privacy Policy: Specify how user data is collected, stored, used, and protected. This content is critical for compliance with privacy regulations.
- Refund & Cancellation: Define refund eligibility, cancellation rules, and payment-related policies for purchased packages or services.
Notes
- All fields support long-form text and HTML content.
- Changes made here are reflected immediately in the user-facing app.
- Ensure legal text is reviewed and approved before publishing.
PhonePe Payment Gateway
The PhonePe Payment Gateway section allows administrators to configure and manage PhonePe payment integration for the application. It supports enabling or disabling the gateway, iOS-specific settings, and switching between live and test modes.
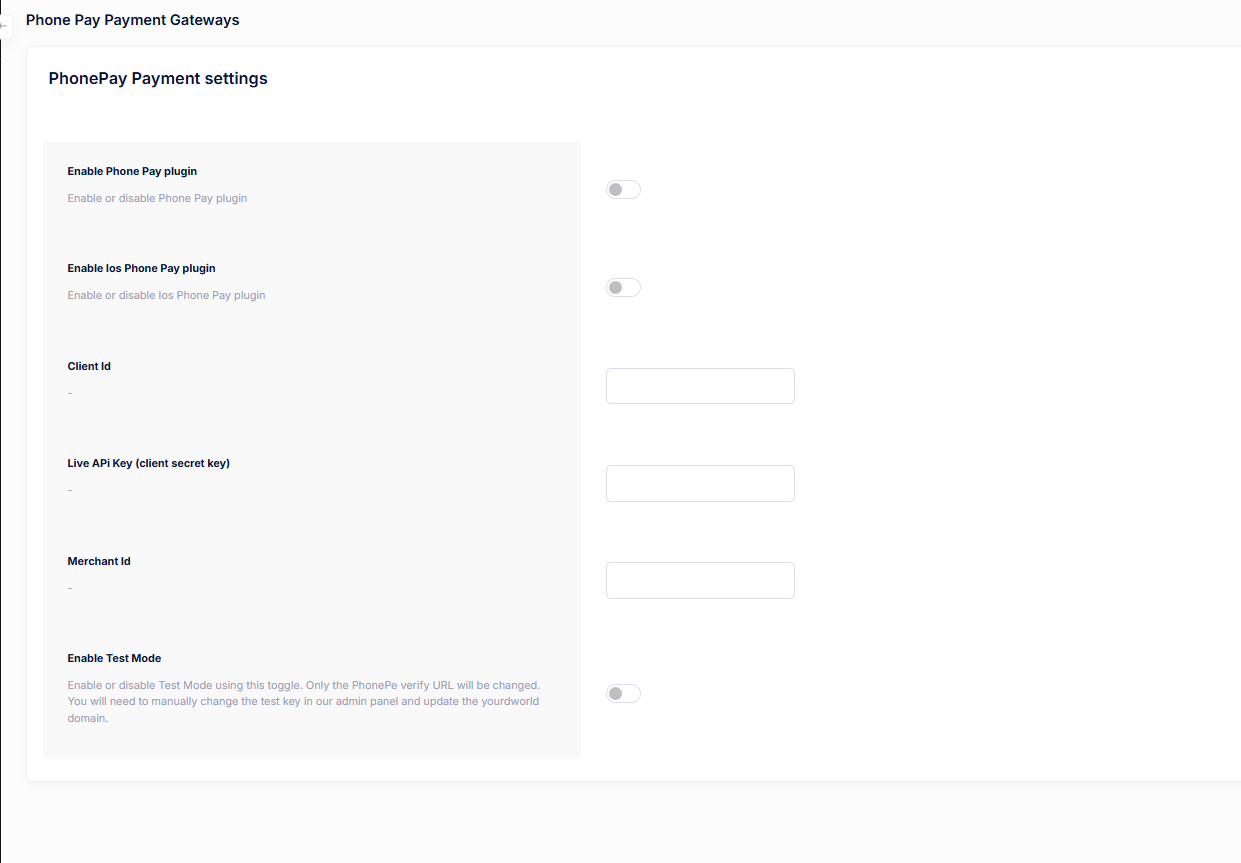
Configuration Options
- Enable PhonePe Plugin: Turn PhonePe payment support on or off for the application.
- Enable iOS PhonePe Plugin: Enable PhonePe payments specifically for iOS devices.
- Client ID: Enter the PhonePe client ID provided by PhonePe.
- Live API Key (Client Secret Key): Add the live API secret key used for secure payment transactions.
- Merchant ID: Specify the registered PhonePe merchant identifier.
- Enable Test Mode: Activate test mode to use PhonePe sandbox verification URLs for testing payments without real transactions.
Notes
- When Test Mode is enabled, ensure test credentials are configured correctly.
- For production use, disable Test Mode and use live credentials only.
Razorpay Payment Gateway
The Razorpay Payment Gateway section allows administrators to configure and manage Razorpay integration for secure online payments. You can enable or disable the plugin, configure iOS support, and set live API credentials.
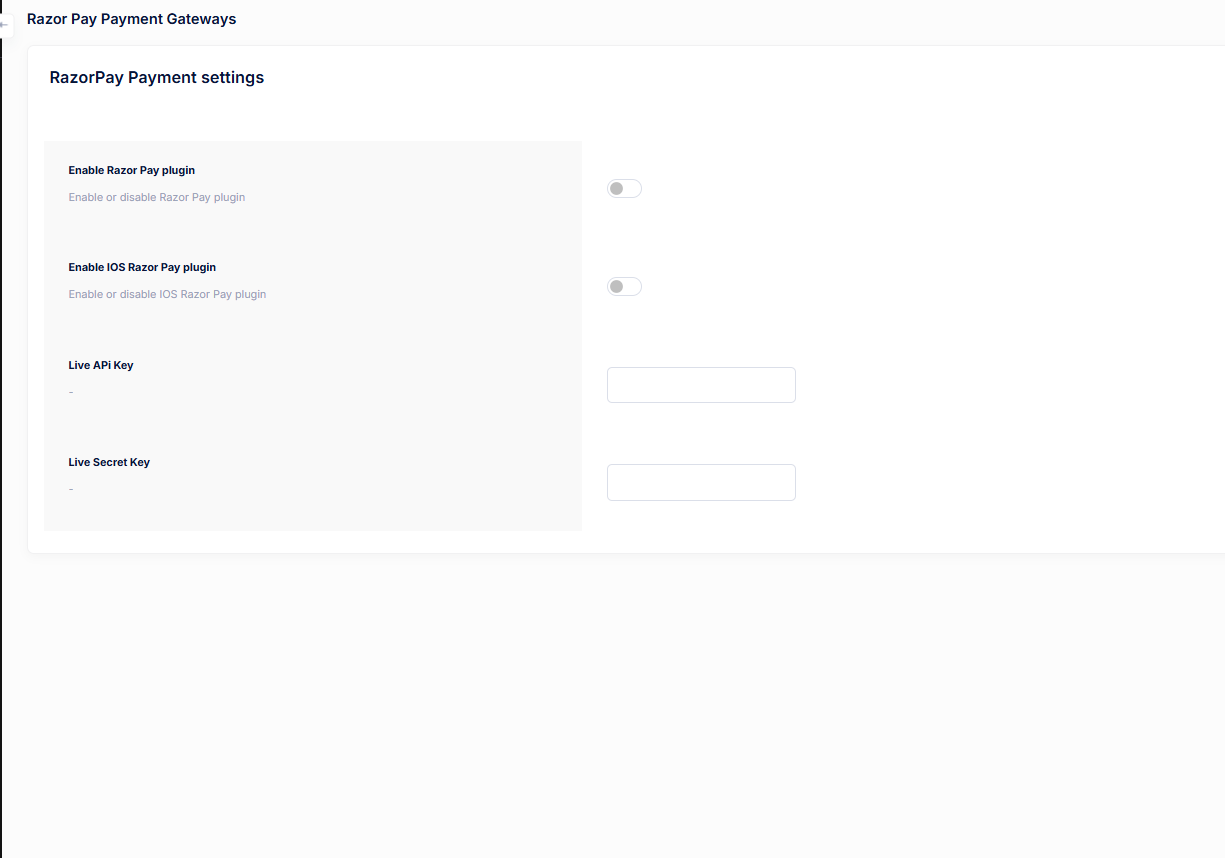
Configuration Options
- Enable Razorpay Plugin: Enable or disable Razorpay payments for the application.
- Enable iOS Razorpay Plugin: Toggle Razorpay payment support specifically for iOS devices.
- Live API Key: Enter the Razorpay Live API Key provided in your Razorpay dashboard.
- Live Secret Key: Enter the Razorpay Live Secret Key used to securely authenticate payment requests.
Notes
- Make sure to use live credentials only in production environments.
- Keep API keys and secret keys confidential to avoid security issues.
Cashfree Payment Gateway
The Cashfree Payment Gateway section allows administrators to configure and manage Cashfree integration for handling secure online payments. You can enable the plugin for web and iOS platforms, configure API credentials, and switch between live and test modes.
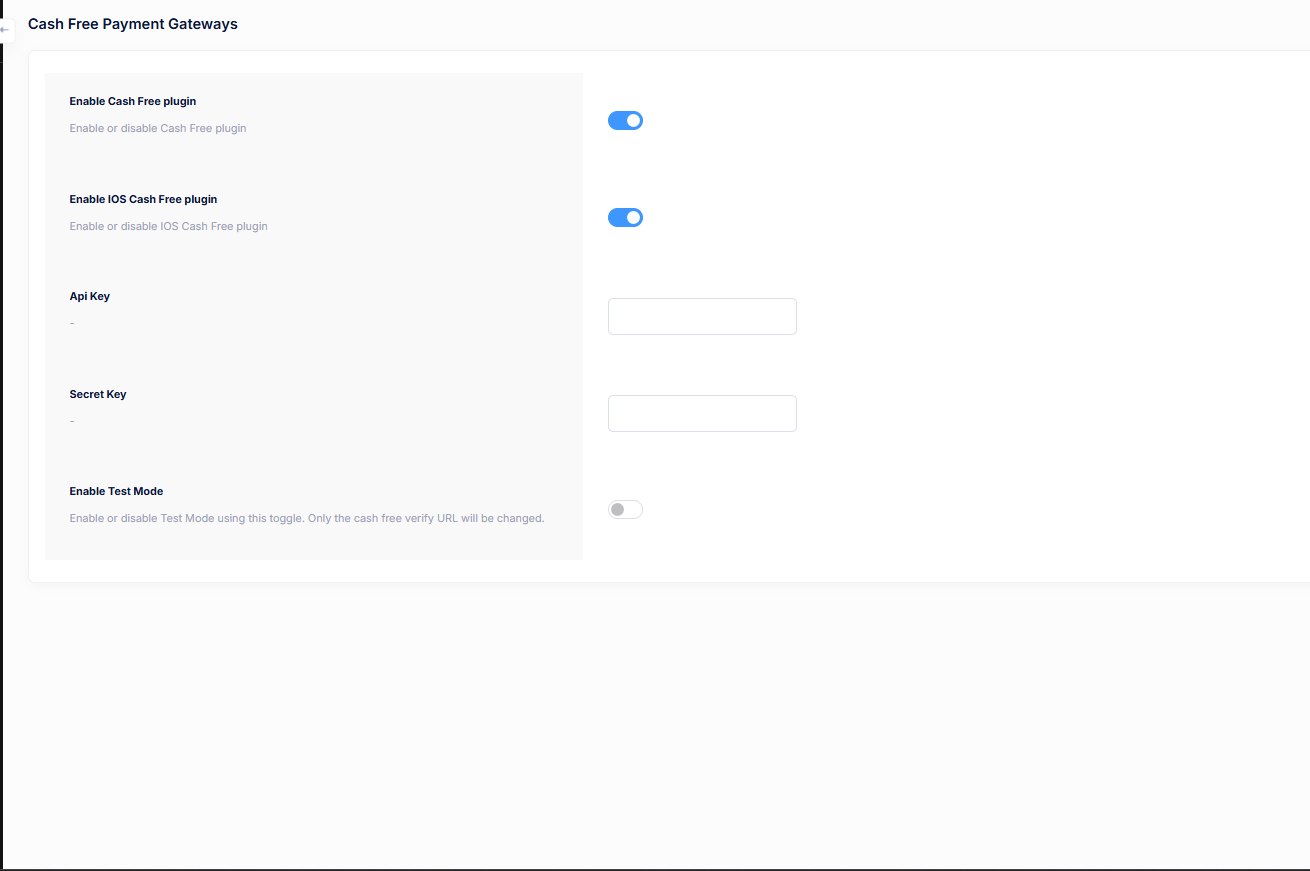
Configuration Options
- Enable Cashfree Plugin: Enable or disable Cashfree payments across the application.
- Enable iOS Cashfree Plugin: Toggle Cashfree payment support for iOS devices.
- API Key: Enter the Cashfree API Key provided by your Cashfree dashboard.
- Secret Key: Enter the Cashfree Secret Key used to authenticate payment requests.
- Enable Test Mode: Enable test mode to use Cashfree sandbox/verification URLs for testing transactions before going live.
Notes
- Always test payments using Test Mode before switching to live credentials.
- Keep API and Secret keys secure and do not expose them publicly.
Folder Structure Settings
The Folder Structure Settings section allows administrators to control how folders are created and managed within the system. This setting is mainly used to define limits or sizing rules applied when generating new folders.
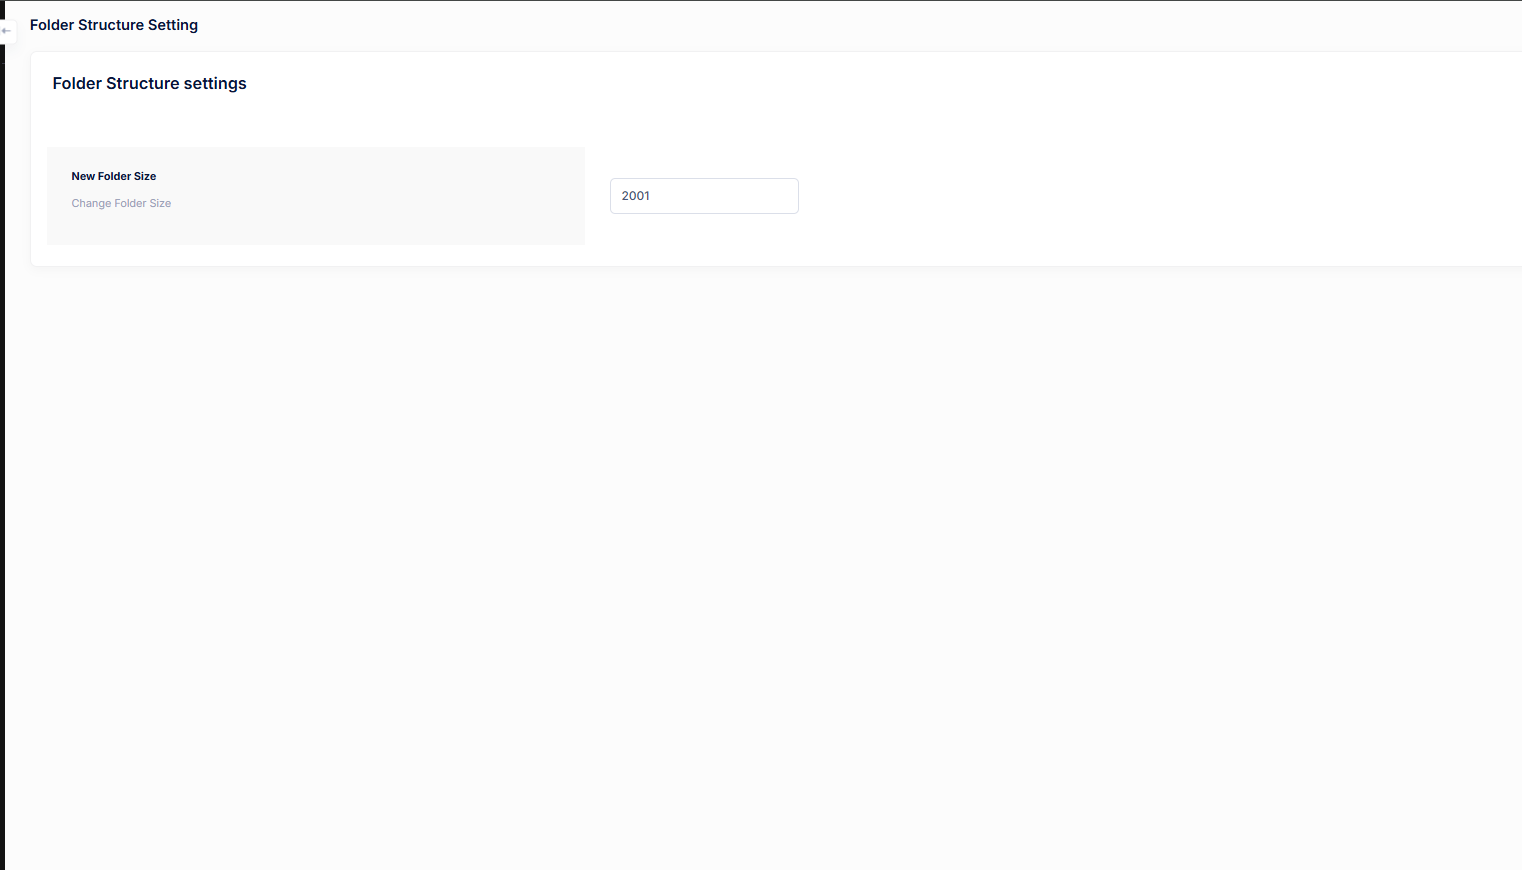
Configuration Options
- New Folder Size: Define or update the default folder size. This value determines the size limit applied when new folders are created.
Usage Notes
- Ensure the folder size aligns with your server storage and performance limits.
- Changing this value may affect how future folders are created but may not impact existing folders.
SMTP Plugin
The SMTP Plugin allows you to configure outgoing email services for the application. By setting up SMTP credentials, the system can send emails for notifications, verification, password resets, and other transactional communications.
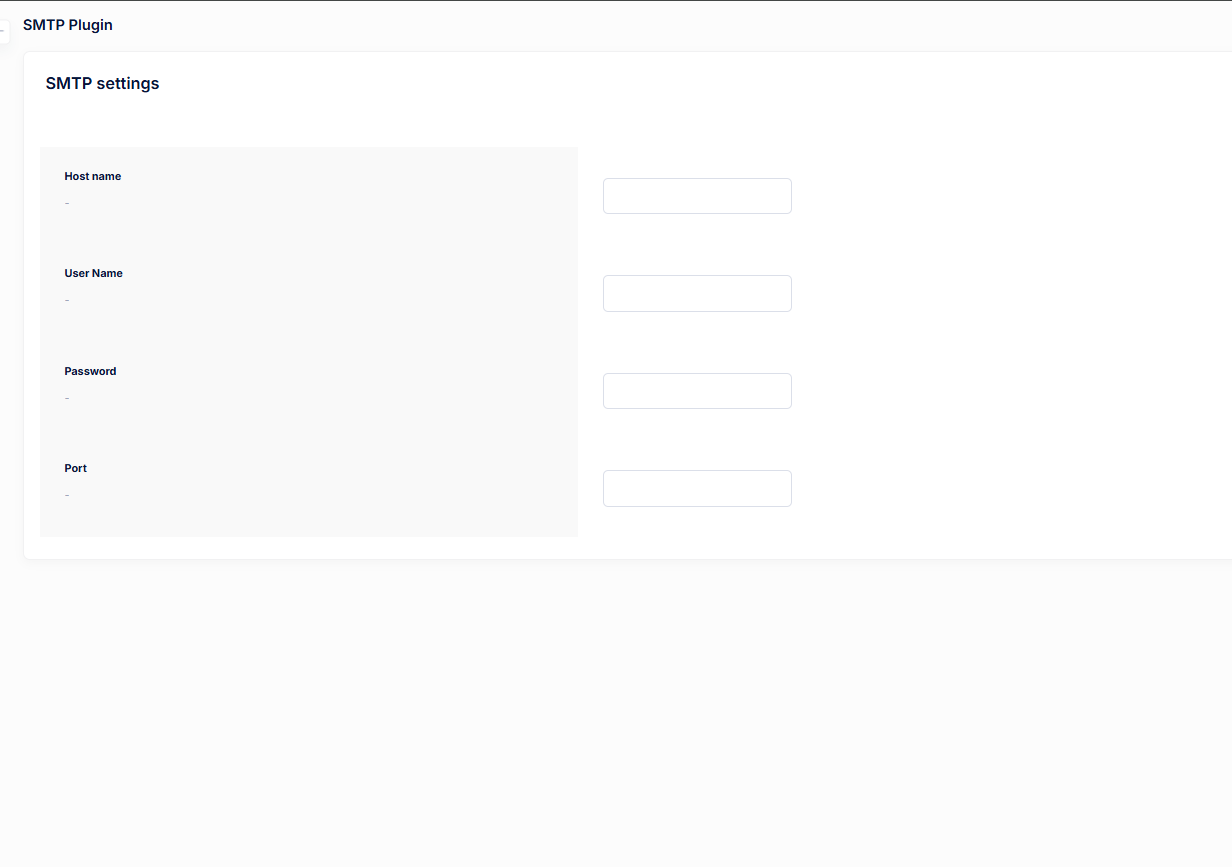
SMTP Settings
- Host Name: The SMTP server host provided by your email service (e.g. smtp.gmail.com).
- User Name: The email address or username used to authenticate with the SMTP server.
- Password: The password or app-specific password for the SMTP account.
- Port: The port number used by the SMTP service (commonly 465 for SSL or 587 for TLS).
Usage Notes
- Ensure the SMTP credentials are correct; otherwise, emails will fail to send.
- For Gmail or similar providers, use an app password instead of your main account password.
- After updating SMTP settings, it is recommended to test email delivery.
Ads Plugin
The Ads Plugin allows administrators to enable or disable advertisements across the application and configure different ad formats. By adding the correct ad keys, you can control how and where ads are displayed to users.
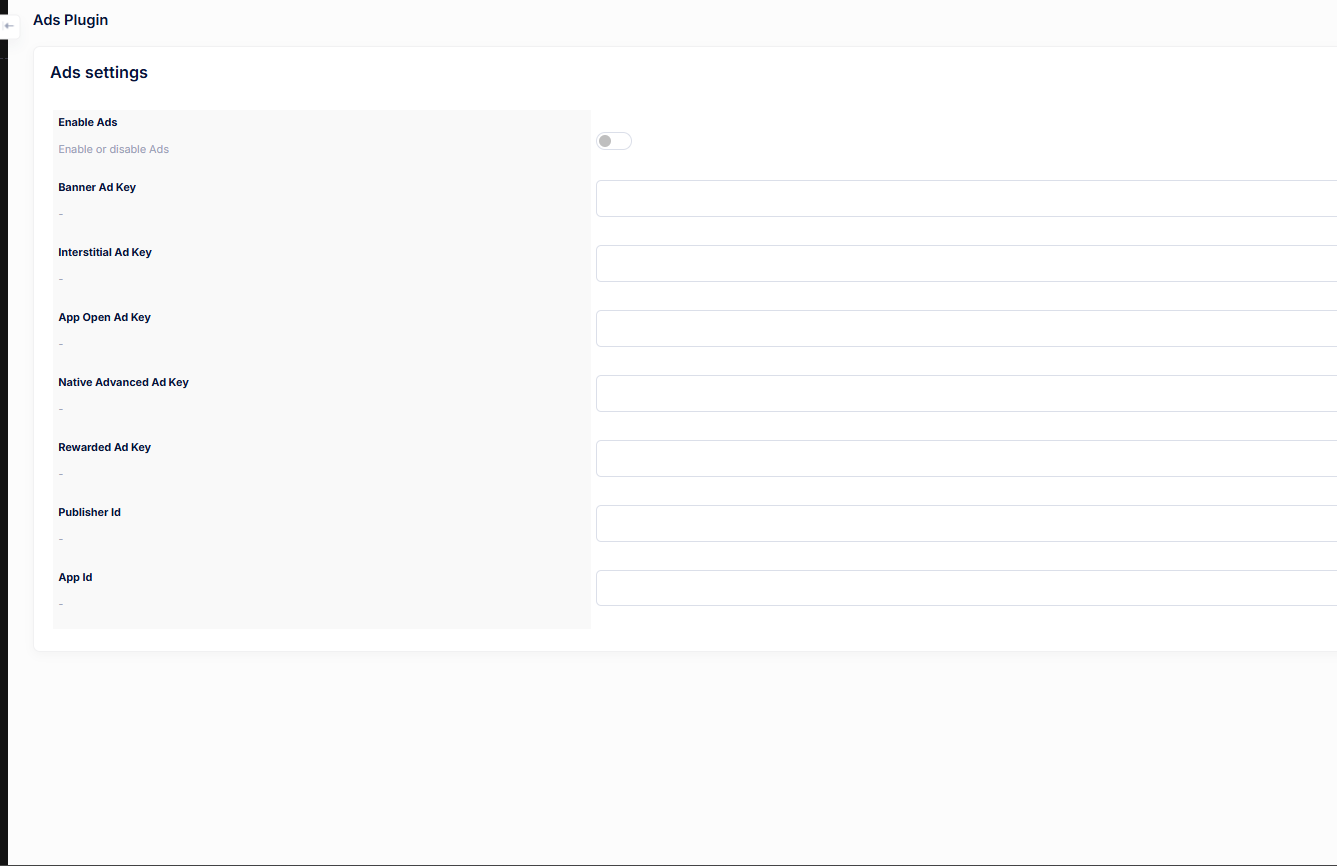
Ads Settings
- Enable Ads: Toggle to enable or disable ads globally in the application.
- Banner Ad Key: Ad unit key used to display banner advertisements.
- Interstitial Ad Key: Key for full-screen interstitial ads shown between screens or actions.
- App Open Ad Key: Ad key used to show ads when the application is opened.
- Native Advanced Ad Key: Used for native advanced ad placements that blend with app content.
- Rewarded Ad Key: Ad unit key for rewarded ads, where users earn rewards after watching ads.
- Publisher ID: Your ad network publisher identifier.
- App ID: The application ID provided by the ad network.
Usage Notes
- Ensure all ad keys are correctly configured before enabling ads.
- Missing or incorrect keys may cause ads to fail or the app to crash.
- Changes usually take effect immediately but may require an app restart.
Notification Plugin
The Notification Plugin allows administrators to send instant or scheduled push notifications to users. Notifications can include a title, message, and optional image to increase engagement.
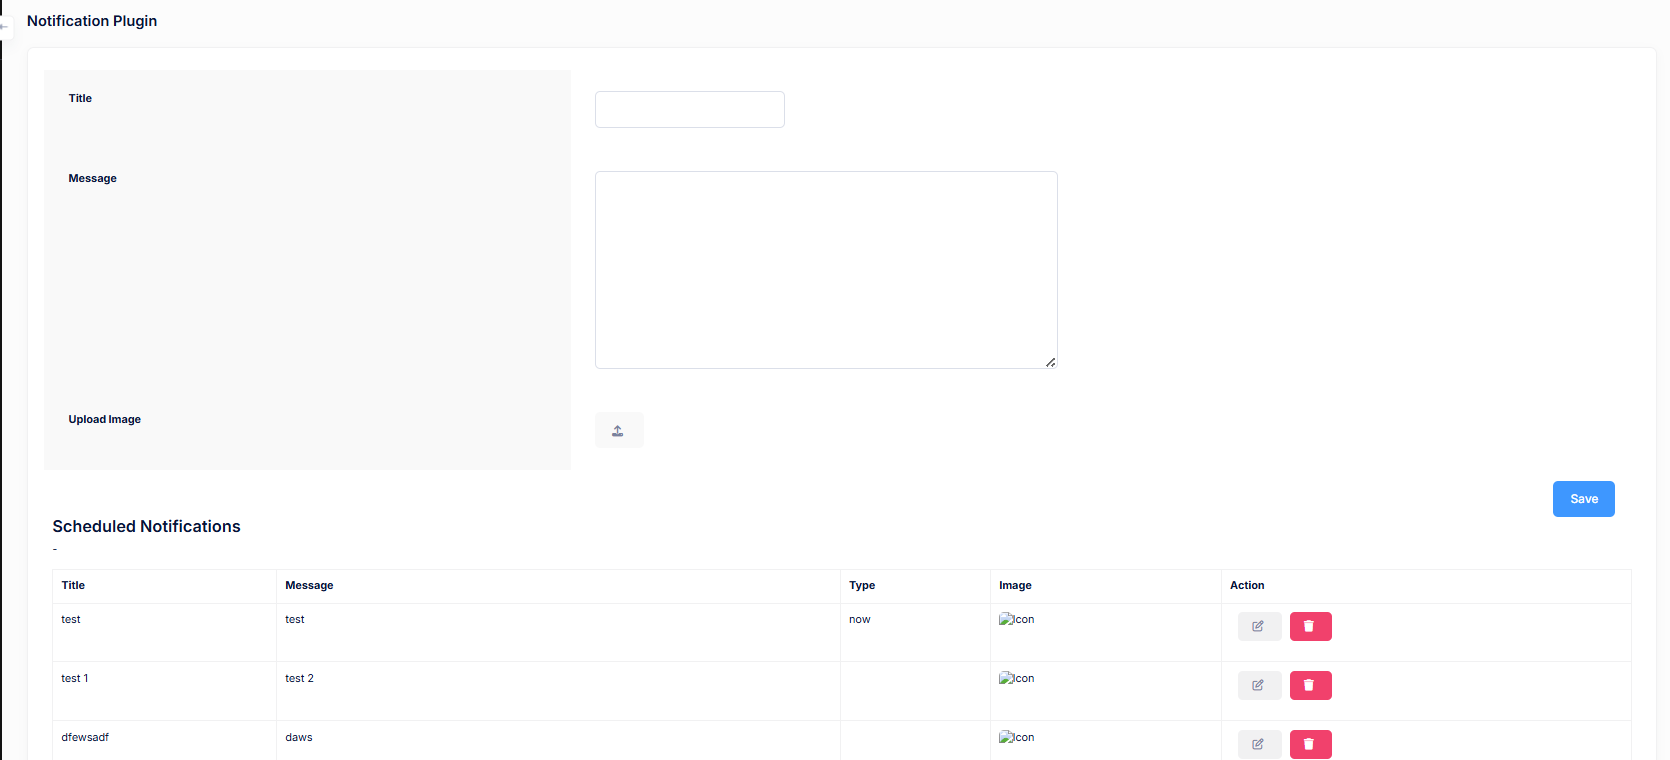
Create Notification
- Title: The heading of the notification shown to users.
- Message: The main content/body of the notification.
- Upload Image: Optional image displayed along with the notification.
- Save: Sends the notification immediately or schedules it based on configuration.
Scheduled Notifications
Below the notification form, a list of scheduled and previously sent notifications is displayed for easy management.
- Title: Notification title.
- Message: Notification message content.
- Type: Indicates whether the notification was sent instantly (now) or scheduled.
- Image: Displays the associated notification image, if any.
- Action: Edit or delete existing notifications.
Usage Notes
- Use clear and concise titles to improve open rates.
- Avoid sending too many notifications to prevent user fatigue.
- Images should be optimized for faster delivery.
Banner Plugin
The Banner Plugin allows administrators to manage promotional banners displayed across the application. Each banner can contain a clickable link and an image, making it ideal for promotions, announcements, or redirects.
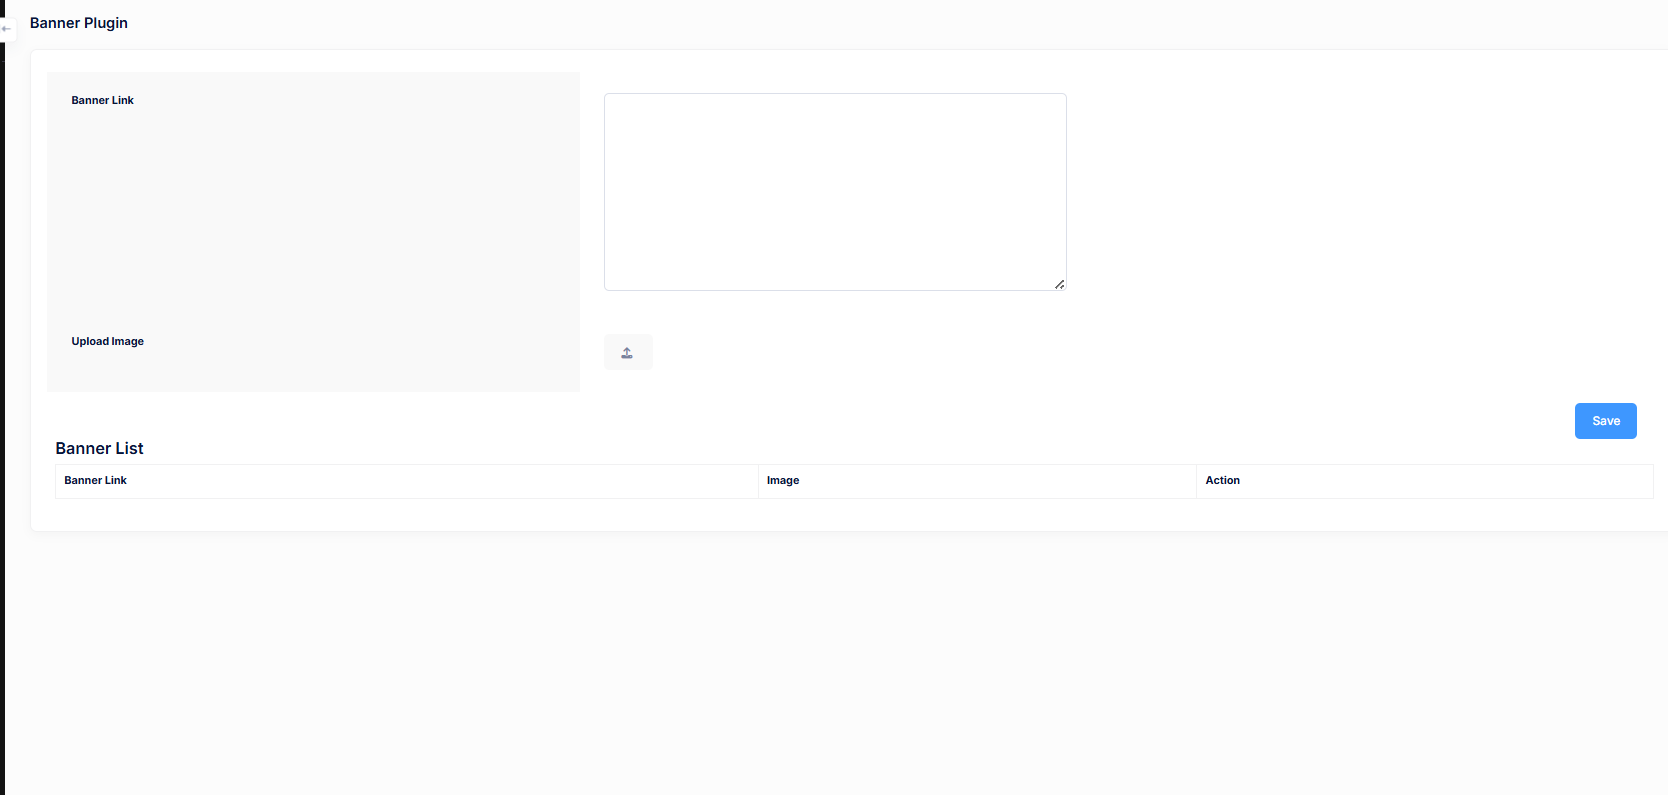
Add New Banner
- Banner Link: URL where users will be redirected when they click the banner.
- Upload Image: Upload the banner image to be shown in the app or website.
- Save: Saves the banner and makes it available in the banner list.
Banner List
All added banners are listed below the form for easy management.
- Banner Link: Displays the redirect URL associated with the banner.
- Image: Preview of the uploaded banner image.
- Action: Edit or delete existing banners.
Usage Notes
- Ensure banner images are optimized for fast loading.
- Use valid and secure URLs (HTTPS recommended).
- Keep banner content relevant to improve click-through rates.
Store Setting Banner Plugin
The Store Setting Banner Plugin is used to manage banners that are displayed specifically on store-related screens. These banners can be enabled or disabled individually and are commonly used for store promotions, offers, or important announcements.
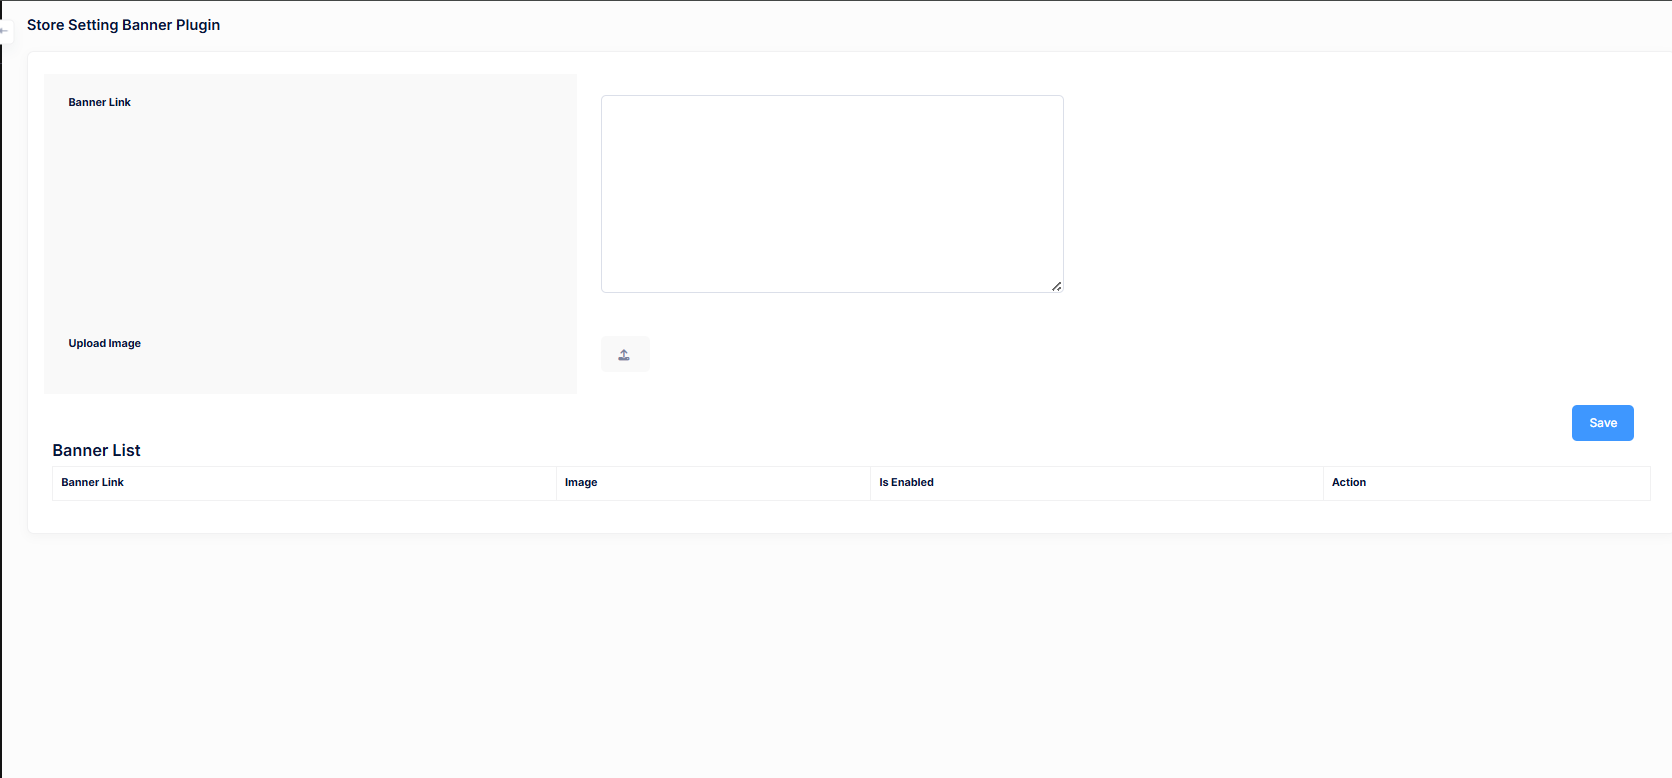
Add Store Banner
- Banner Link: URL where the user is redirected after clicking the banner.
- Upload Image: Upload the banner image to be shown in store sections.
- Save: Saves the banner and adds it to the store banner list.
Banner List
The banner list displays all store banners along with their current status.
- Banner Link: The redirect URL assigned to the banner.
- Image: Preview of the banner image.
- Is Enabled: Indicates whether the banner is currently active.
- Action: Edit, enable/disable, or delete banners.
Usage Notes
- Enable only relevant banners to avoid cluttering the store UI.
- Use clear call-to-action links for better conversions.
- Ensure banner images follow recommended size guidelines.
User Setting Banner Plugin
The User Setting Banner Plugin allows administrators to manage banners that appear specifically on user-related settings screens. These banners are useful for highlighting announcements, feature updates, offers, or guidance relevant to users.
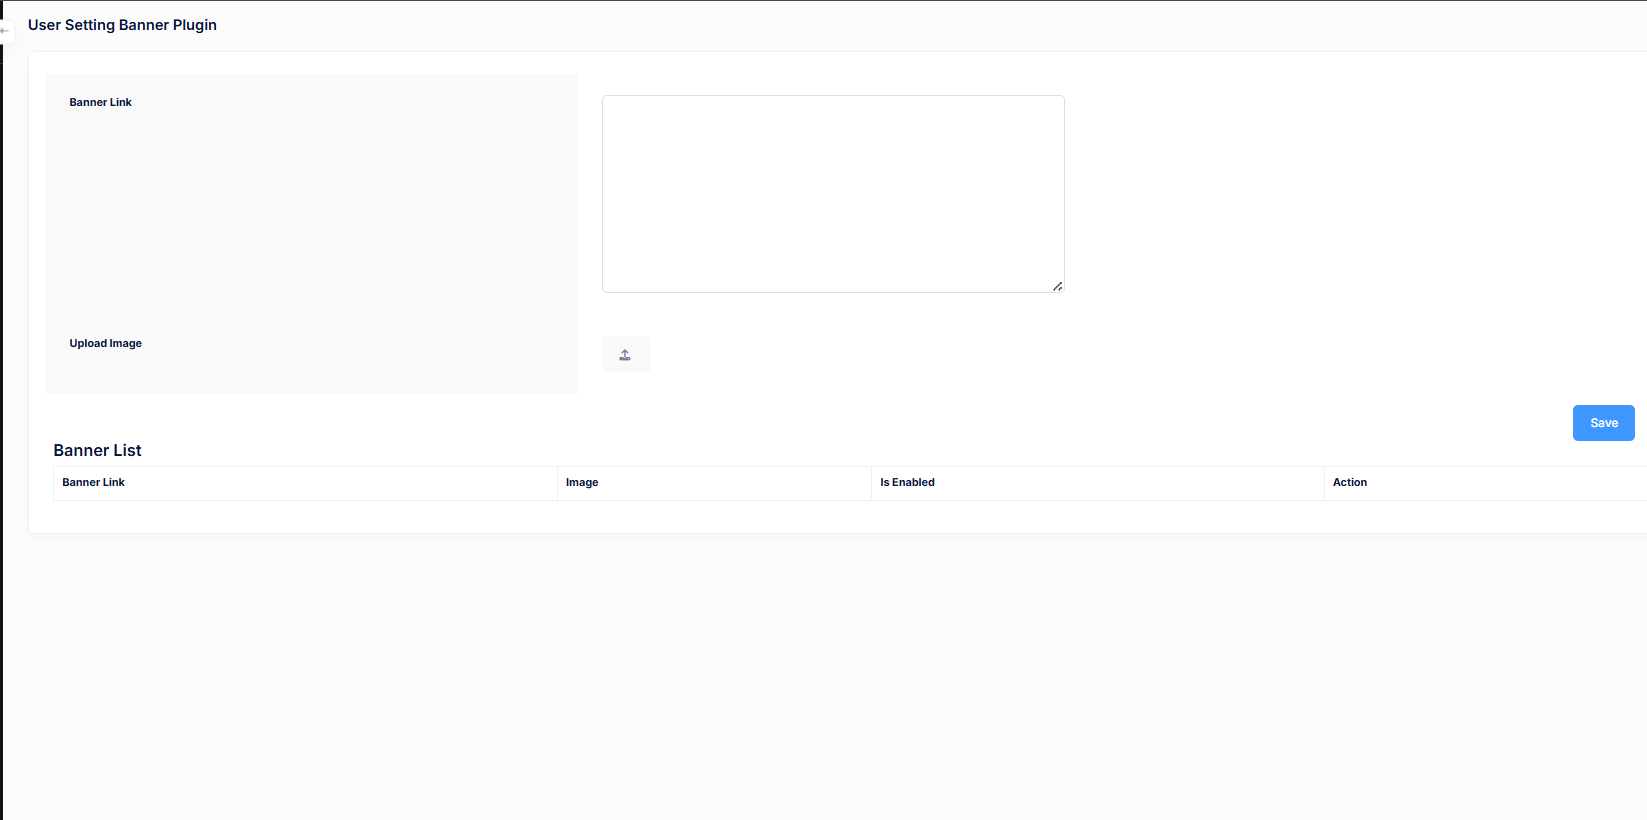
Add User Setting Banner
- Banner Link: Enter the URL where users will be redirected when they click on the banner.
- Upload Image: Upload the banner image that will be displayed in user settings.
- Save: Saves the banner and adds it to the banner list below.
Banner List
This section displays all banners created for user settings along with their current status.
- Banner Link: The redirect URL associated with the banner.
- Image: Preview of the uploaded banner image.
- Is Enabled: Shows whether the banner is currently active or disabled.
- Action: Options to edit, enable/disable, or delete the banner.
Best Practices
- Keep banner messages short and relevant to user settings.
- Use high-quality images with clear call-to-action messaging.
- Disable outdated banners to keep the interface clean.
User FAQs Plugin
The User FAQs Plugin allows administrators to manage frequently asked questions and optional help videos that are shown to end users inside the application. This helps reduce support requests by providing clear, self-service guidance.
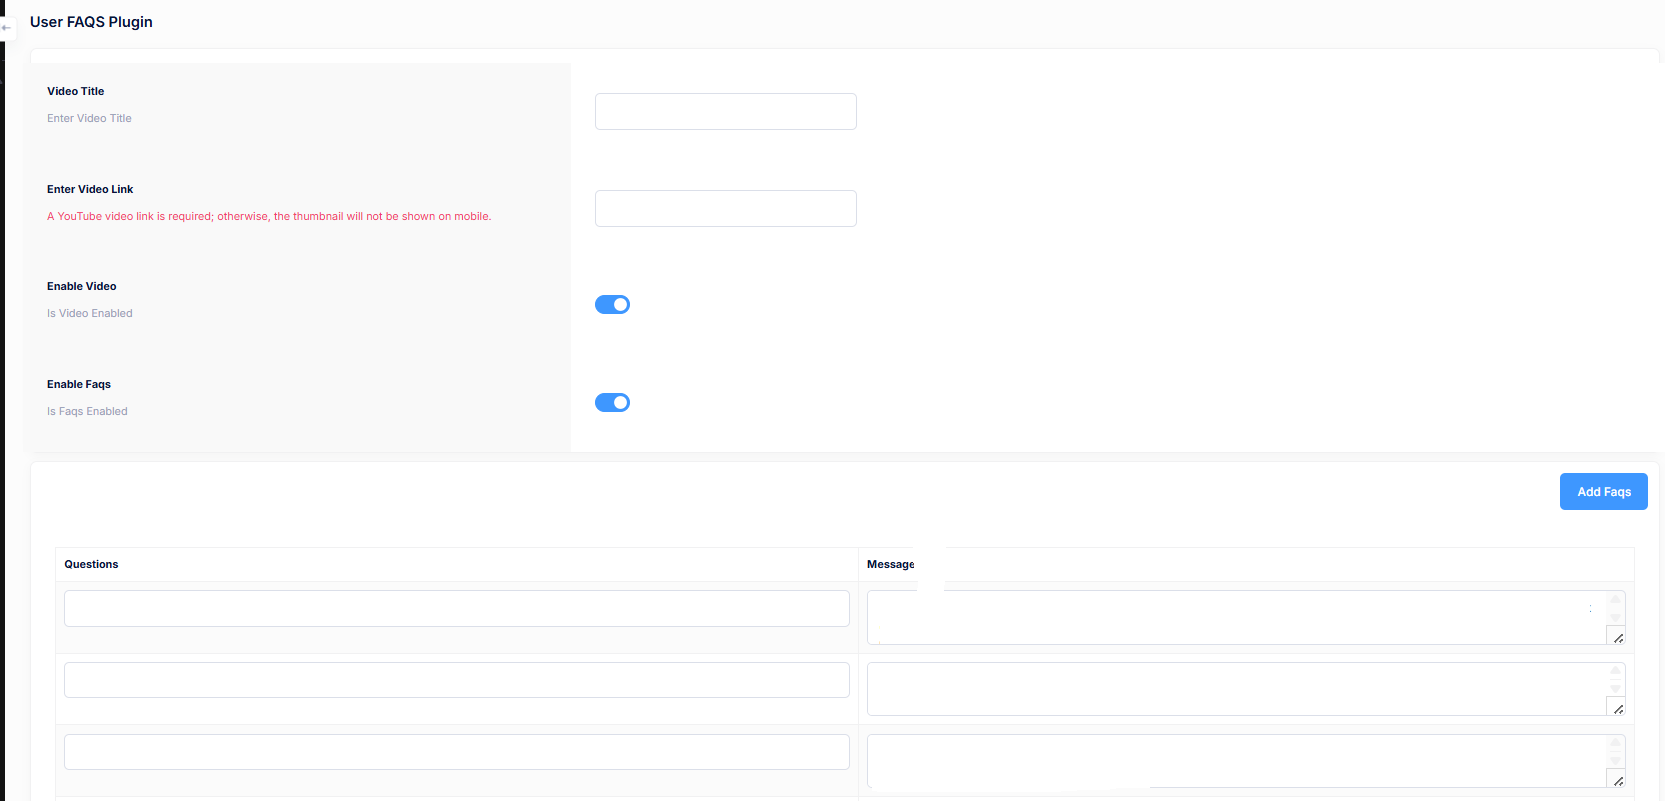
Video Configuration
- Video Title: Enter the title displayed above the help video.
- Enter Video Link: Paste a YouTube video URL. This is required to display the video thumbnail correctly on mobile devices.
- Enable Video: Toggle to enable or disable the video section for users.
- Enable FAQs: Toggle to enable or disable the FAQ list for users.
Manage FAQs
Below the video settings, admins can add and manage multiple FAQ entries that appear in the user application.
- Question: Enter the FAQ question that users commonly ask.
- Message: Provide a clear and helpful answer to the question.
- Add FAQs: Click this button to add a new question–answer pair.
Best Practices
- Use short, clear questions that reflect real user concerns.
- Keep answers concise and easy to understand.
- Update FAQs regularly as new features or policies are introduced.
- Use the video section for onboarding or common how-to explanations.
Store FAQs Plugin
The Store FAQs Plugin allows administrators to manage FAQs and optional help videos that are specifically shown on the store side of the application. This helps store users understand features, policies, and common questions without contacting support.
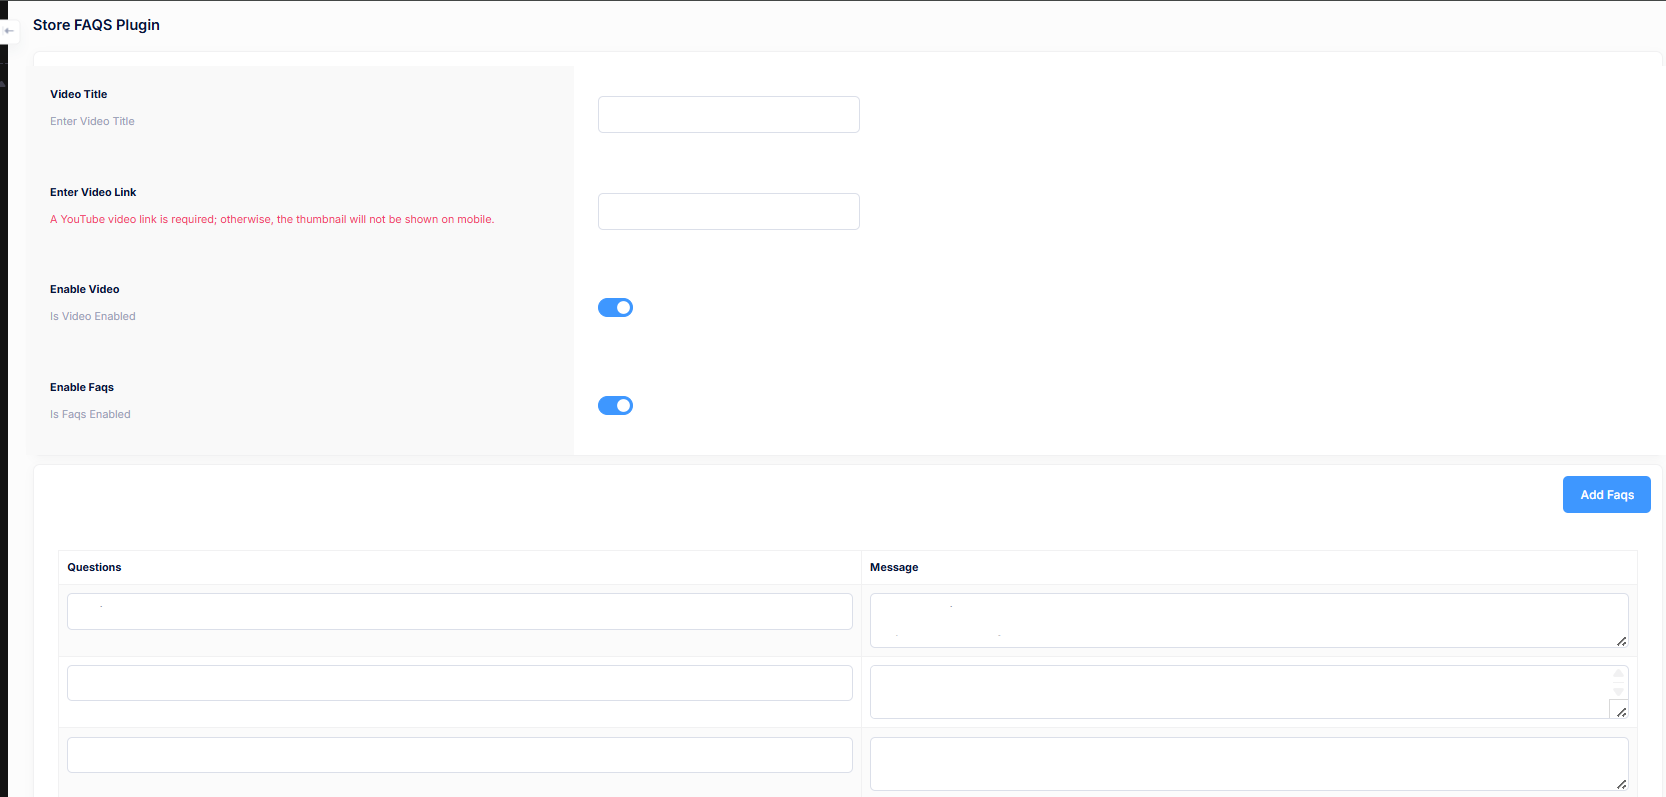
Video Configuration
- Video Title: Enter the title displayed above the store help video.
- Enter Video Link: Paste a valid YouTube video URL. This is required to show the video thumbnail correctly on mobile devices.
- Enable Video: Toggle to enable or disable the video section for store users.
- Enable FAQs: Toggle to enable or disable the FAQs list for store users.
Manage Store FAQs
Below the video settings, administrators can add and manage store-specific FAQs that will be displayed inside the store interface.
- Questions: Enter the frequently asked question related to store usage.
- Message: Provide a clear and helpful answer for the store user.
- Add FAQs: Click this button to add a new store FAQ entry.
Best Practices
- Keep store FAQs focused on store operations, pricing, and order handling.
- Use simple language so non-technical store users can understand easily.
- Update FAQs whenever store policies or workflows change.
- Use the video section for onboarding new store owners or sellers.
Storage and Backup Settings
- The Storage and Backup Settings section allows the administrator to configure where user uploads and media files are stored, such as local storage or cloud storage providers like AWS.
- To access this section, go to Admin Panel → Plugins → Storage and Backup Settings.
-
Important Note:
If you change the storage type, you must manually move your existing upload folders from the source storage to the destination storage. -
Configure the following options:
- Storage Type – Select the storage provider to be used for file uploads (Example: AWS, Local, or other supported providers).
- AWS EndPoint – Enter the AWS S3 endpoint URL associated with your storage service.
- AWS CDN URL – Specify the CDN URL used to serve files faster via a content delivery network.
- AWS Region – Enter the AWS region where your S3 bucket is hosted (e.g. us-east-1, ap-south-1).
- AWS Access Key – Provide your AWS access key ID with permission to access the bucket.
- AWS Secret Key – Enter the secret key associated with the AWS access key. This value should be kept secure.
- AWS Bucket Name – Specify the name of the S3 bucket where files will be stored.
- Use the Test AWS Connection button to verify that the provided credentials and configuration are working correctly before saving the settings.
-
How to Create an AWS S3 Bucket:
