Introduction
- Thank you for choosing the Groot app. We are pleased to have you with us. Enclosed is the documentation to help you set up and launch the app easily. Please read it carefully, as it contains important information. If you need any assistance or have questions, our support team is just a message away.
Prerequisites
- Android Studio Version: Android Studio Meerkat | 2024.3.1 Patch 2
- JDK Version: 17
- NDK Version: 27.0.12077973
- Compile SDK: 35
- Flutter Version: 3.27.4
- Dart Version: 3.6.2
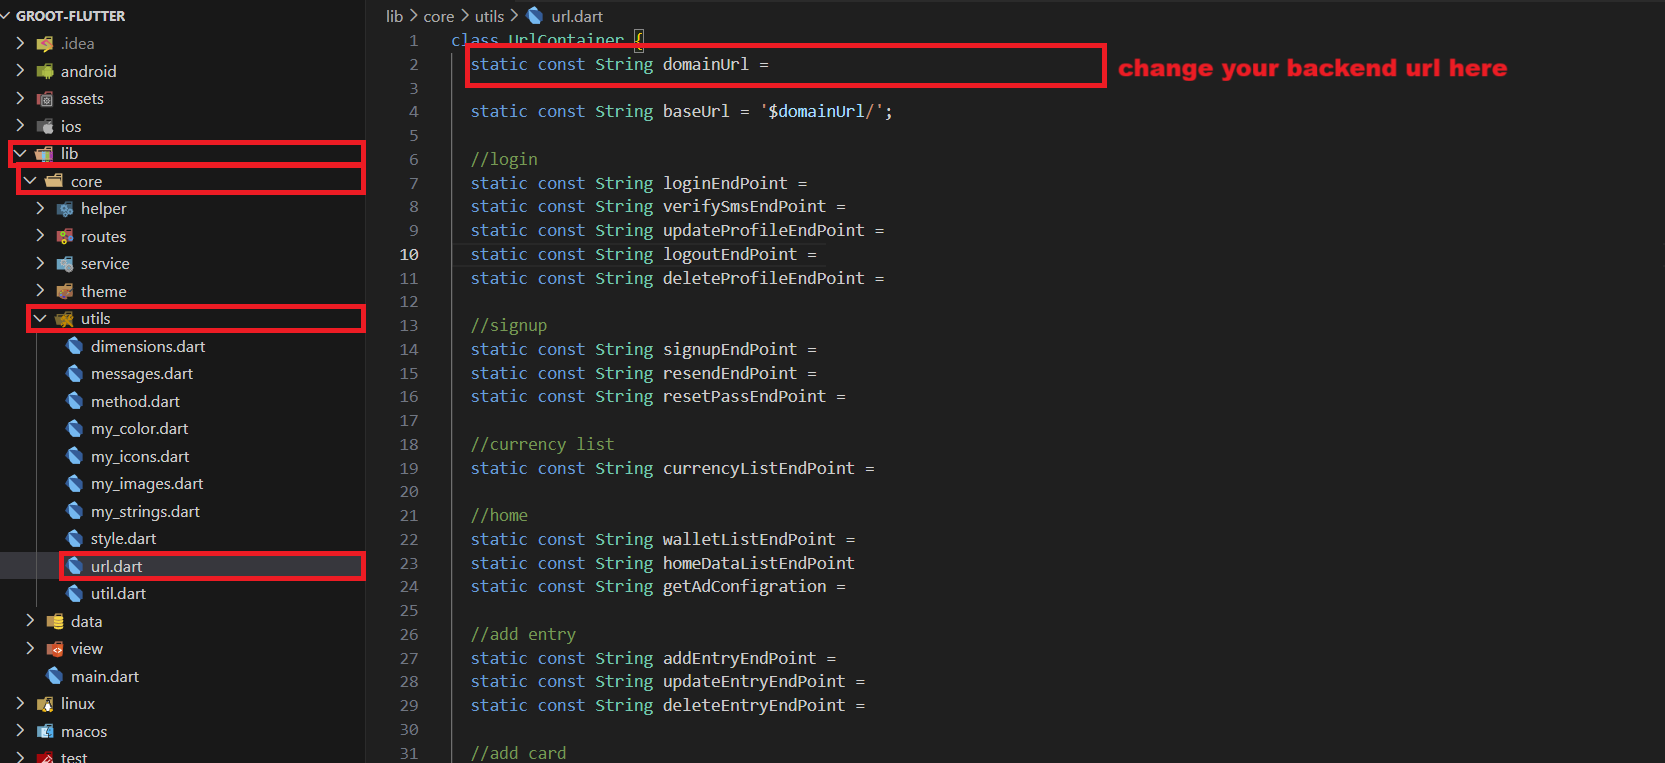
- To change the Compile SDK version, navigate to:
android/app/build.gradle - To change the NDK version, navigate to:
android/build.gradle - This project was originally created using Flutter version 3.27.4 and the corresponding Dart SDK. Please upgrade or adjust as needed based on your current setup.
- Before modifying the project, ensure that both Flutter and Dart are properly installed and configured on your system.
- If you already have the Android SDK set up, you can follow the official steps to install and configure Flutter:
- Download the Flutter SDK from the official website and extract it.
- Add the path to the previously extracted SDK to your PATH variable.
- Run the flutter doctor tool to verify if everything is configured correctly.
Android Studio Windows Setup
- Download Android Studio from the official website:https://developer.android.com/studio/
- Access the Flutter SDK through:https://flutter.dev/docs/get-started/install
- For further information on Android Studio, visit:https://developer.android.com/studio/intro/
- Please download the provided installation bundle to access the latest stable release of the Flutter SDK.
- Upon downloading, extract the zip file and place the 'flutter' directory in your chosen installation directory for the Flutter SDK (e.g., C:\src\flutter). Avoid installing Flutter in directories such as C:\Program Files, as it may require elevated privileges.
- Locate Flutter SDK Path
- Open Environment Variables
- Click on "Edit the system environment variables".
- In the System Properties window, click the "Environment Variables..." button near the bottom.
- Under User variables, select the Path variable and click Edit.
- Paste the path to the flutter\bin directory:
Step 1 : Get the Flutter SDK
Step 2 : Update your path
Step 3 : Run flutter doctor
- From a console window with the Flutter directory added to the PATH (as described above), execute the following command to check for any platform dependencies that may be required to complete the setup:
- If any complications arise during the environment setup, kindly refer to our online resources for guidance. Please click the following link to access:Click Here
Android Studio macOS setup
- Download Android Studio from the official website:https://developer.android.com/studio/
- Download Xcode from the App Store:https://apps.apple.com/us/app/xcode/id497799835?mt=12 .
- Access the Flutter SDK through:https://flutter.dev/docs/get-started/install
- For further information on Android Studio, visit:https://developer.android.com/studio/intro/
- Please download the provided installation bundle to acquire the latest stable release of the Flutter SDK.
- After downloading, extract the SDK by double-clicking on the downloaded file. Subsequently, copy the extracted folder and paste it into your desired location, such as Documents\flutter.
- To update the PATH variable and access the "flutter" command from the terminal, follow these steps:
Step 1 : Get the Flutter SDK
Step 2 : Update your path
- Open the terminal.
- For updating the PATH variable for the current terminal window only, enter the command:
- To update the PATH variable permanently, open or create the .bash_profile file by entering:
- Append the following line to the .bash_profile file, placing it at the bottom:
- Replace [PATH_TO_FLUTTER_SDK_DIRECTORY] with the actual path to the Flutter SDK folder.
- Refresh the PATH variables by running the command:
- Verify that the SDK is successfully installed by running:
- If the check list of Flutter SDK requirements is displayed, the SDK is successfully installed, and you can proceed with building Flutter apps.
- For troubleshooting during environment setup on macOS, refer to our online resourcesClick Here
Configure Firebase
- Please navigate to your Firebase project, which you may have created while following the backend documentation. If you haven't created one yet, please follow the steps below to set up a project:
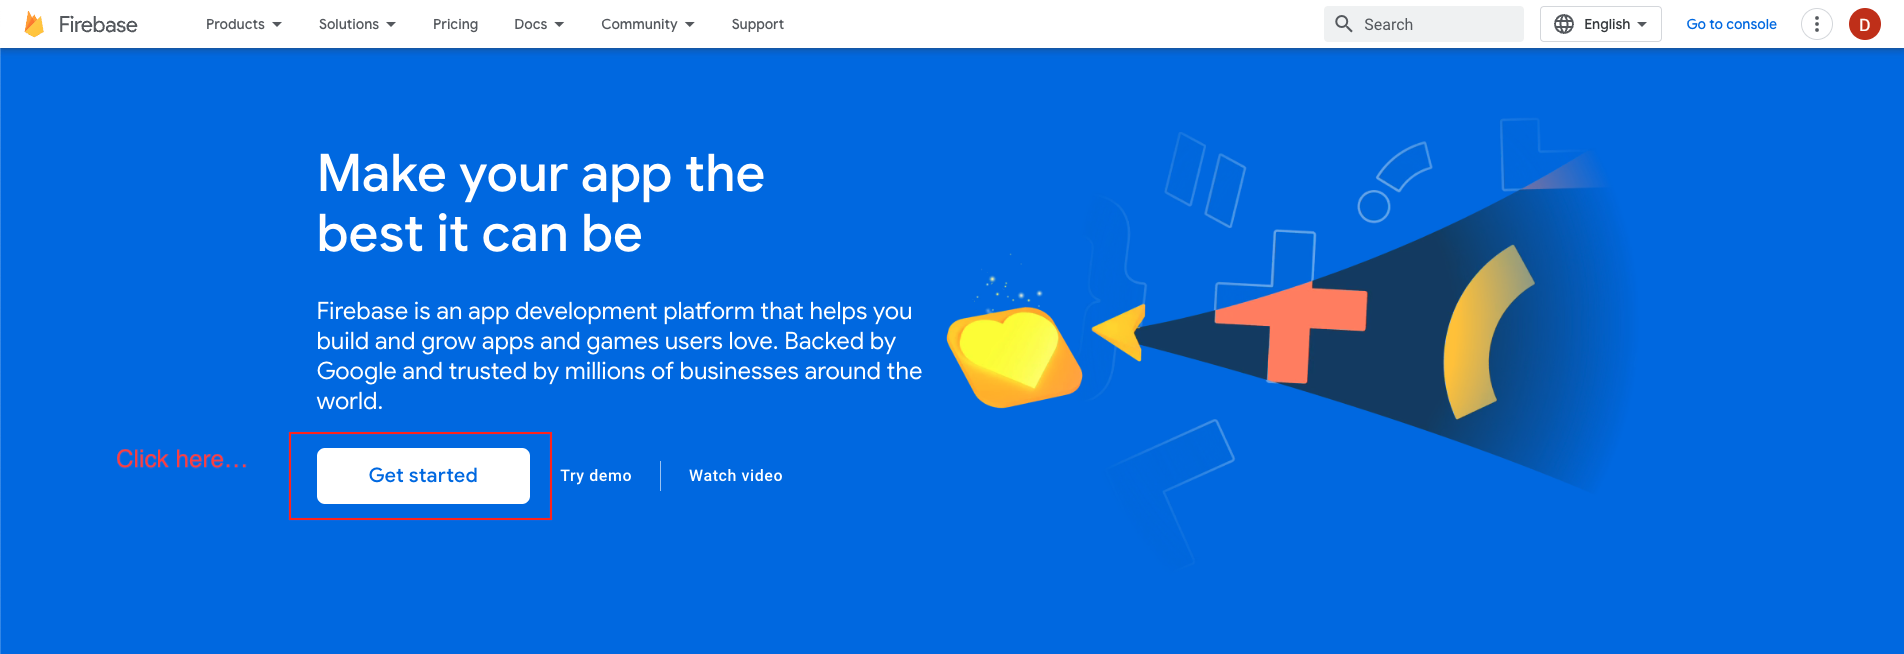
- Begin by visiting the Firebase website through the following link: https://firebase.google.com/
- If you do not already have a Firebase account, kindly sign up for one. Otherwise, proceed to sign in with your existing account credentials.
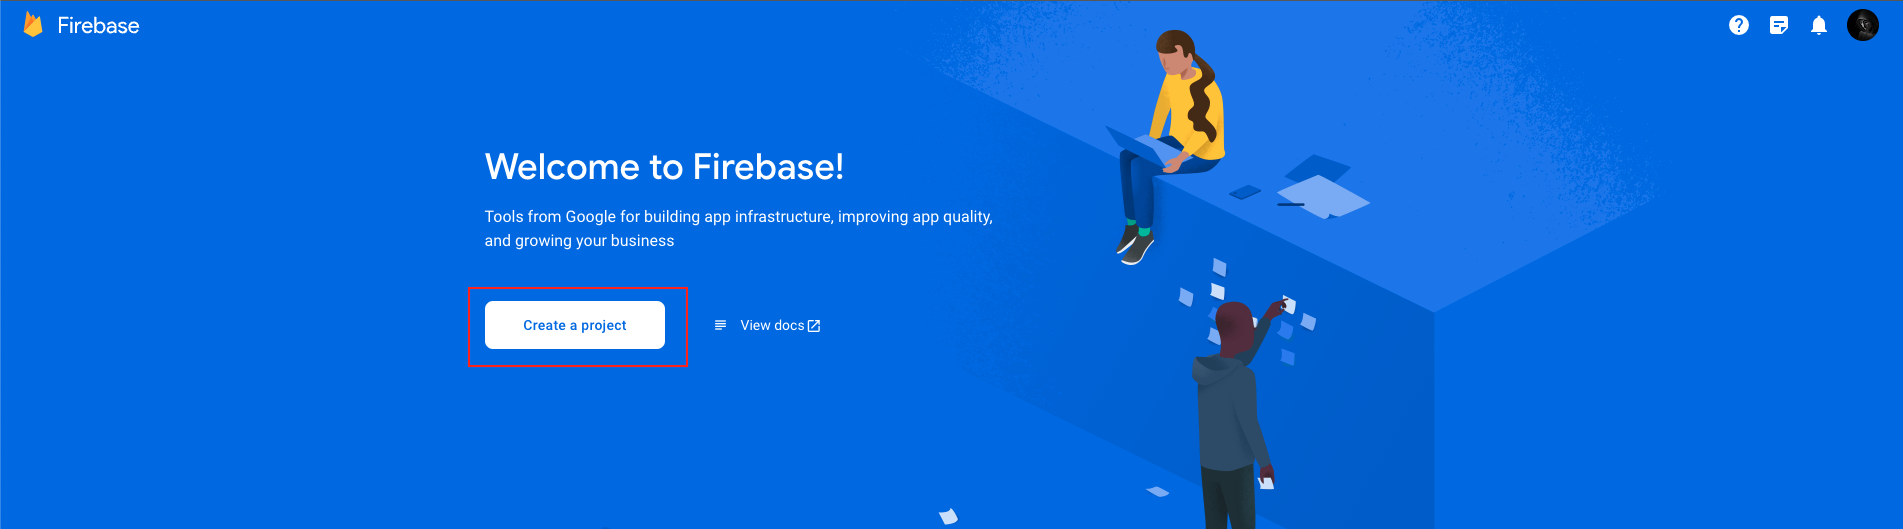
- Upon successful login, you will be directed to the Firebase Console. Click on the "Add project" button to initiate the creation of a new project.
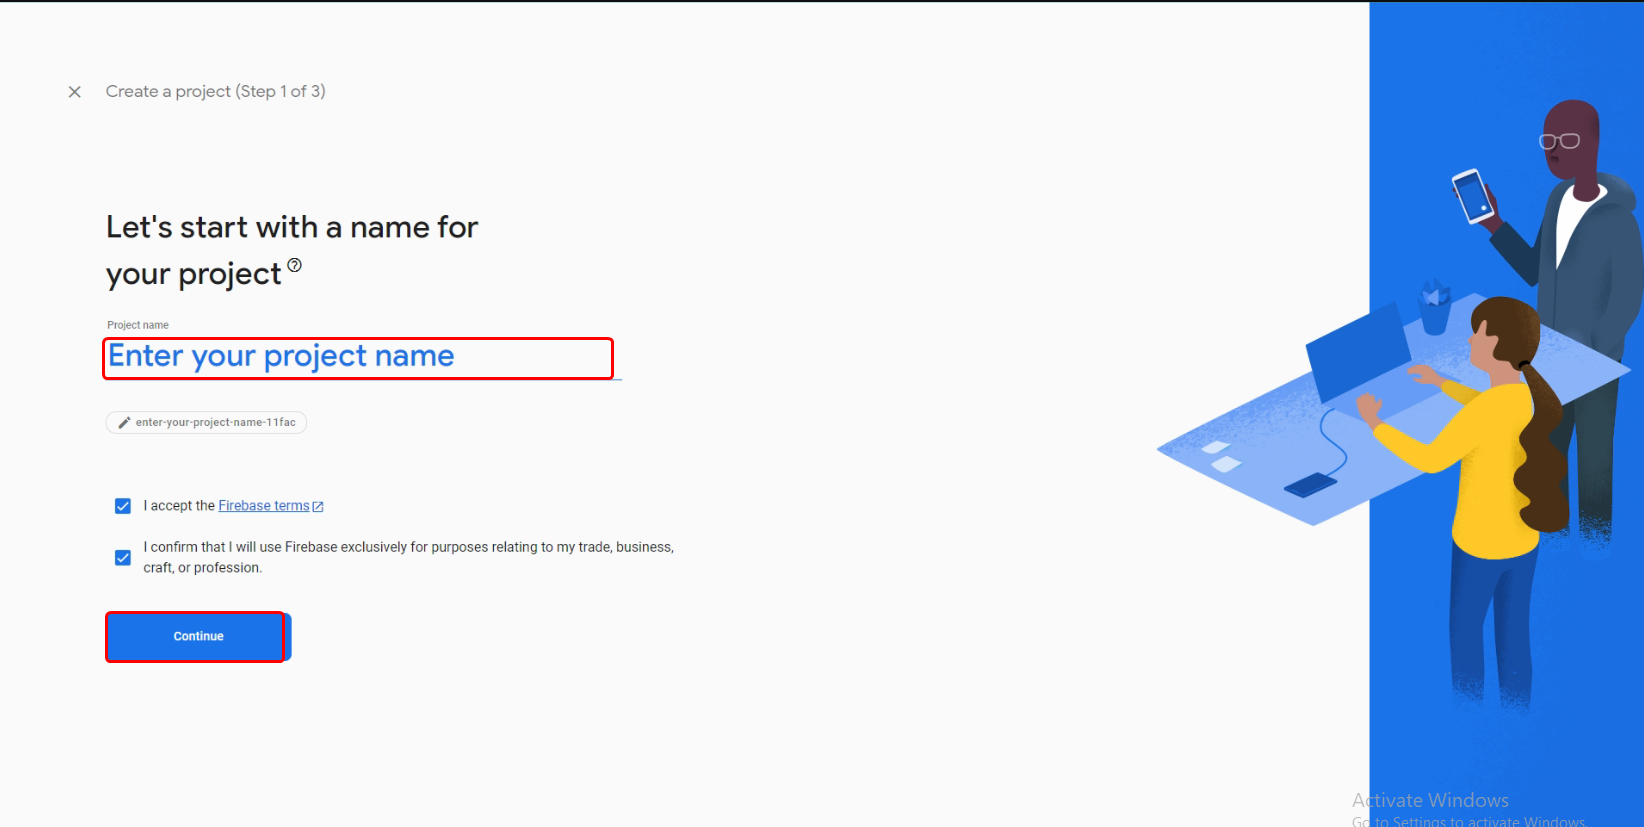
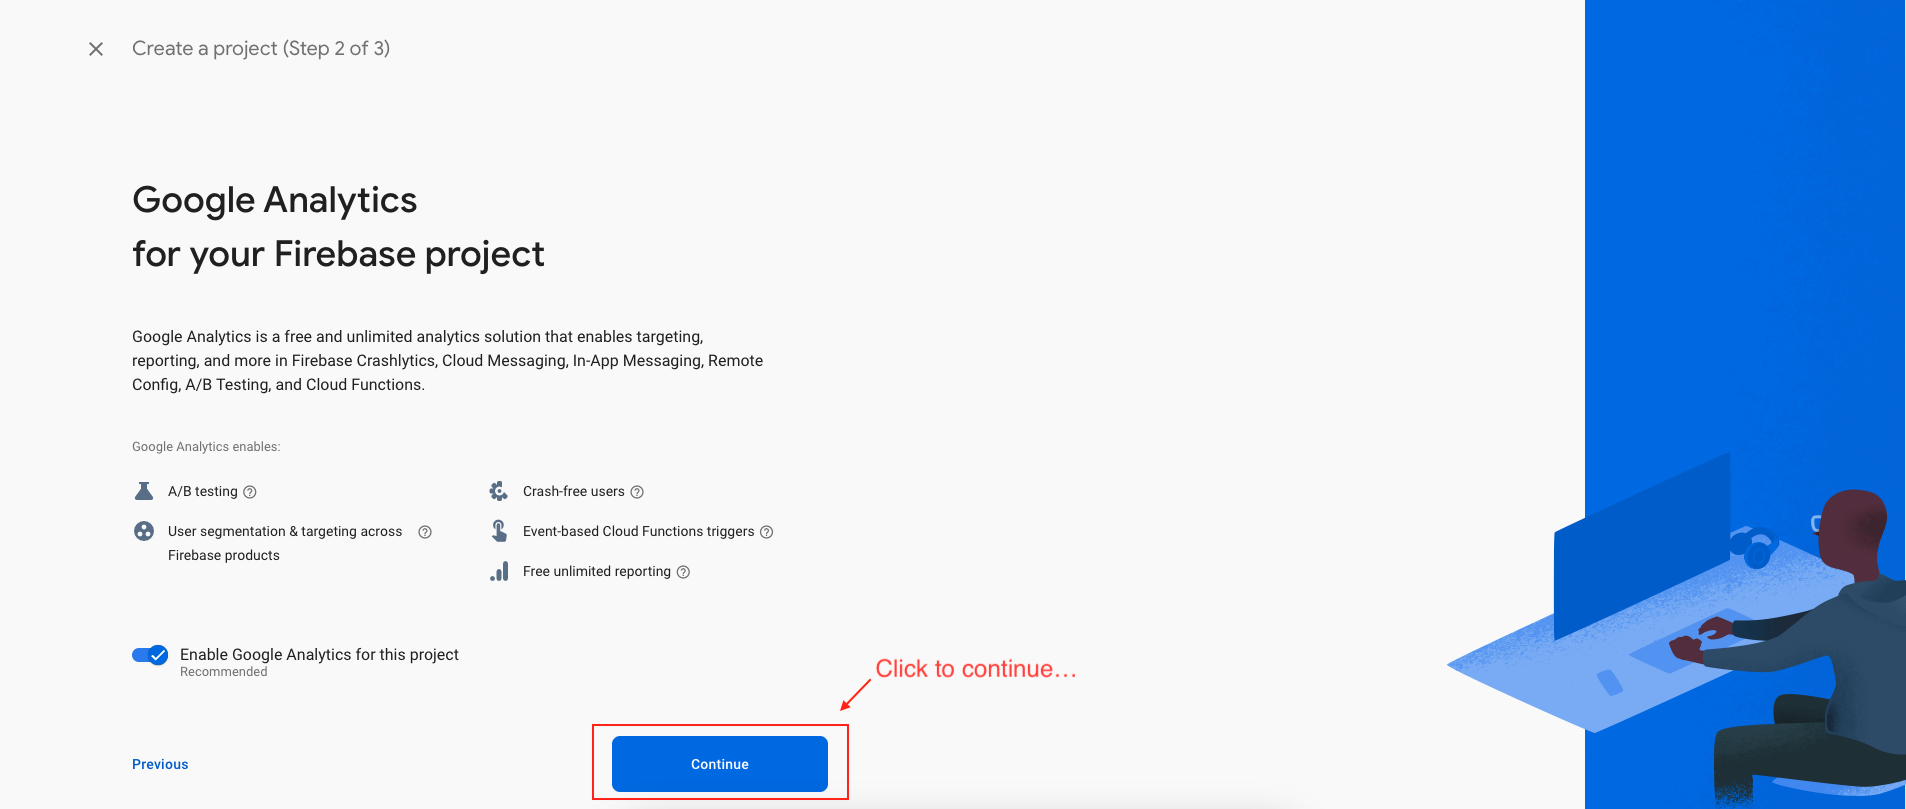
- Enter a suitable name for your project and configure your preferred options for Firebase Analytics and Google Analytics. Subsequently, click on the "Continue" button.
- First, select the default Firebase account, then proceed to create the project.

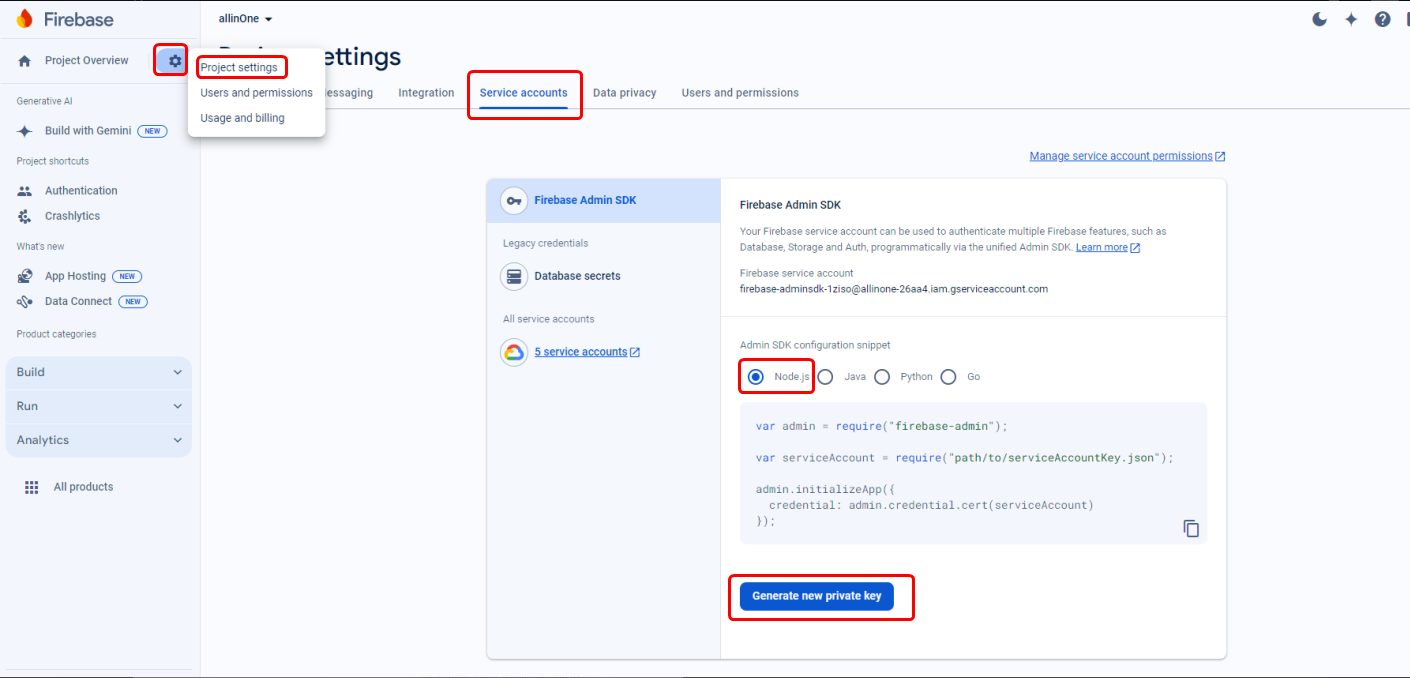
Download Firebase Private Key
- Here's a step-by-step guide to downloading your Firebase private key in a professional manner:
- If you have multiple projects, select the Firebase project for which you need the private key.
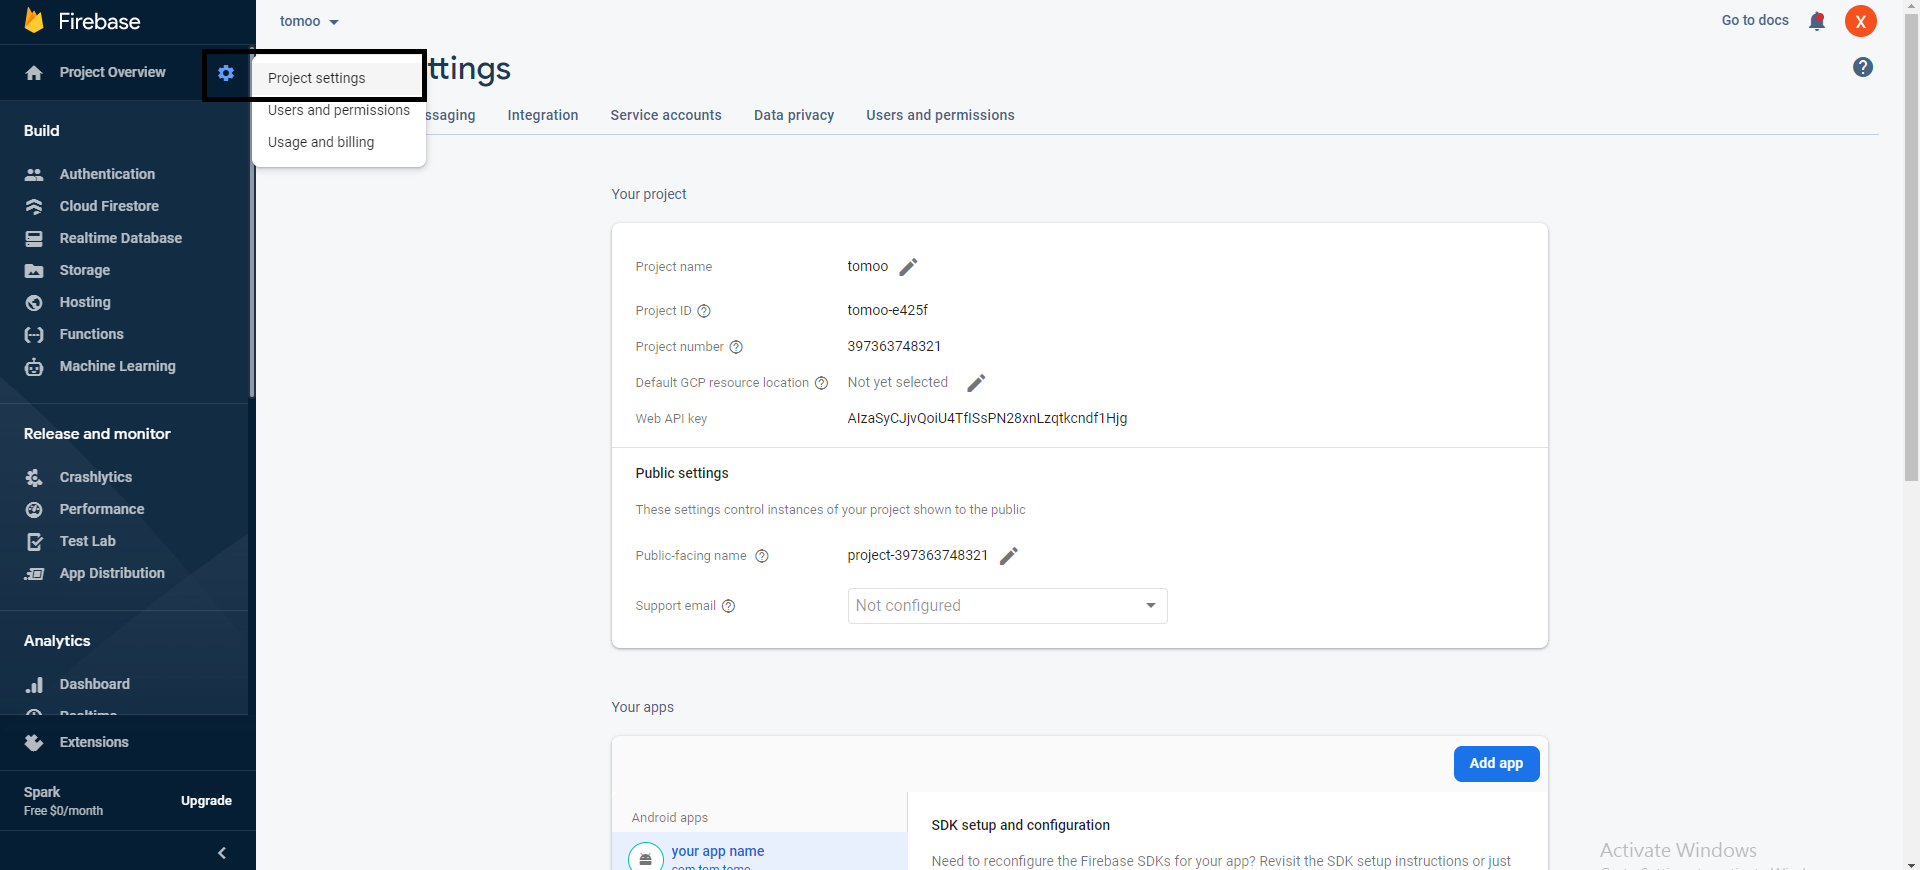
- Click on the gear icon (Settings) next to "Project Overview" on the top left corner of the Firebase Console.
- In the project settings, navigate to the "Service Accounts" tab.
- Scroll down to the "Firebase Admin SDK" section.
- Click on the "Generate New Private Key" button.
- A prompt will appear asking you to confirm your action.
- Once downloaded, store the JSON file containing the private key securely on your local machine.
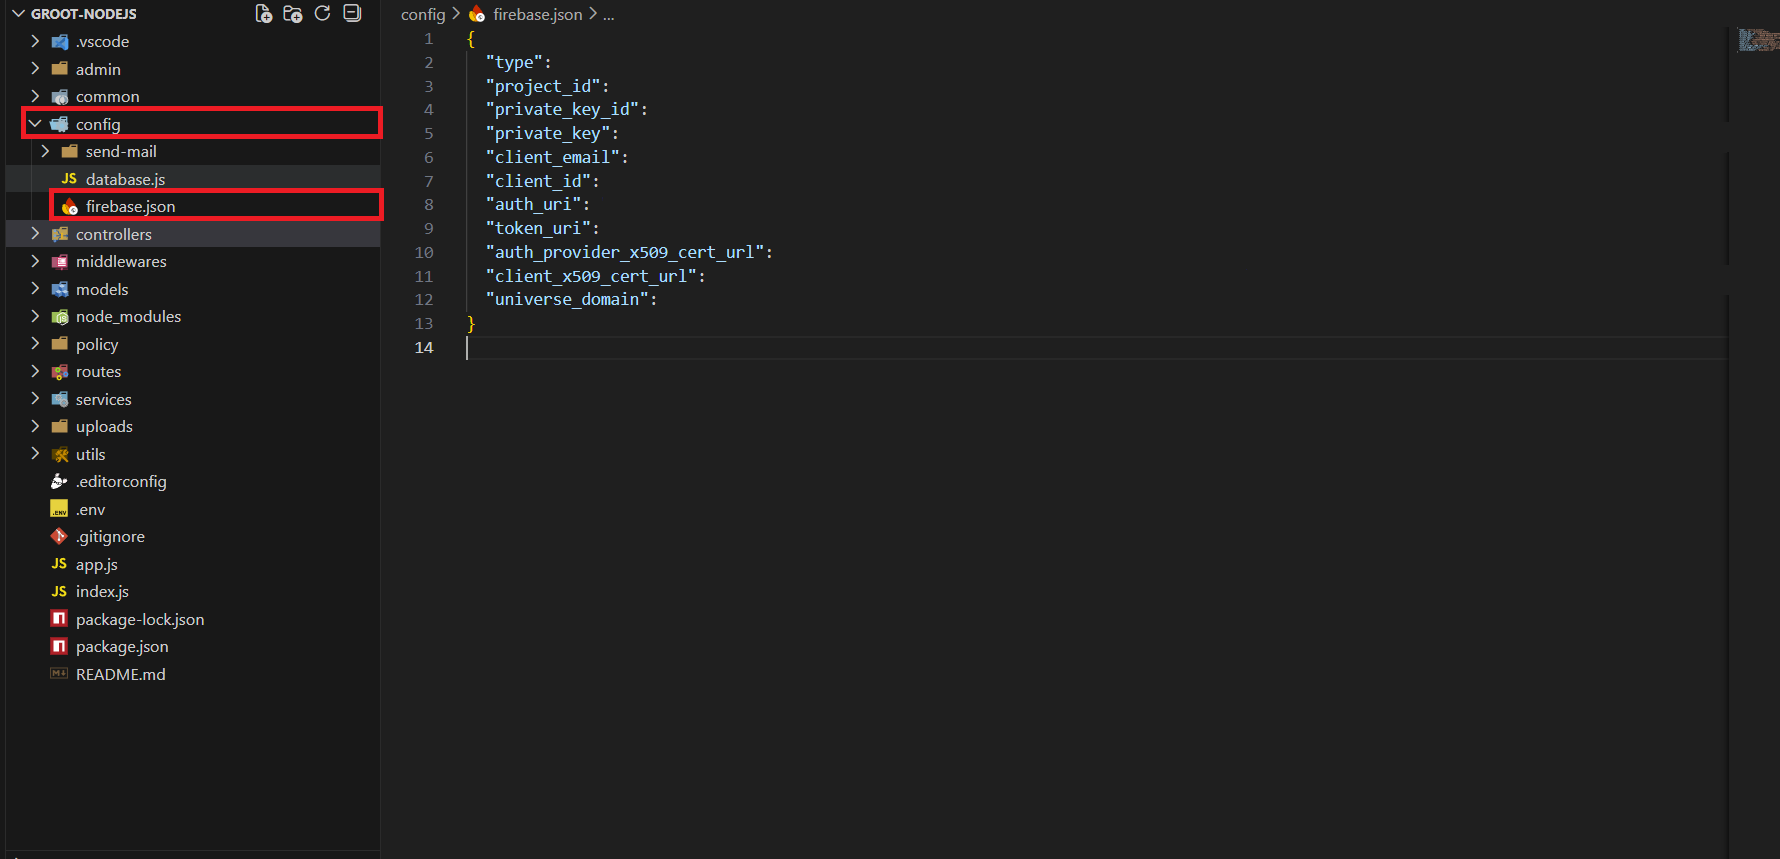
- Please update the downloaded private key file in the 'config' folder of the code and rename it to firebase.json.
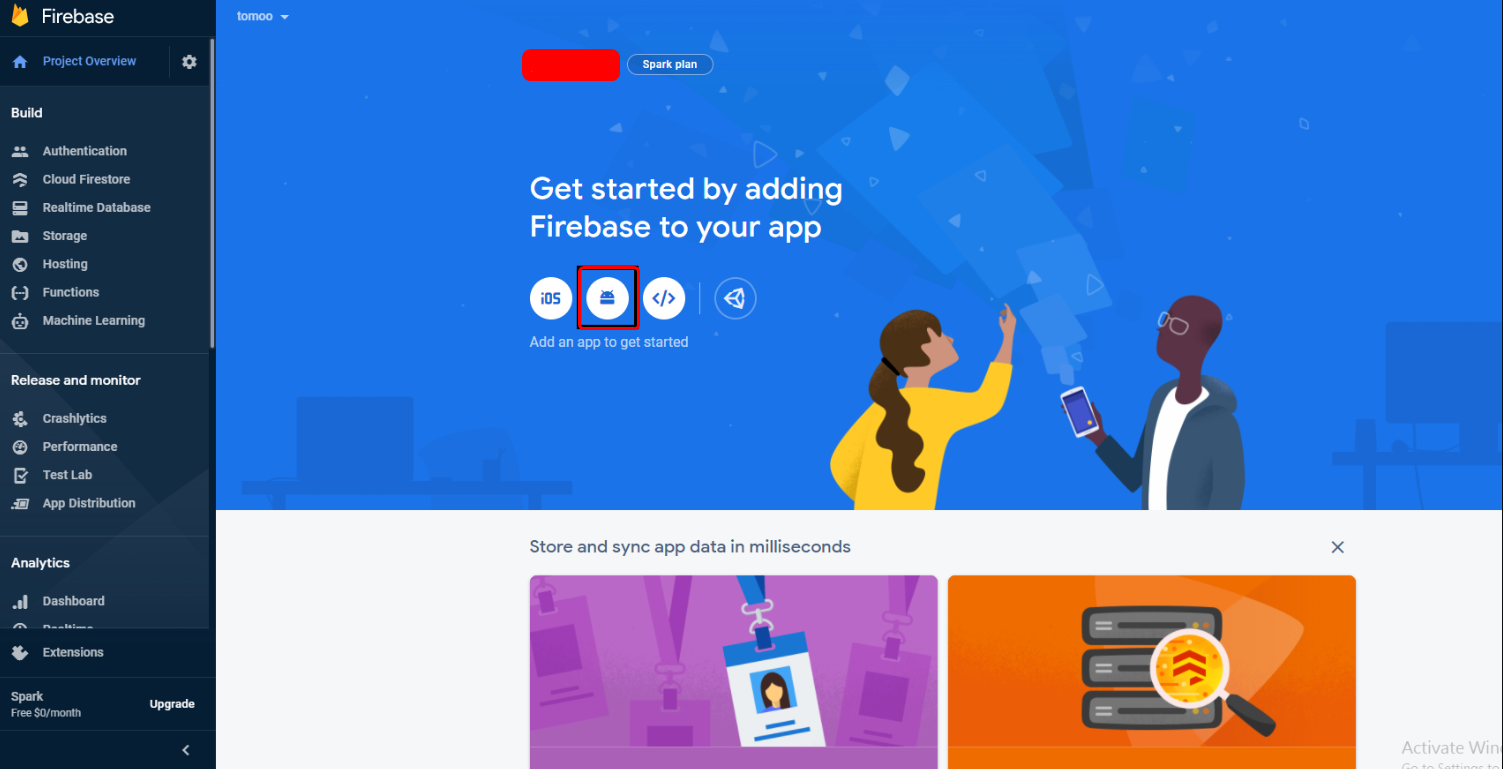
Add Android App To Firebase
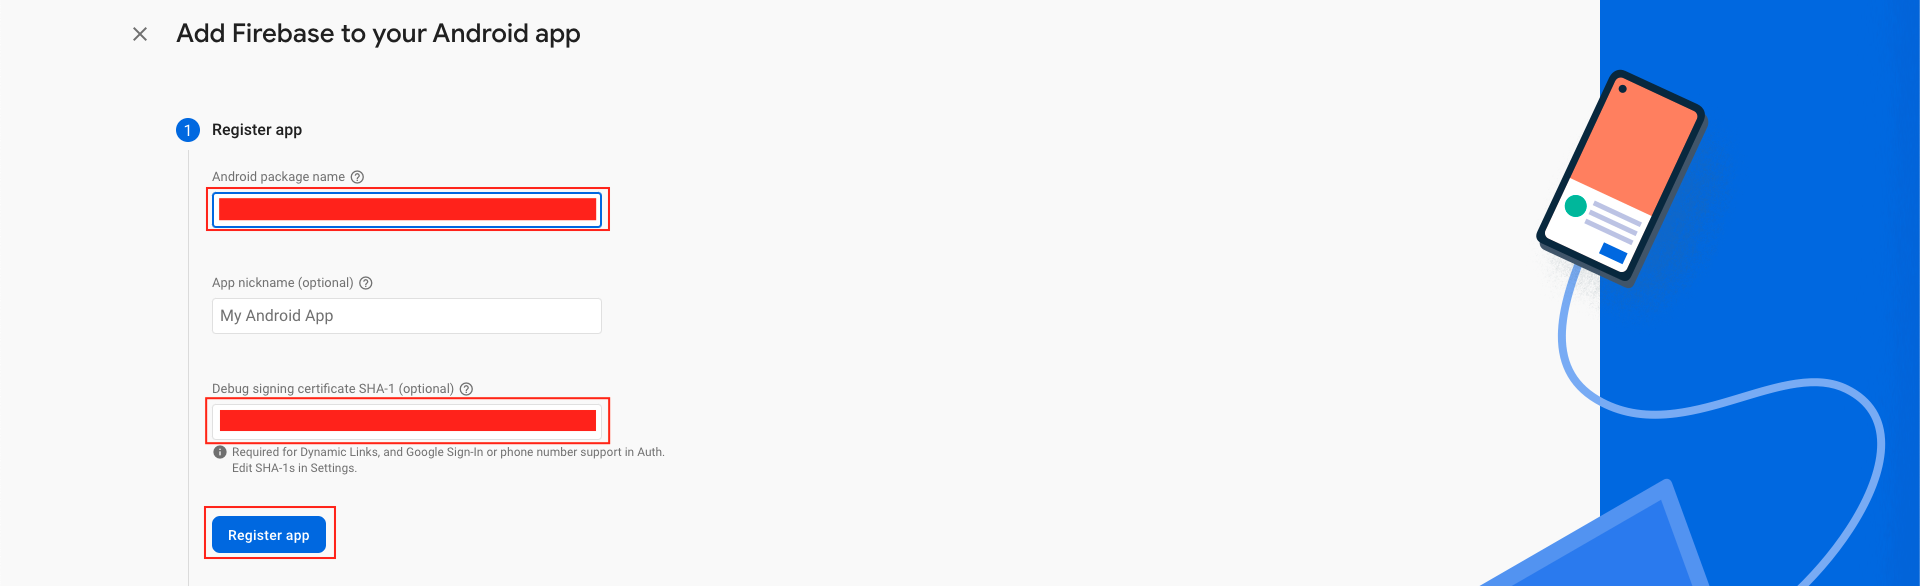
- In the next step, we have to choose the platform to add Firebase to our application. Click on Android.
- The platform can be Android, iOS, Web etc..
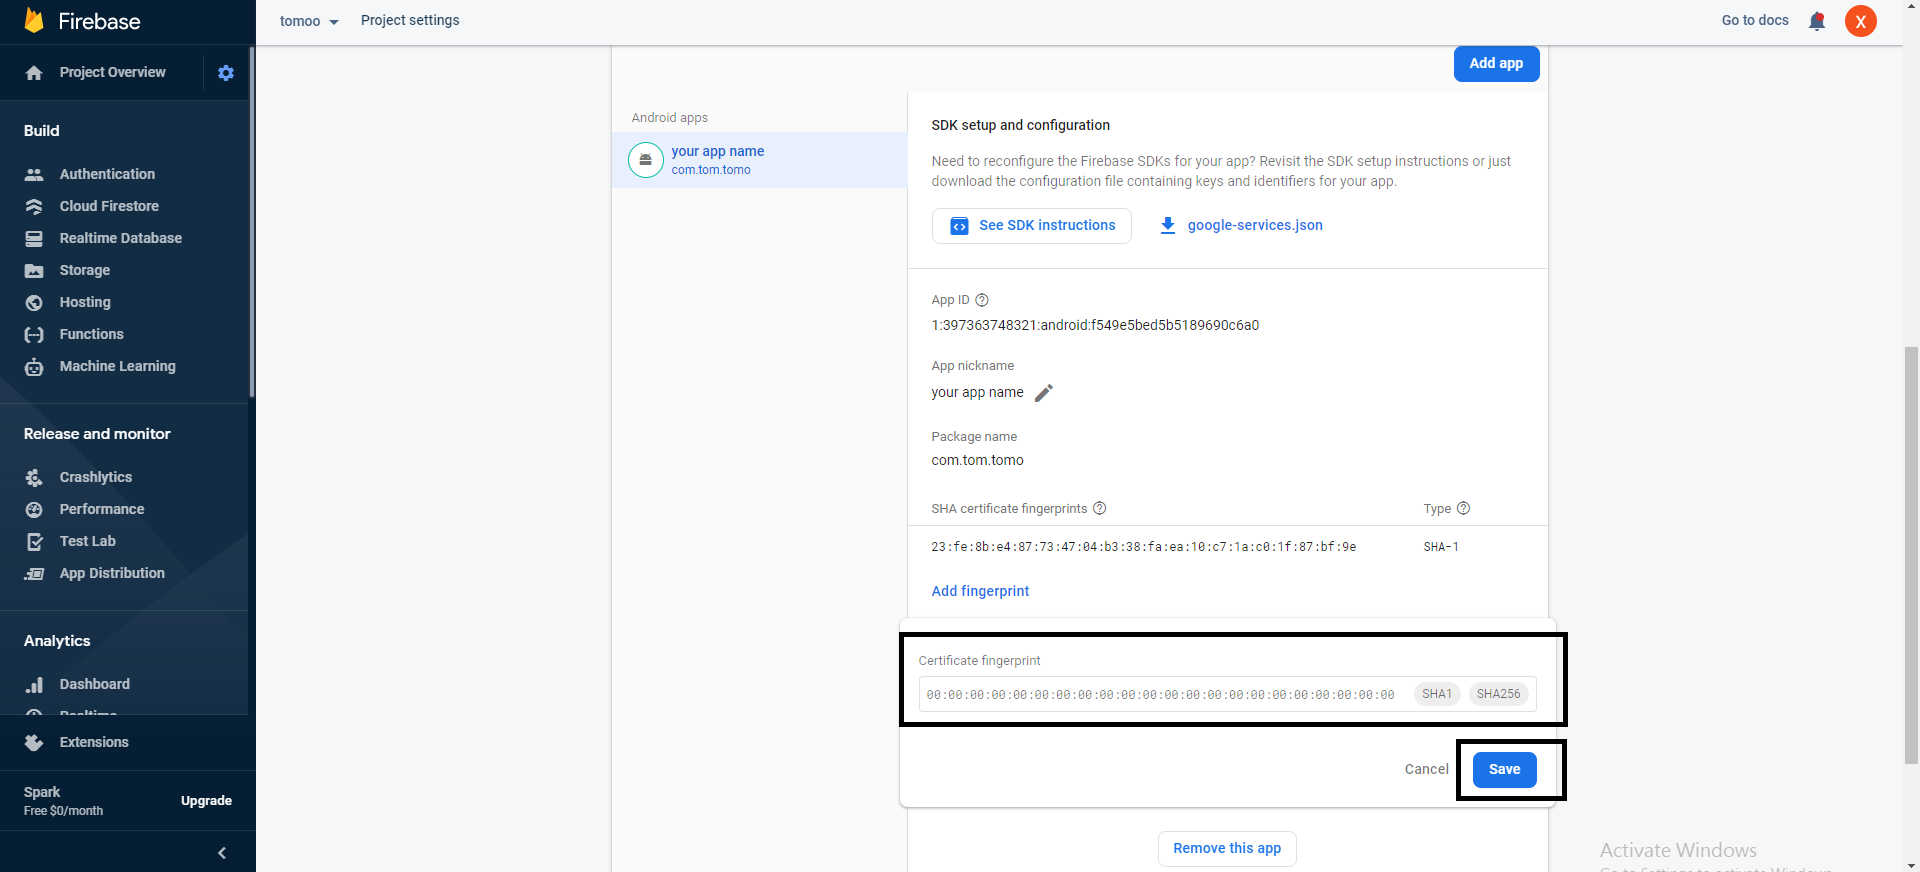
- Your package name is generally the applicationId in your build.gradle (app-level) file
- Refer to thePagefor guidance on utilizing keytool to obtain the SHA-1 hash of your signing certificate.
- Add your applicationid in the first field and SHA-1 to the third field as shown in the image below.
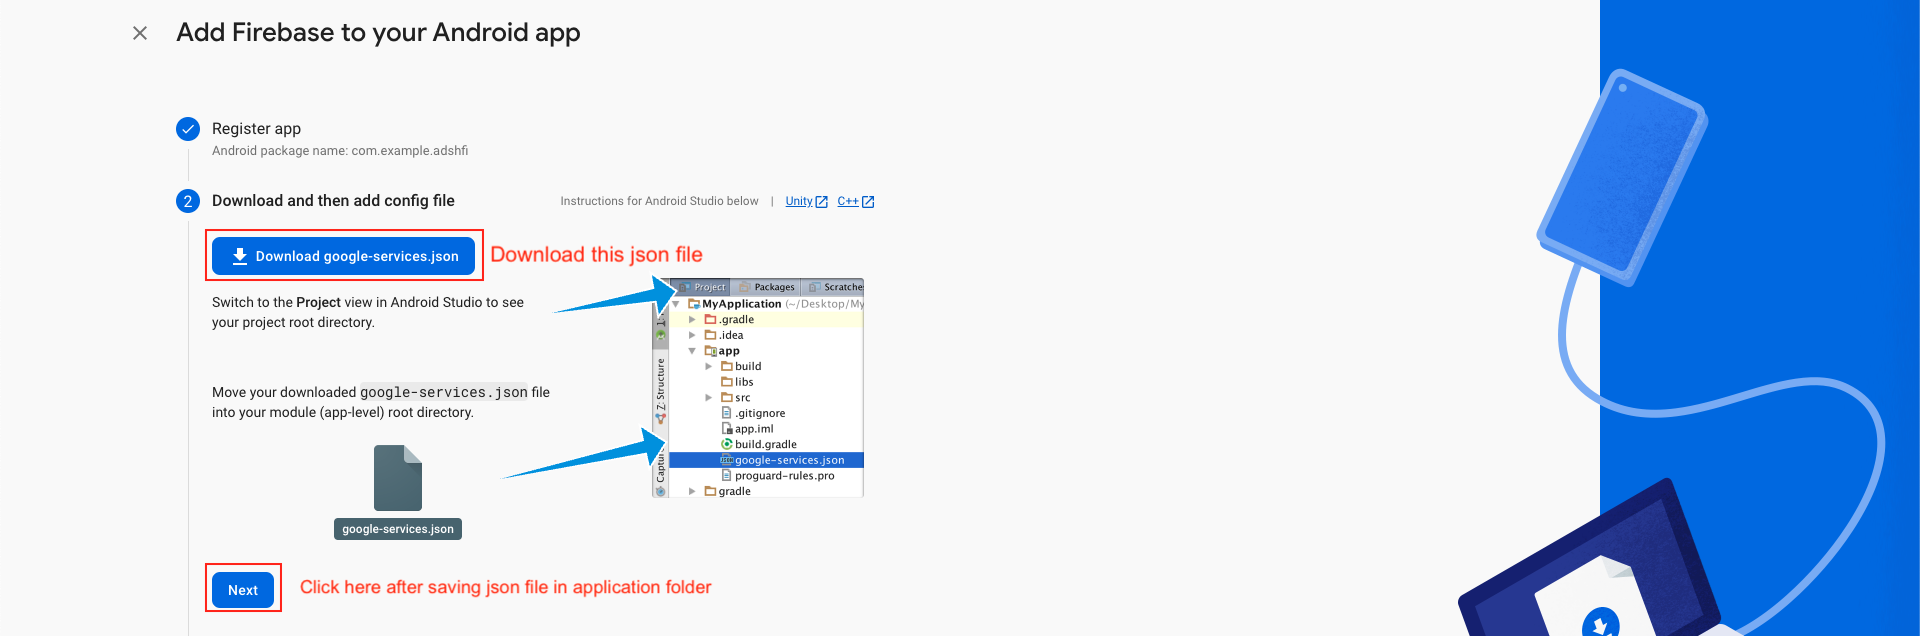
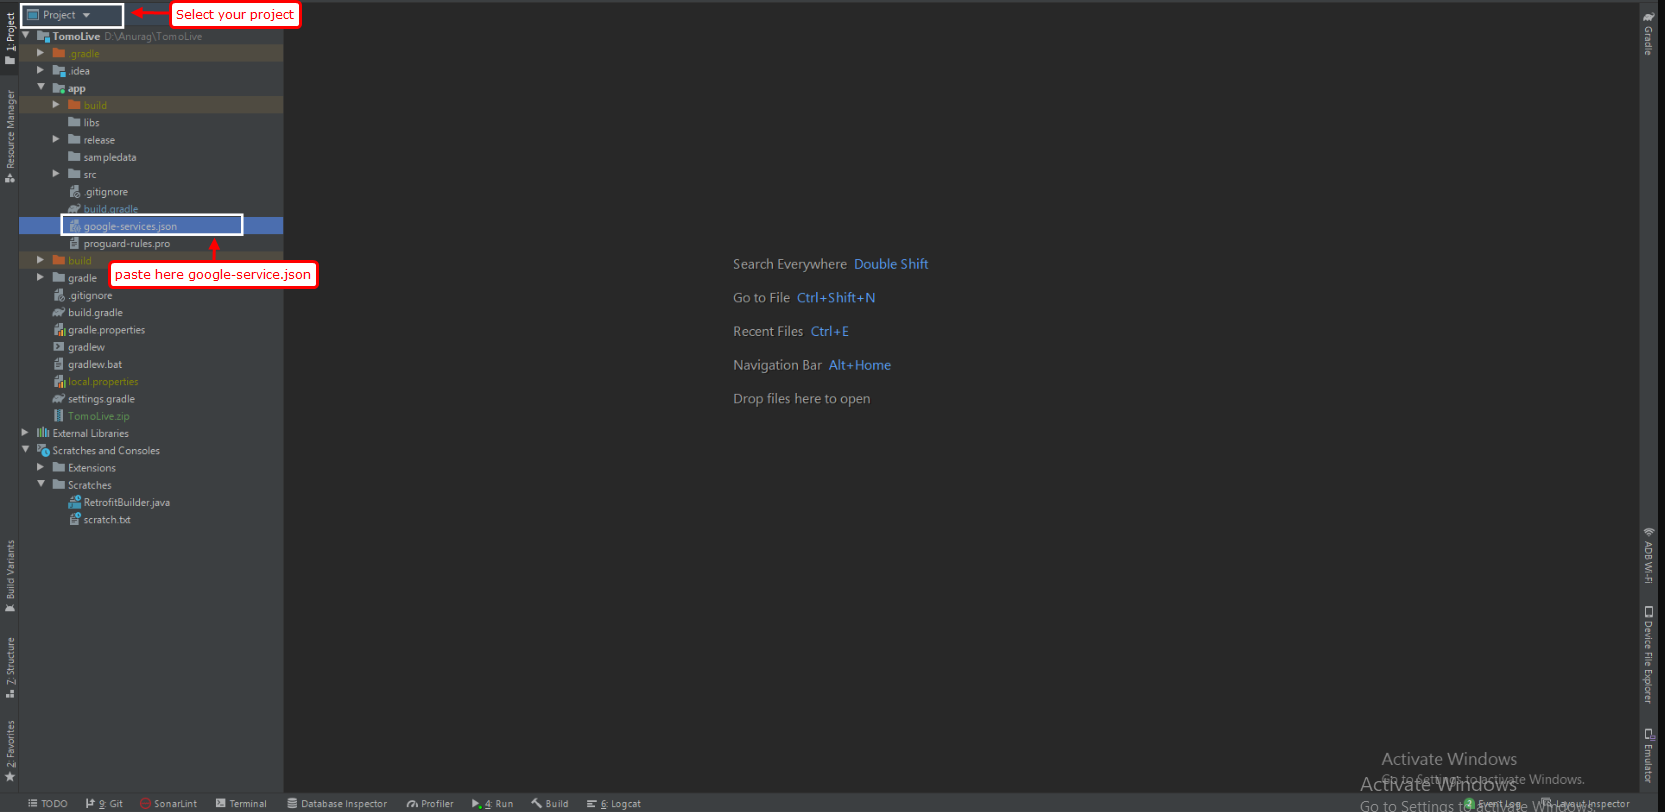
- Download the google-services.json file & place it in your project's app root directory.
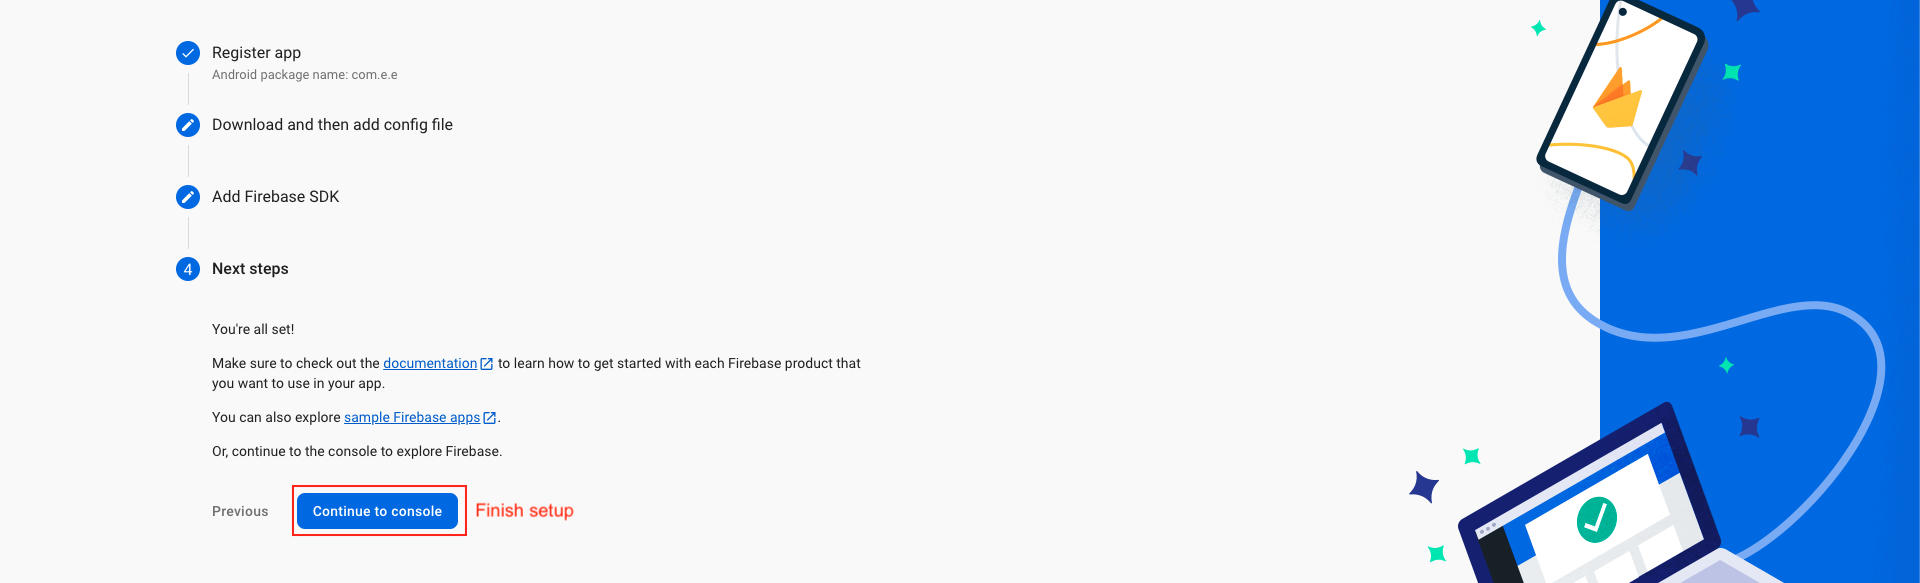
- Back in the Firebase console-setup workflow, click Next to skip the remaining steps and then finish and complete
Step 1 : Enter SHA Key in firebase console
- If you fail to provide the SHA-1 key in the Firebase project, functionalities such as phone login and Google login will be impaired.
- It is essential to add your SHA-1 keys for both debug and live modes to ensure seamless operation.
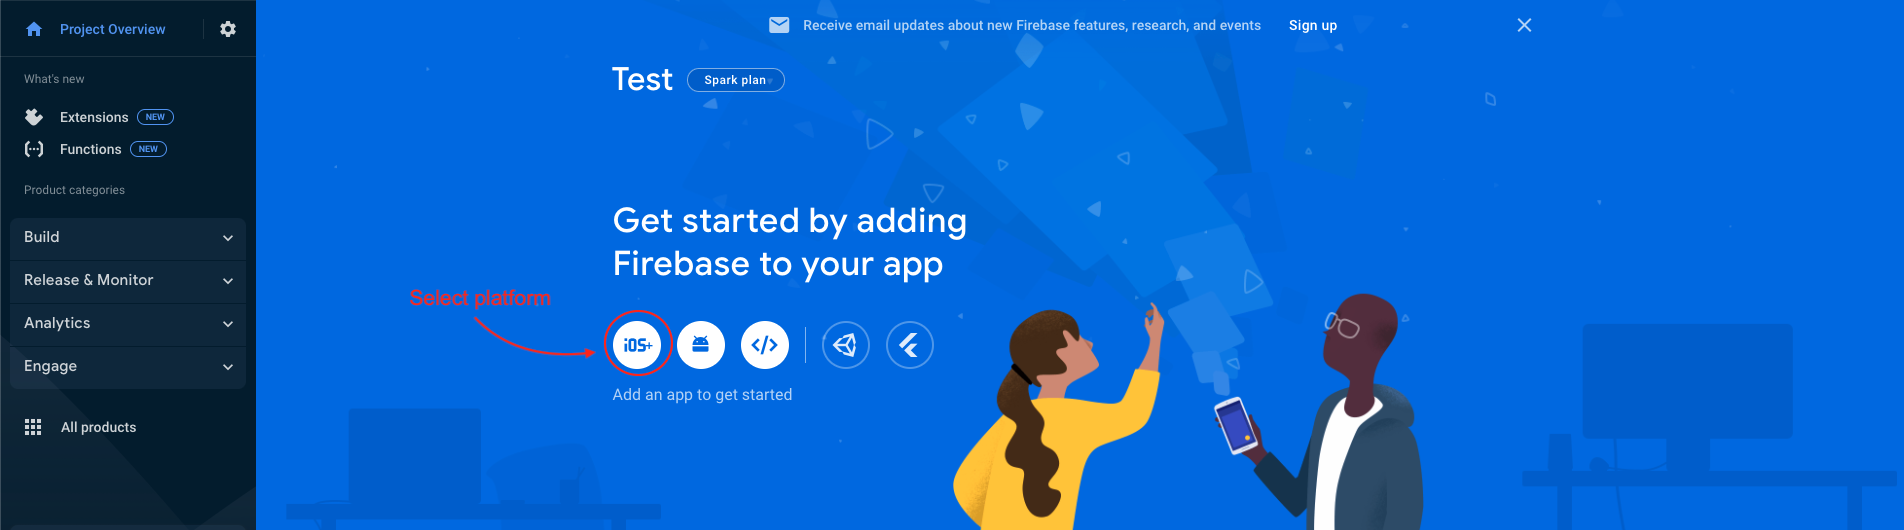
Add IOS App In Firebase
- we have to choose the platform to add Firebase to our application. Click on iOS.
- On the next screen, enter your iOS bundle ID & App nickname and click on Register App. You can find your bundle ID in the General tab for your app's primary target in Xcode. If specified, the app nickname will be used throughout the Firebase console to represent this app. Nicknames aren't visible to users.
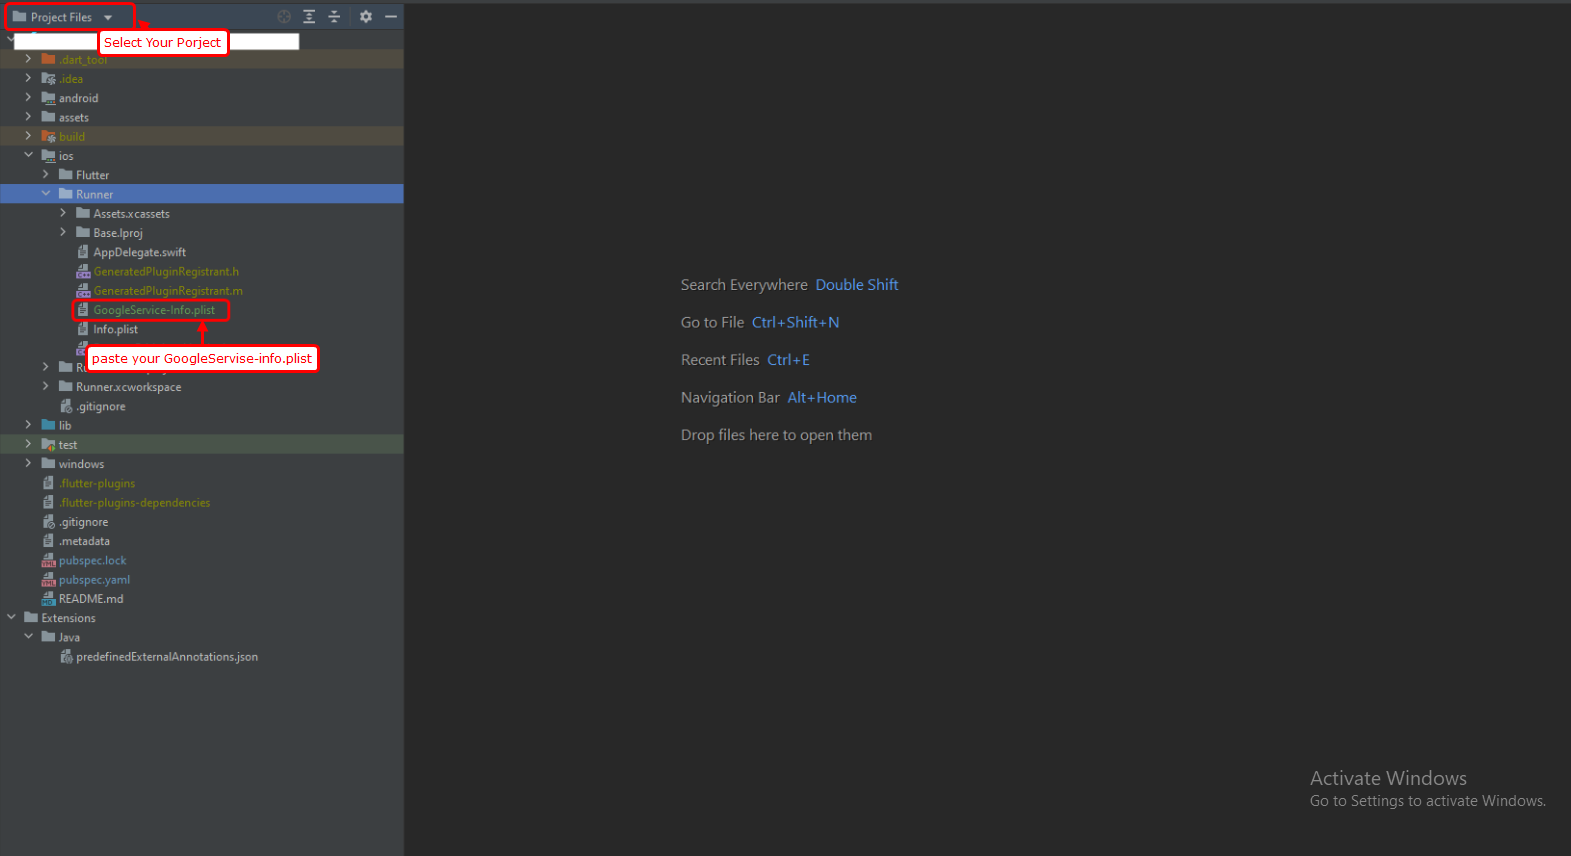
- Download the GoogleService-Info.plist file & move the GoogleService-Info.plist file you just downloaded into the root of your Xcode project and add it to all targets.
- Back in the Firebase console-setup workflow, click Next to skip the remaining steps and then finish and complete
- If you fail to provide the SHA-1 key in the Firebase project, functionalities such as phone login and Google login will be impaired.
- It is essential to add your SHA-1 keys for both debug and live modes to ensure seamless operation.


Step 1 : Enter SHA Key in firebase console
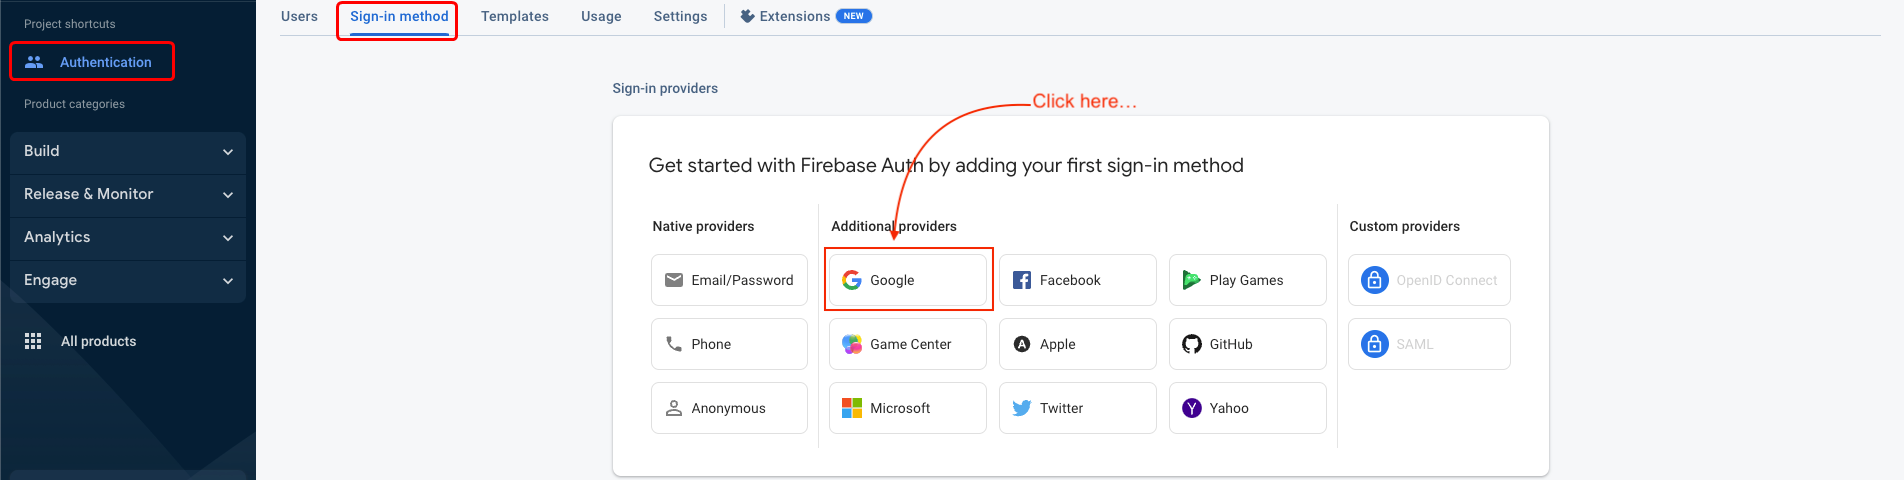
Google Sign In Configuration
- Navigate to the "Authentication" section and select the "Sign-in method" tab.
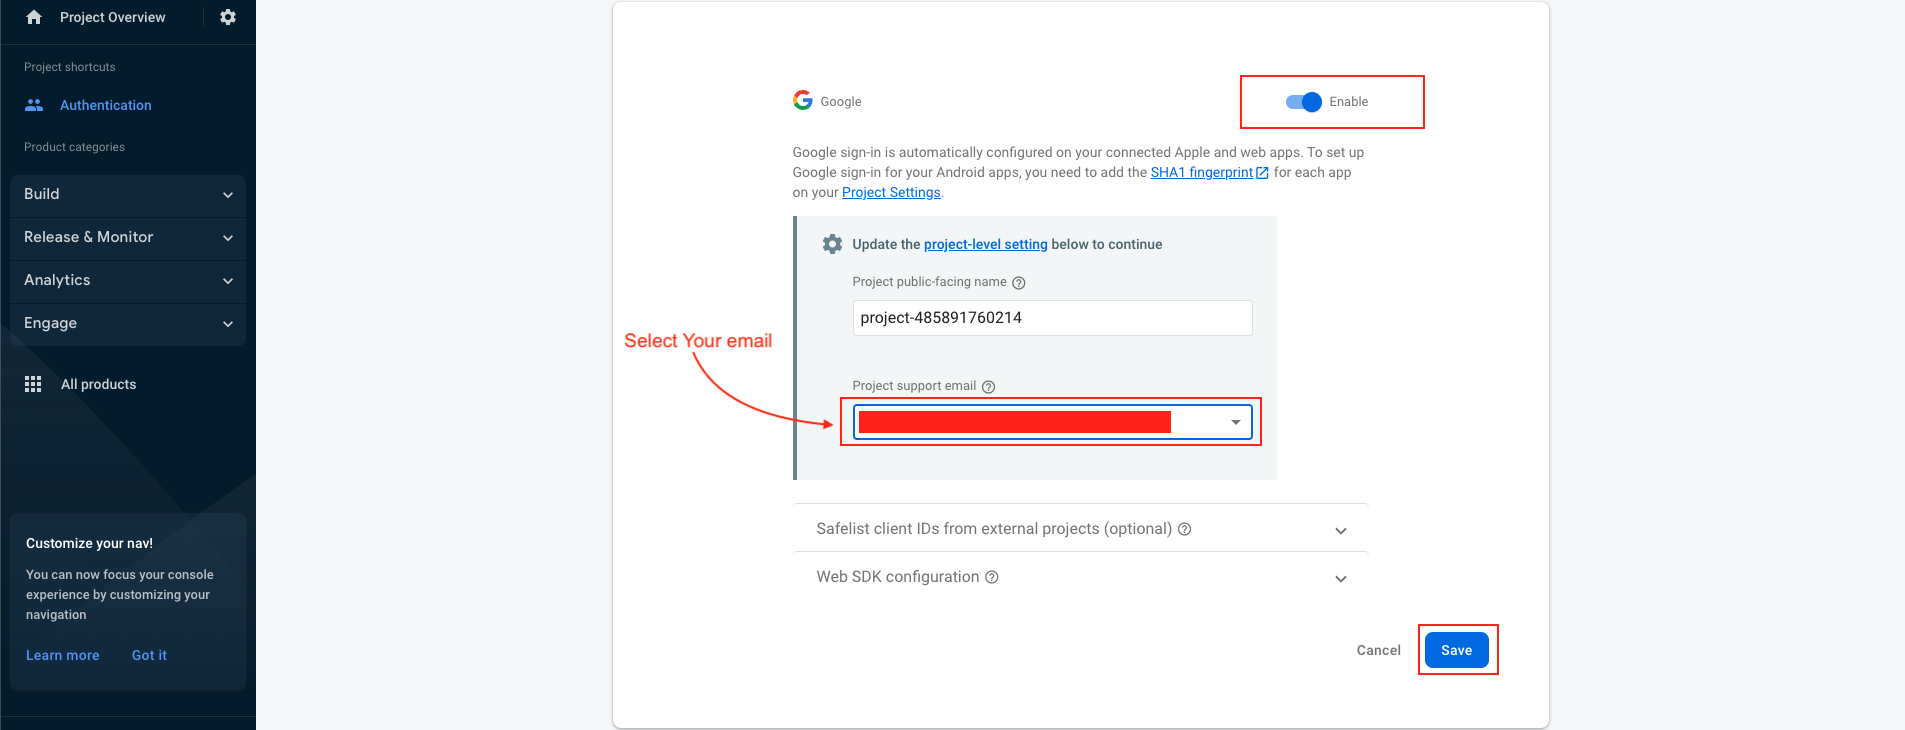
- Click to Enable
- Select your support email and save
- Google sign-in method has been successfully enabled.

Dynamic Links Configuration
- Navigate to the "Dynamic Links" section and click the three dots.
- Click to Allowlist URL pattern
- In Regex URL pattern add your domain same as below example


Create APNs Auth Key For Push Notification
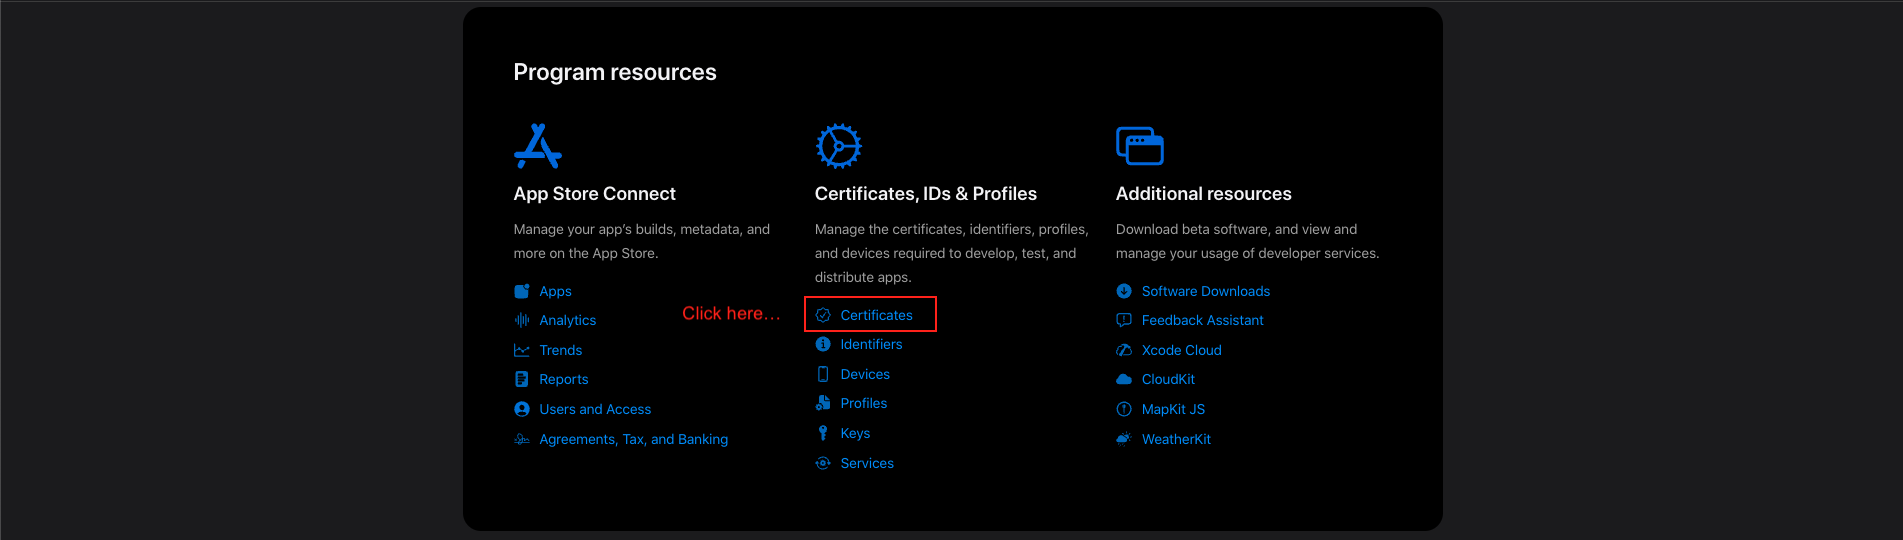
- Navigate to https://developer.apple.com/account.
- Log in using your Apple developer credentials.
- Obtain a provider certificate from your developer account. This can be found in the "Certificates" section, as depicted in the image below.
- Select the "Certificate, IDs & Profiles" tab.
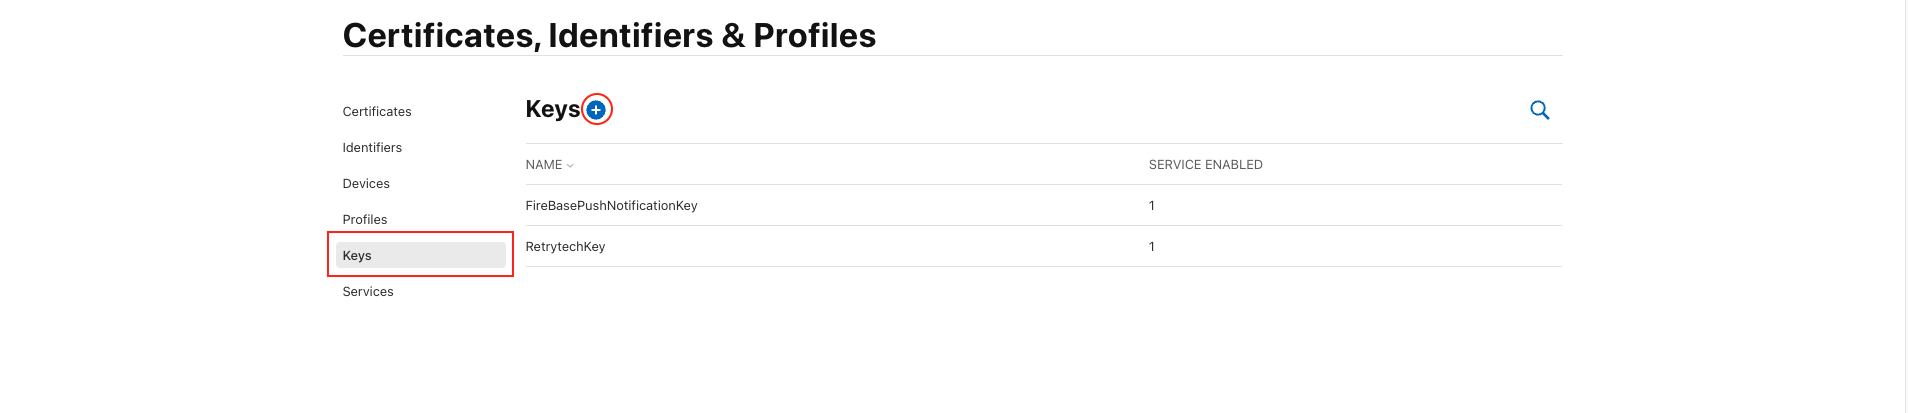
- Select the "Keys" tab.
- Click on the "+" button.
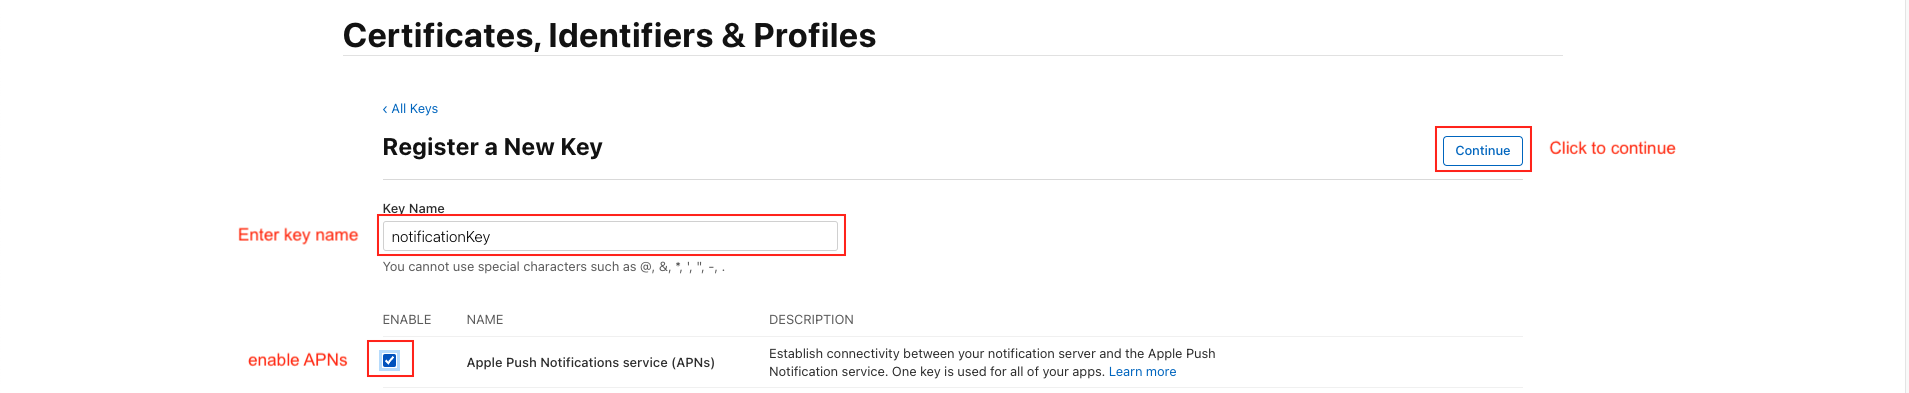
- A key can be generated which gives the FCM full access over the Apple Push Notification service (APNs). On the "Keys" menu item, register a new key. The name of the key can be anything, however you must ensure the APNs service is enabled.
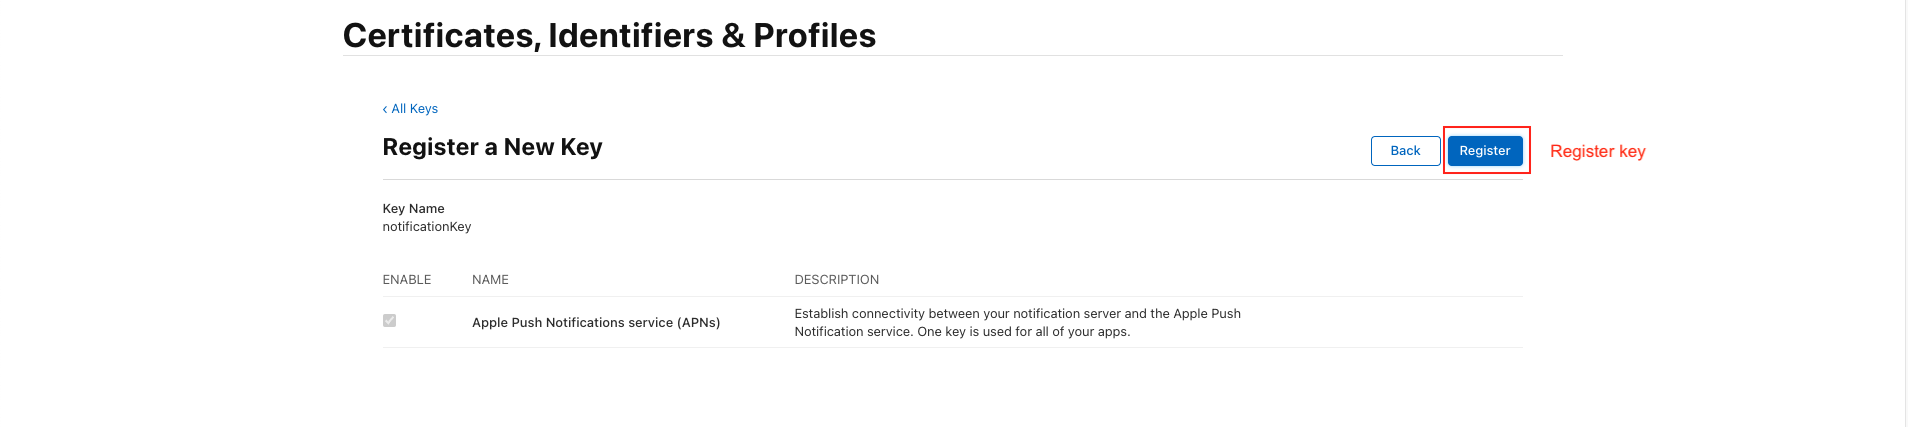
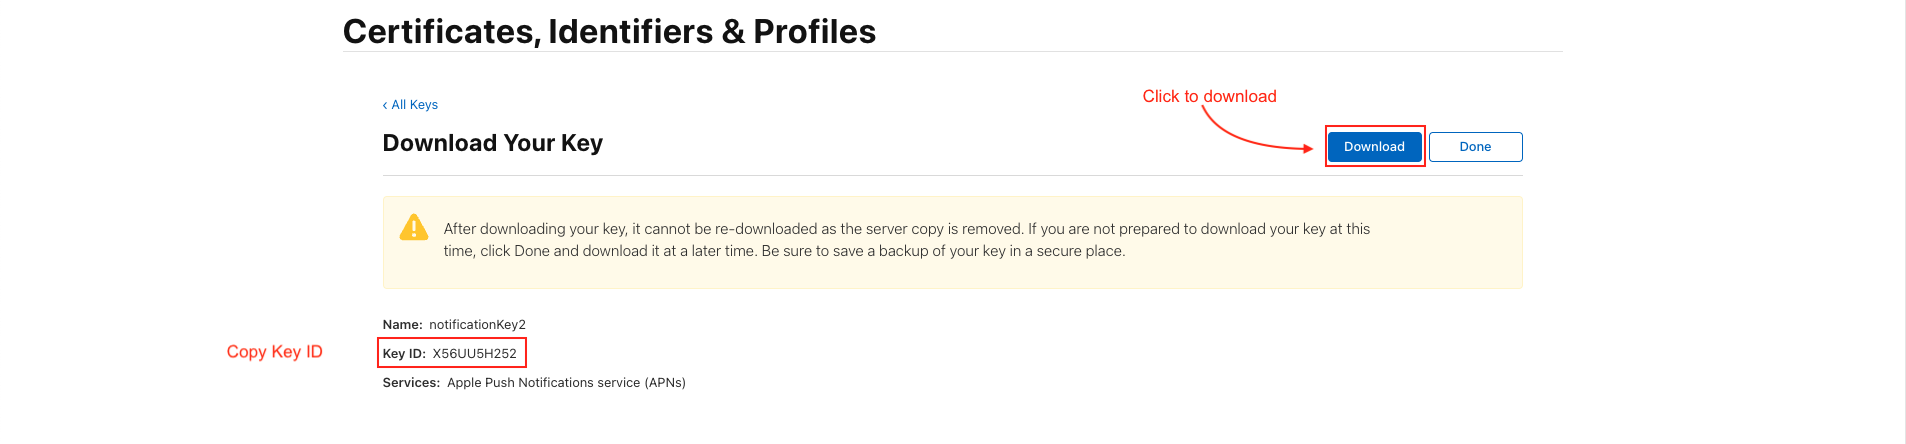
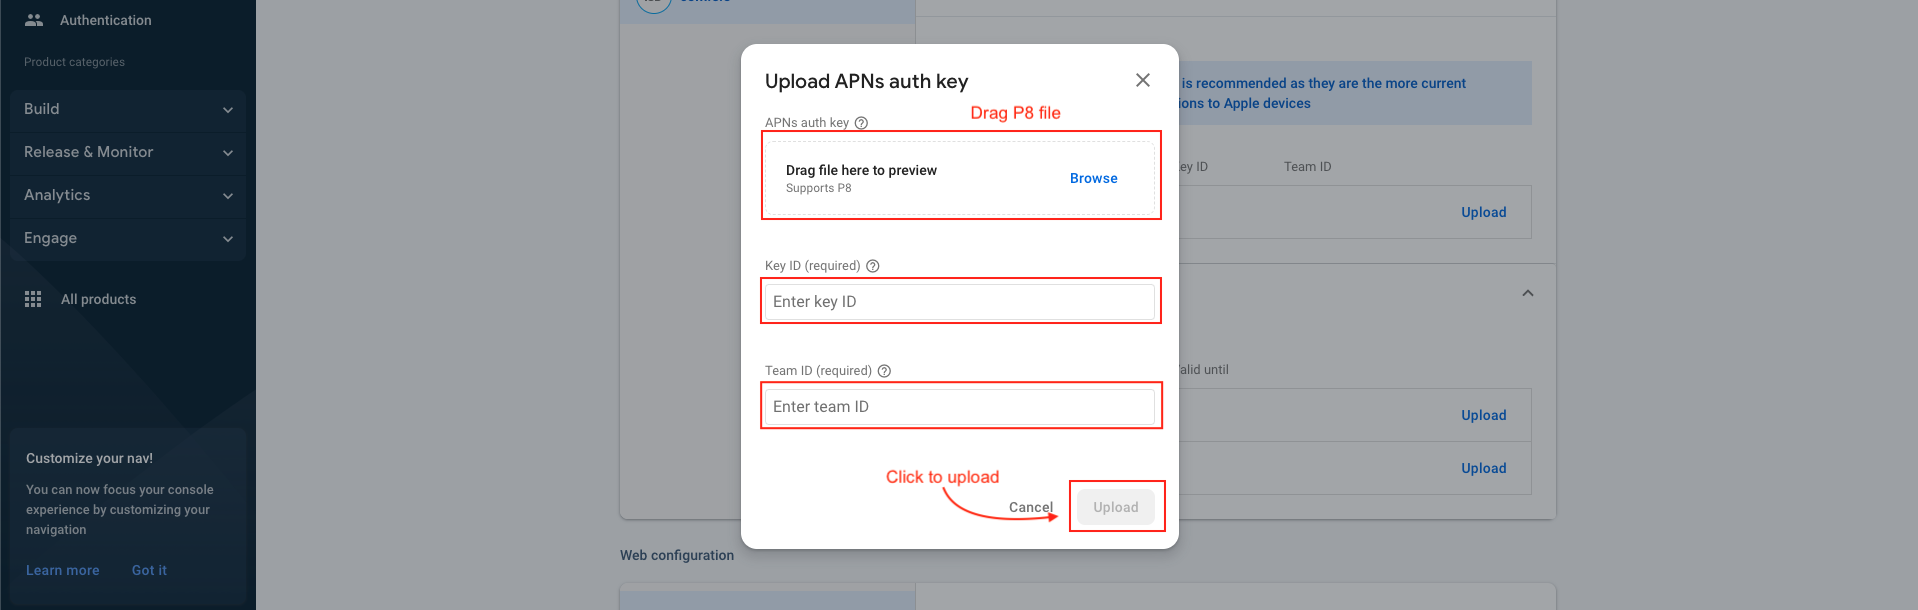
- Click "Continue" & then "Save". Once saved, you will be presented with a screen displaying the private "Key ID" & the ability to download the key. Copy the ID, and download the file to your local machine.
- Copy the Key ID and download the file.
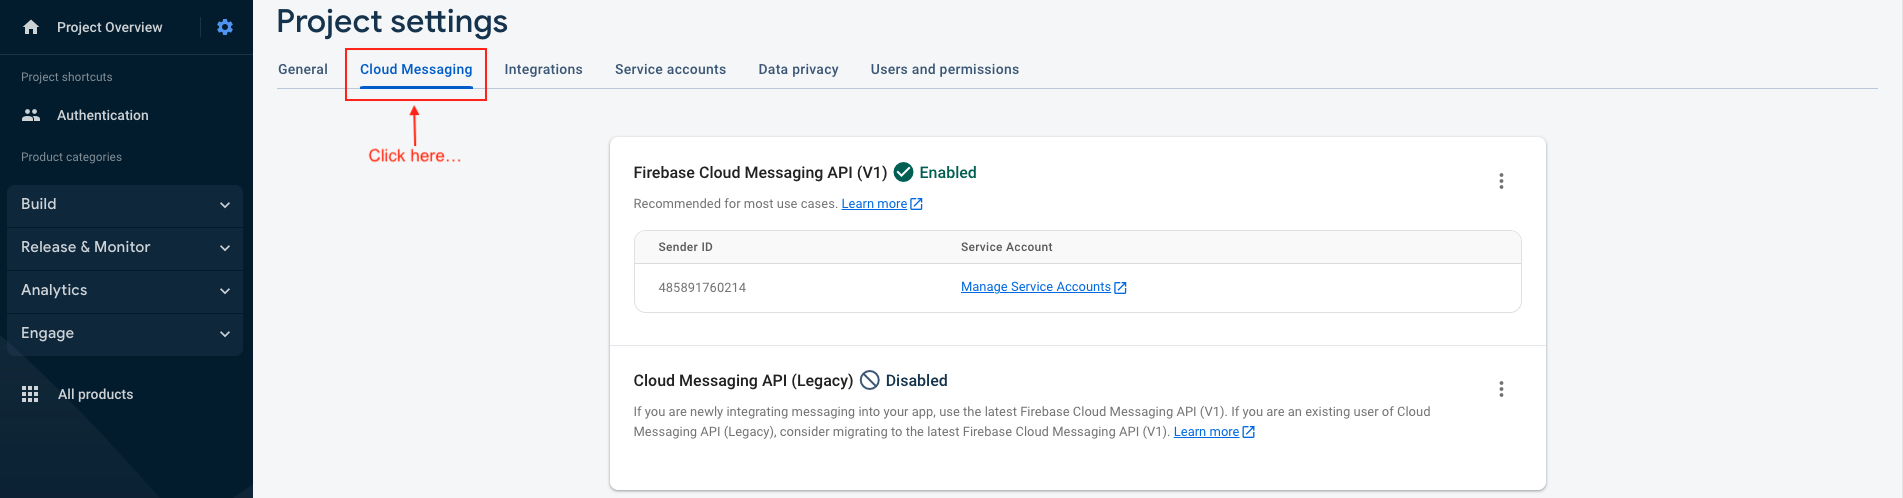
- The file & Key ID can now be added to your Firebase Project. On the Firebase Console, navigate to the "Project settings" and select the "Cloud Messaging" tab. Select your iOS application under the "iOS app configuration" heading.s
- Upload the downloaded file and enter the Key & Team IDs;

Set up admob in App
-
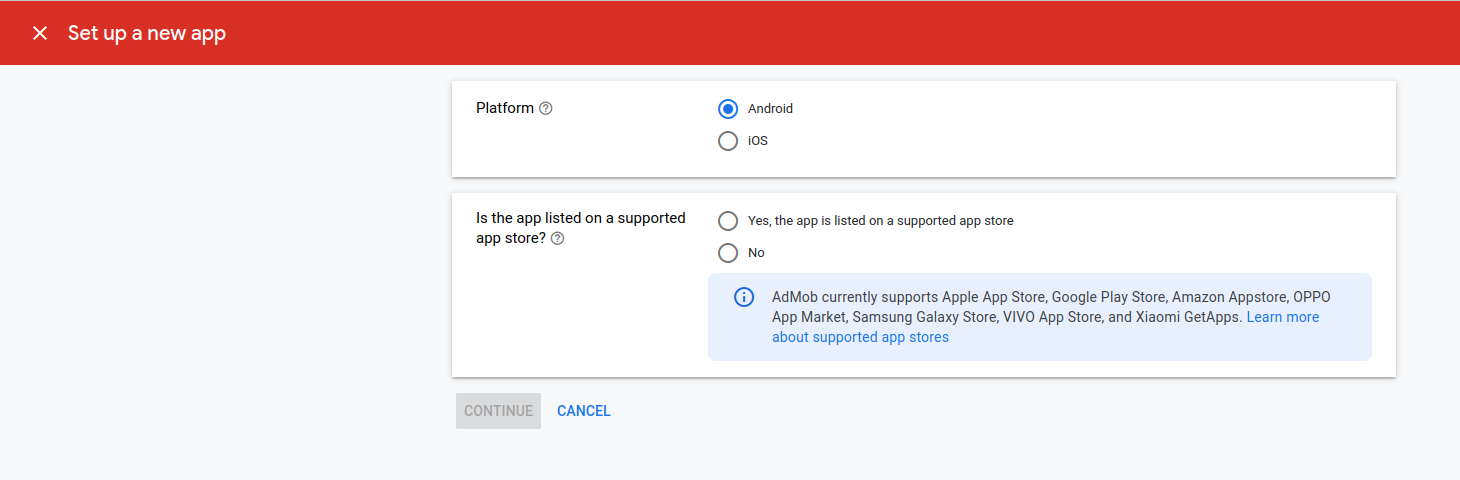
In the Admob console,
click add android app from the Apps menu.
-
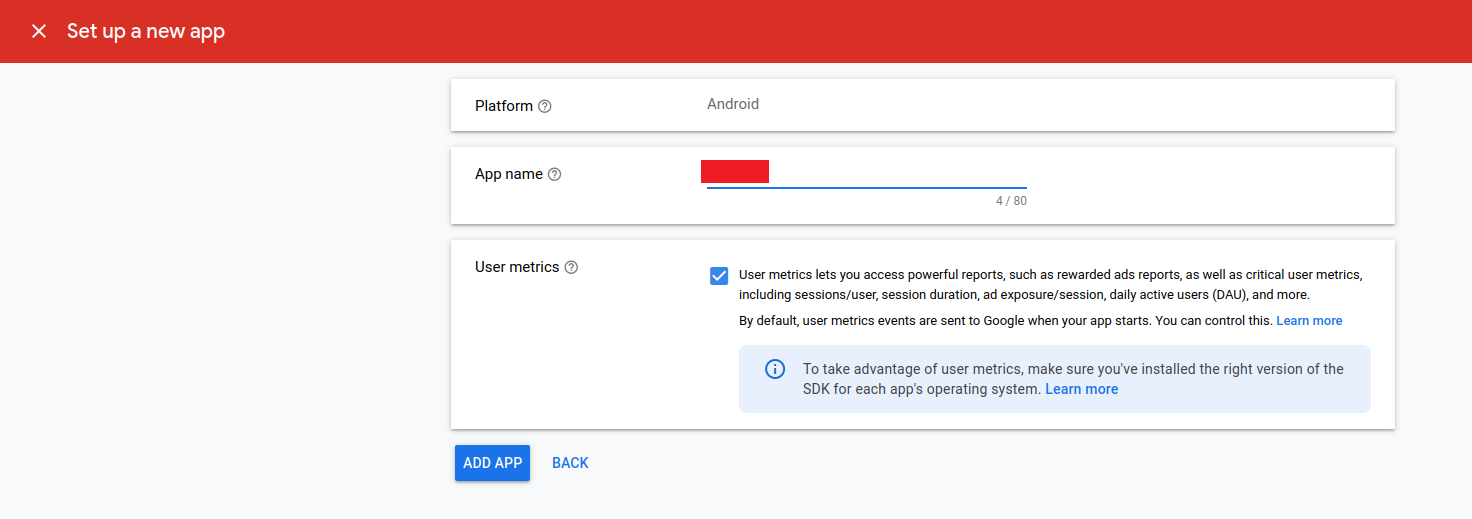
Enter your app name and Enabling user metrics is not necessary to complete this
codelab. However, we recommend that you do because it allows you to understand
user behavior in more detail and click on ADD APP button.
-
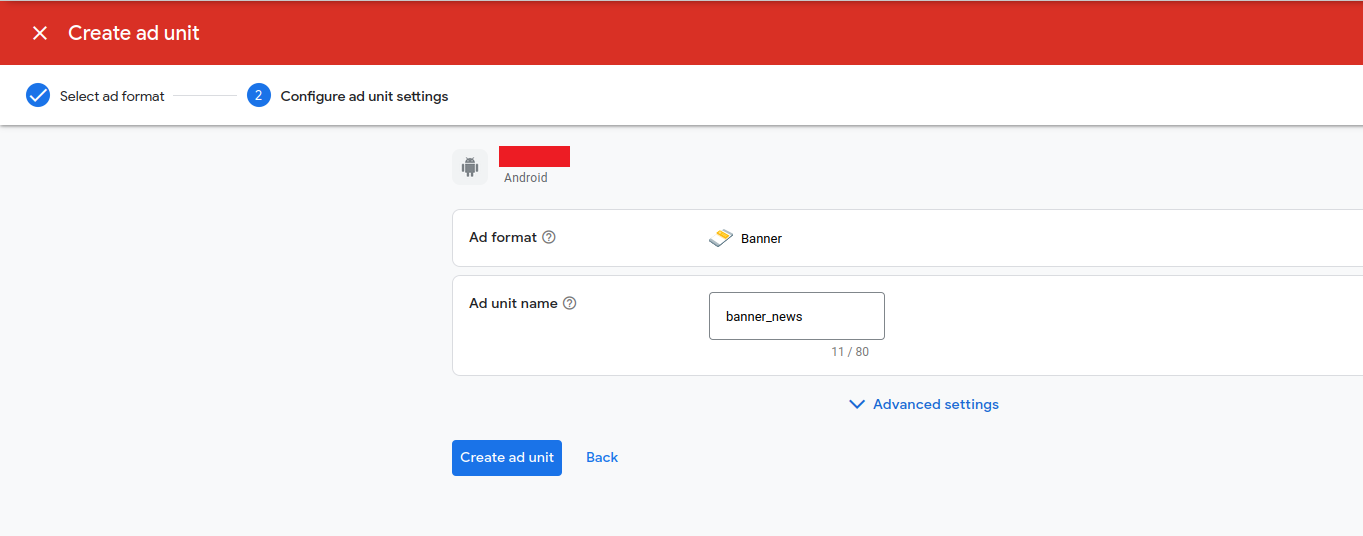
Create ad units.

-
Select Banner unit ad and enter banner unit ad name then click on Create ad Unit
button.

-
Then add another unit add shown in below image and Same as above create
Interstitial ads and native ads.
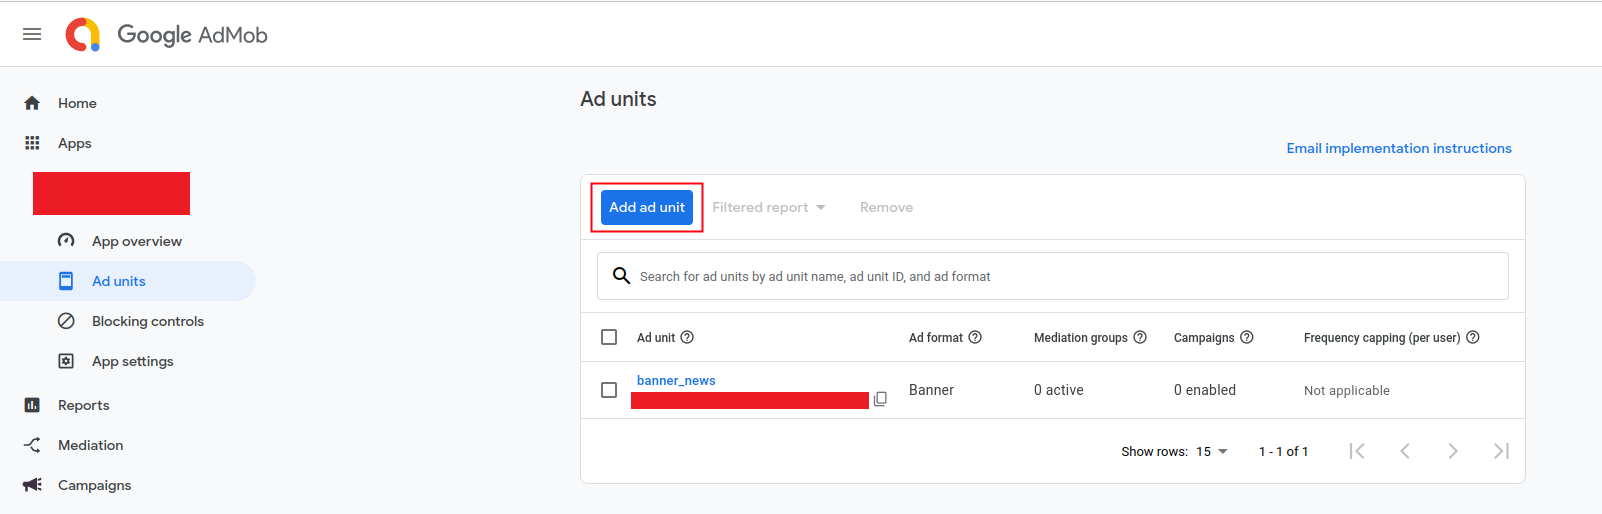
- Also add Google Admob ads appId as a value for android:name="com.google.android.gms.ads.APPLICATION_ID" in android/app/src/main/AndroidManifest.xml file.
- Add iOS App and add units in iOS app in same way.
- Also add Google Admob ads appId as a value for GADApplicationIdentifier in ios/Runner/info.plist File.
-
Add your ad unit id in admin panel -> Plugin -> Ads Plugin.

- To import the app, open Android Studio and import or open the template. Ensure that you wait for all processes, including the Gradle Build, to complete before proceeding to the next step.
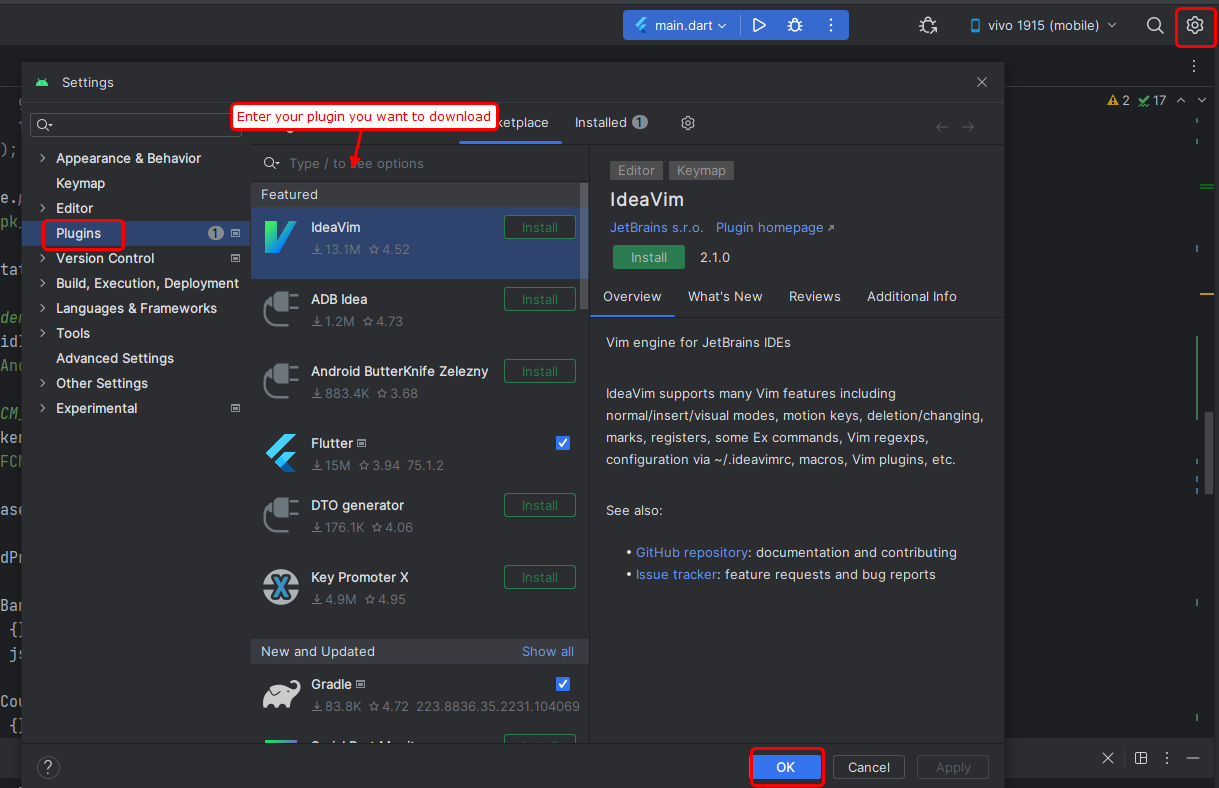
- To install the Flutter and Dart plugins, follow these steps:
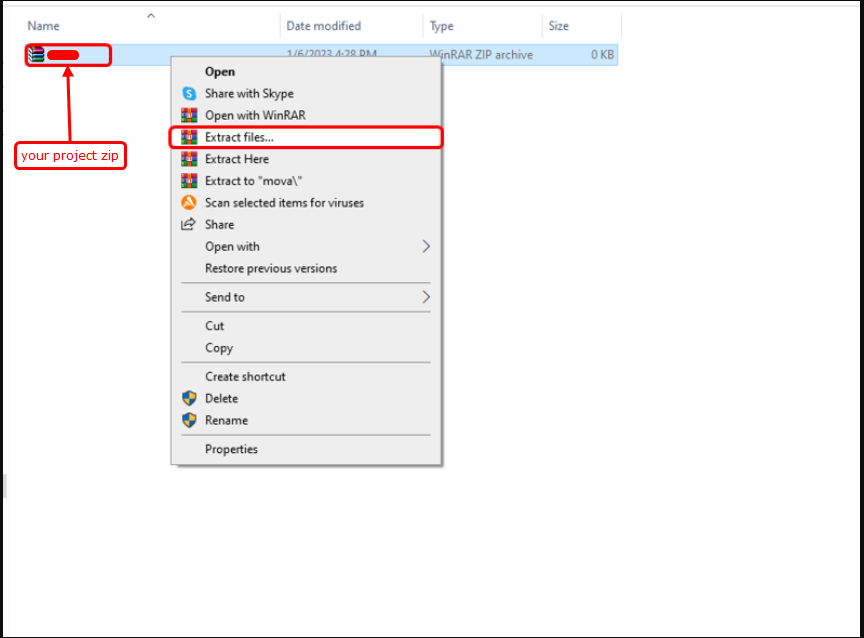
Extract The Project
- Click on the settings button located in the corner.
- A pop-up will appear. Select "Plugins".
- In the search bar within the pop-up, enter the names of the plugins you wish to install (as shown in the image below).
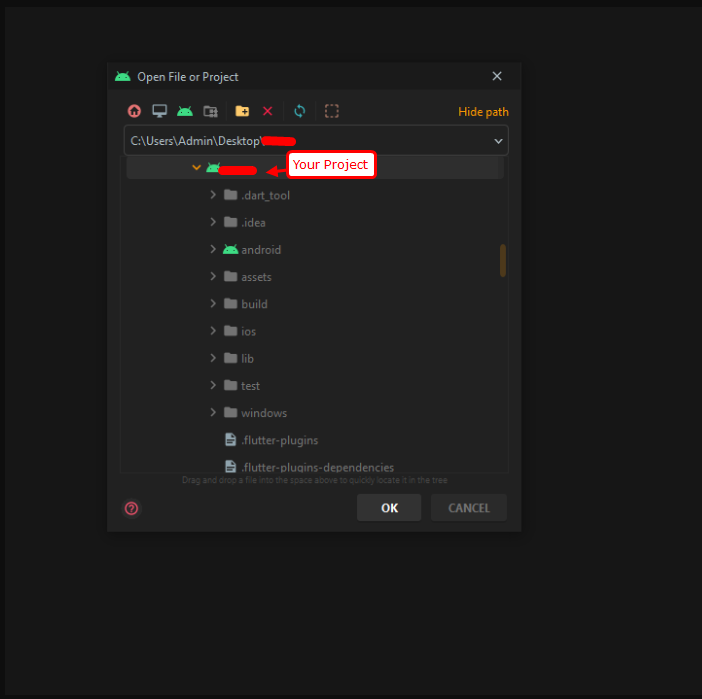
- Click on "Open" and open your project.
- A pop-up will appear; select your project and then click on the "Ok" button.
- In some cases, the Gradle Build may fail. If additional components are required, Android Studio will prompt you to download them in the 'messages' tab. Simply follow the instructions provided to install and download the necessary additional components.

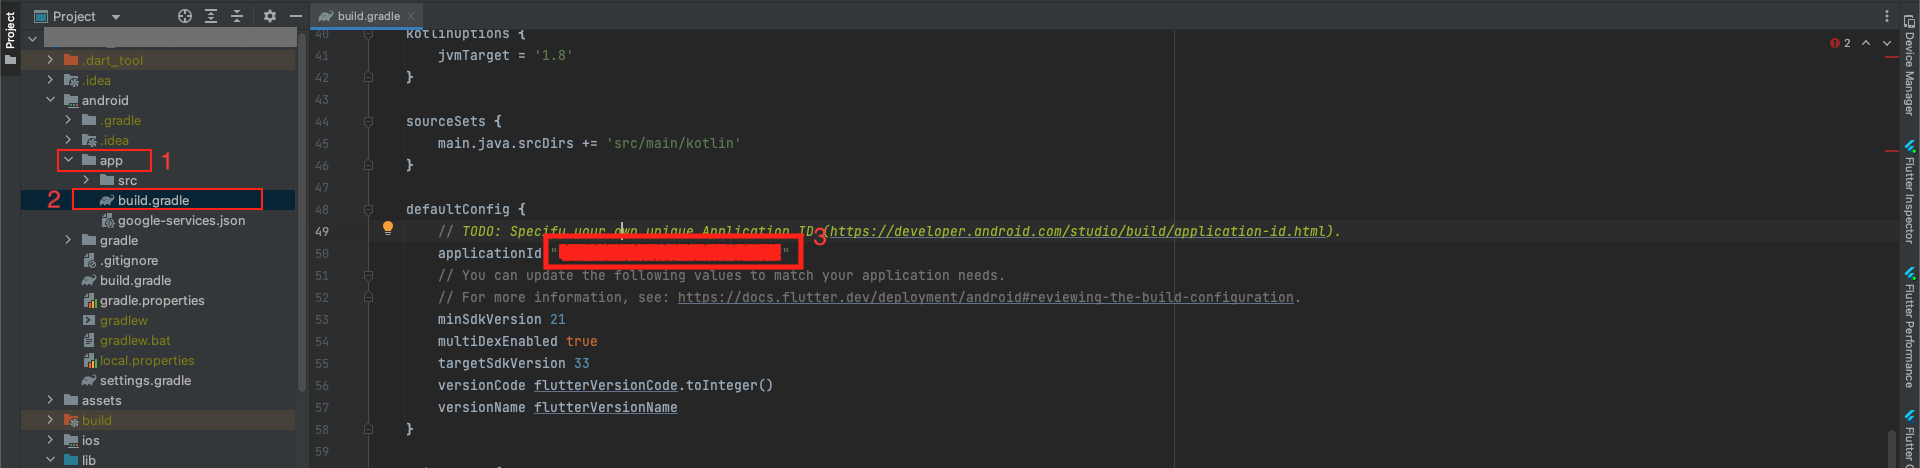
Change Package Name
- Android
- Navigate to the "android/app" directory and locate the "build.gradle" file.
- Within this file, update the "applicationId" and its corresponding dependencies as necessary
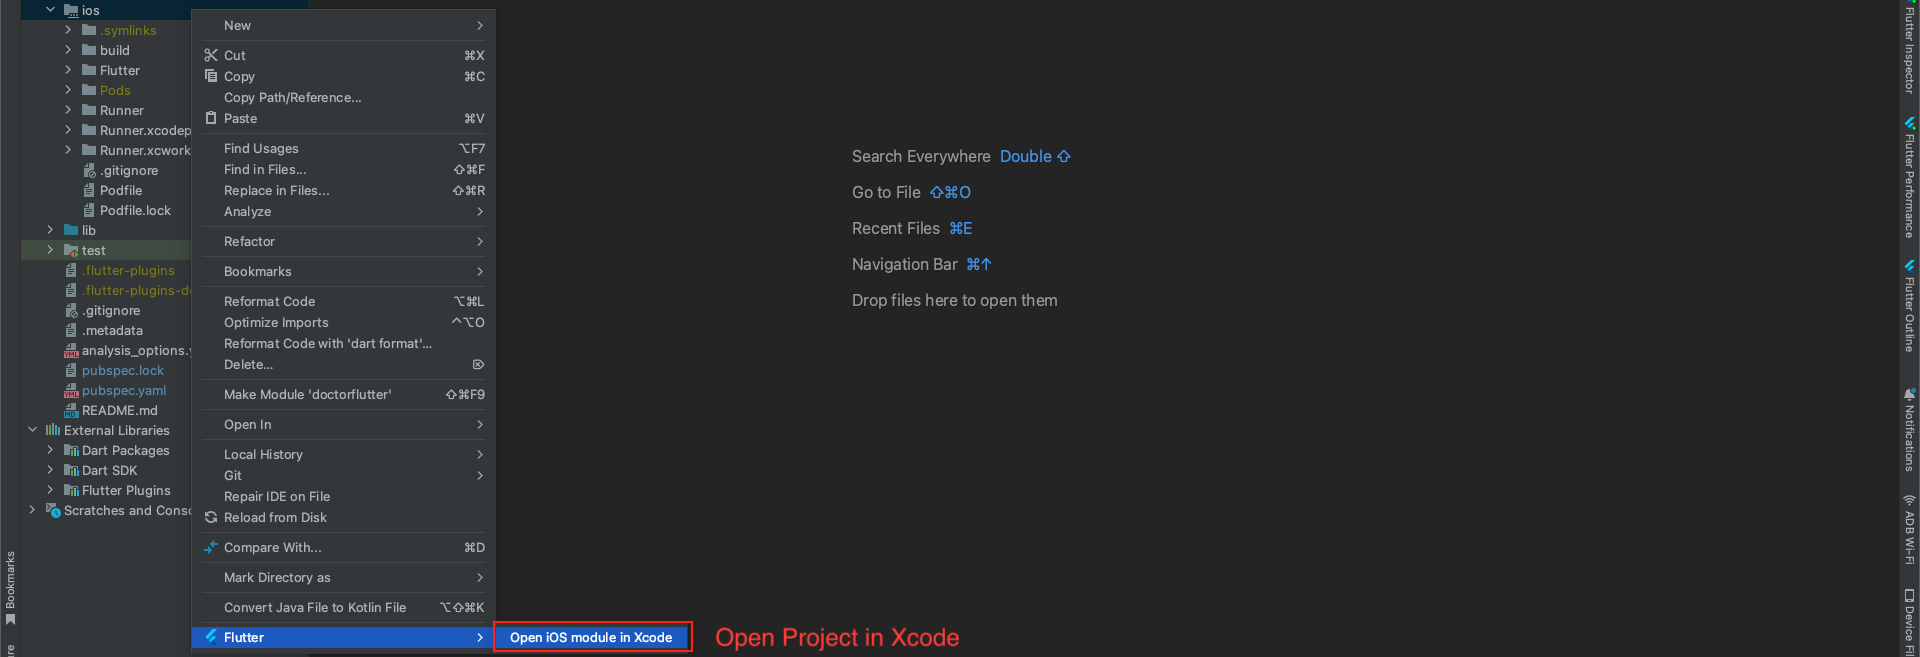
- IOS
- Please initiate a right-click on the iOS directory, followed by selecting "Flutter" and then "Open iOS module in Xcode" to proceed further.
- After successfully opening the project in Xcode, proceed to the following steps:
- Navigate to "Runner" > "Signing & Capabilities".
- Modify the bundle identifier according to your requirements.
- Save the changes, and the process is complete.

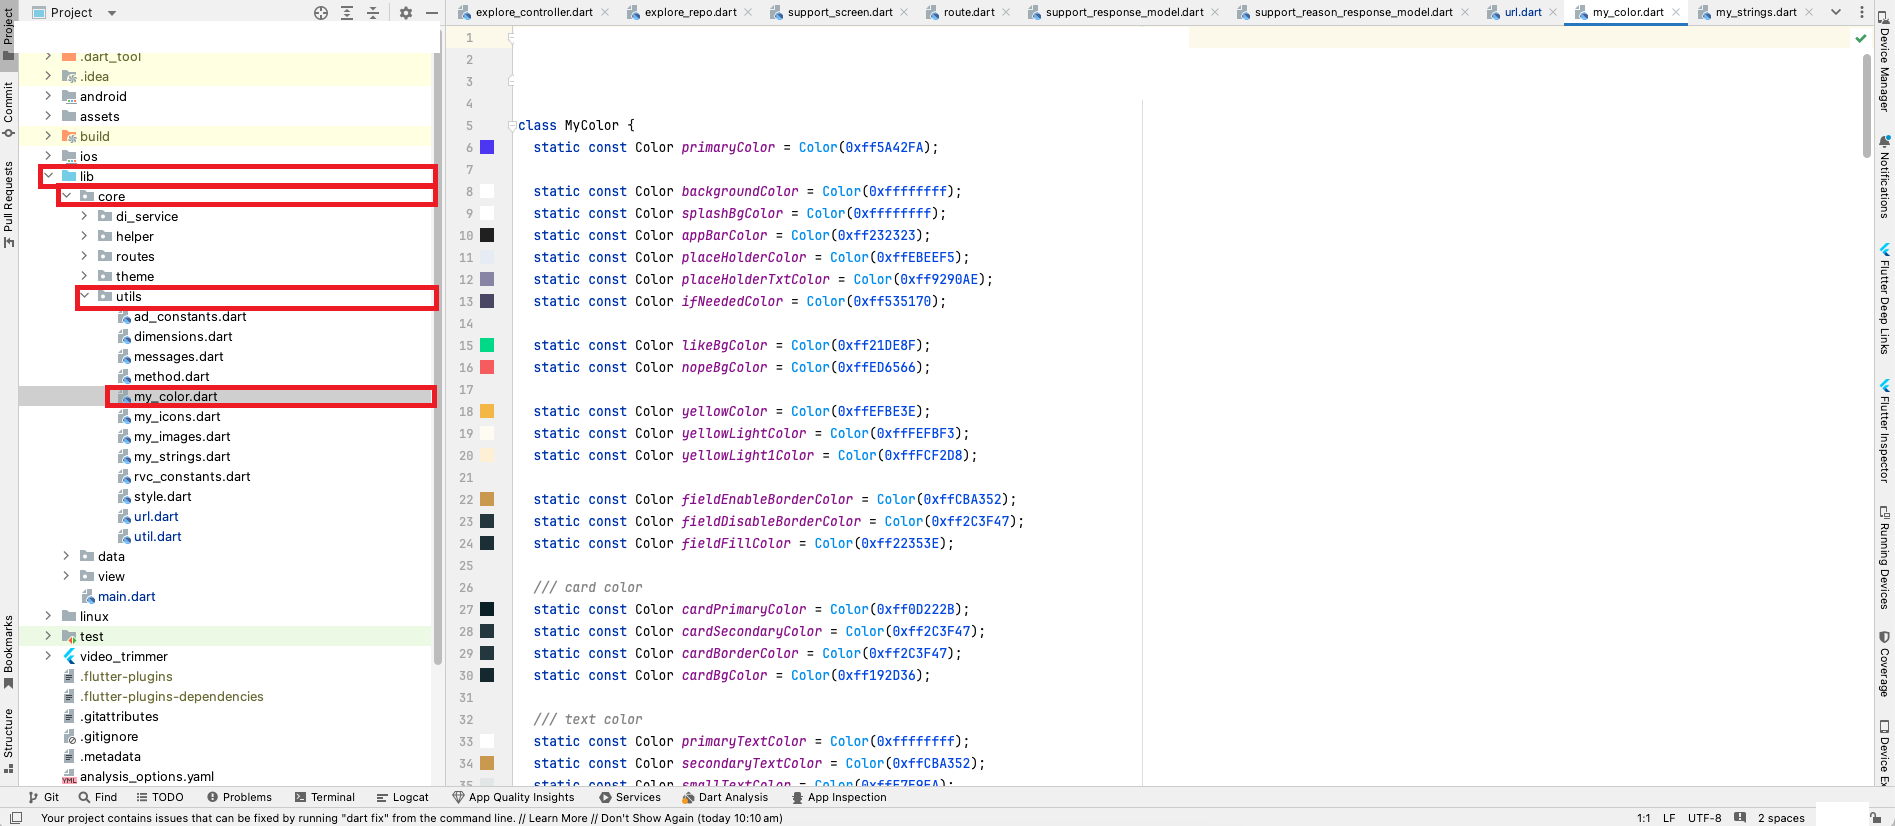
Change App Color
- Go to your project lib > core > utils > my_color.dart as shown in the below image.
Change App Icon
- To generate icons of various sizes for both iOS and Android platforms,visit
- Upload the icon image, select the desired options for iPhone and Android compatibility, and click on "Generate". This website will efficiently produce icons in multiple sizes for both platforms simultaneously.
- Upon completion, the website will download a ZIP file named "AppIcons", containing folders named "android" and "Assets.xcassets", along with images suitable for the App Store and Google Play Store. These assets can be directly uploaded as icons in both app stores.
- Please open your project in Android Studio.
- Android
- Navigate to the "android/app/src/main/res" directory in your project. Right-click on the "res" folder and select "open in Finder". Once in Finder, delete all the existing mipmap folders. Then, paste the mipmap folders from the AppIcon/android directory that you have downloaded.
- IOS
- Navigate to the "ios/Runner directory and locate the ".xcassets" file. Right-click on the "Runner" folder and select "open in Finder". Once in Finder, delete the "Assets.xcassets" folder. Then, paste the "Assets.xcassets" folder from the "AppIcon" directory that you have downloaded.
- After replacing the images in the Android and iOS folders manually, proceed to "lib/main.dart" and run the Flutter project using the following command in the Flutter console.
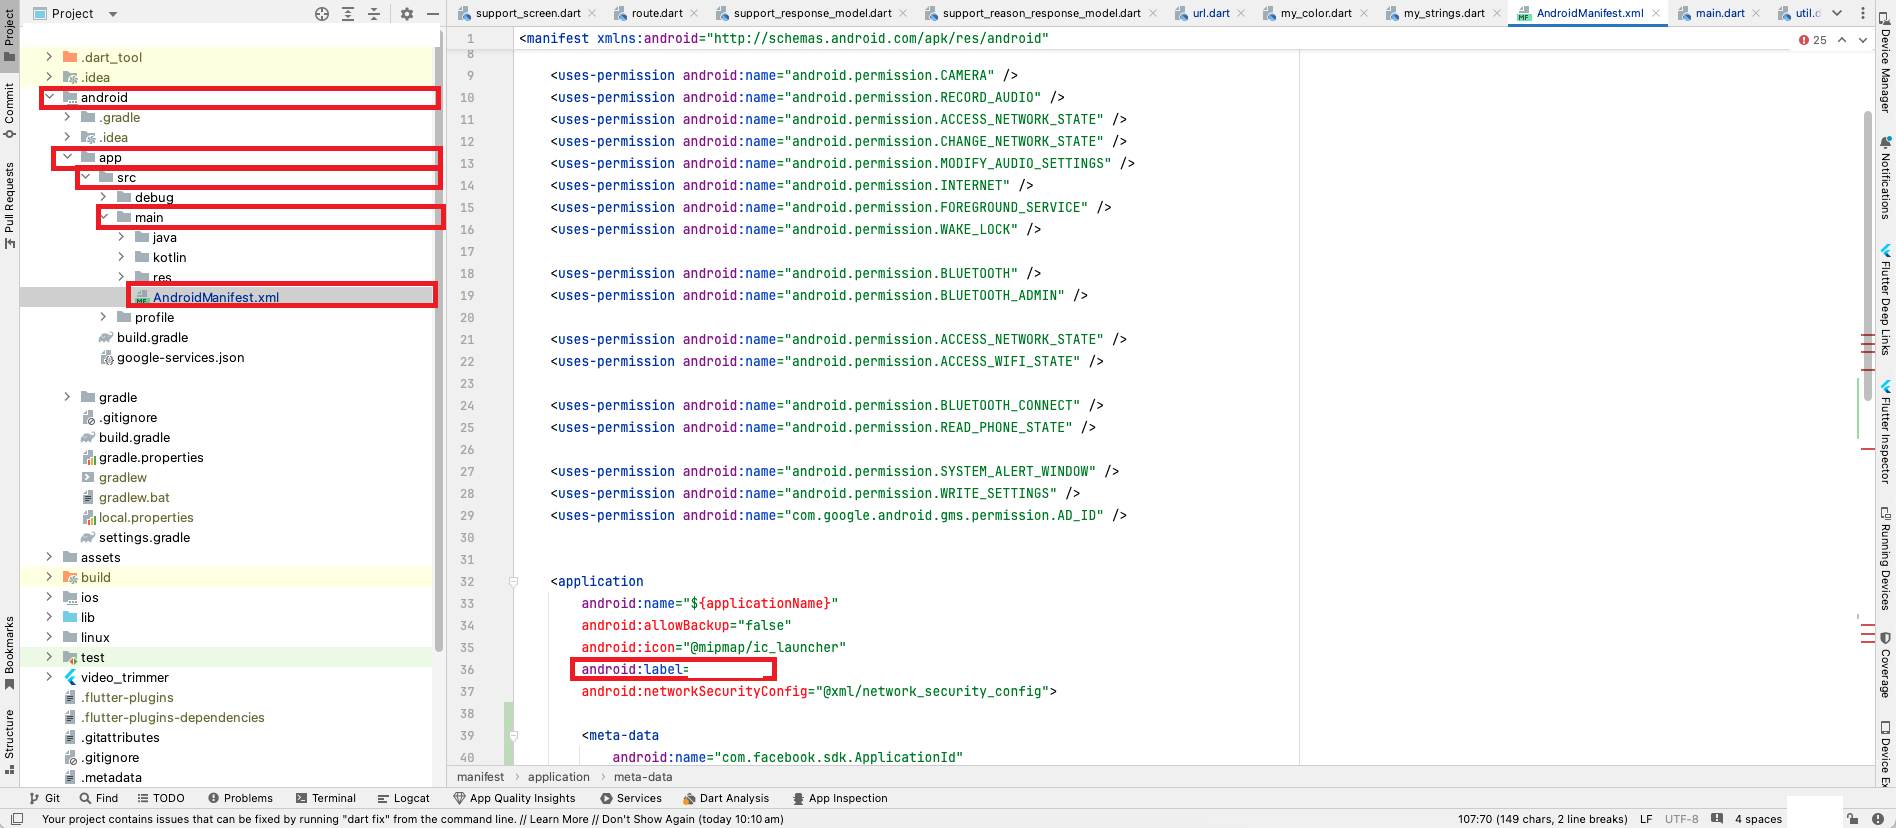
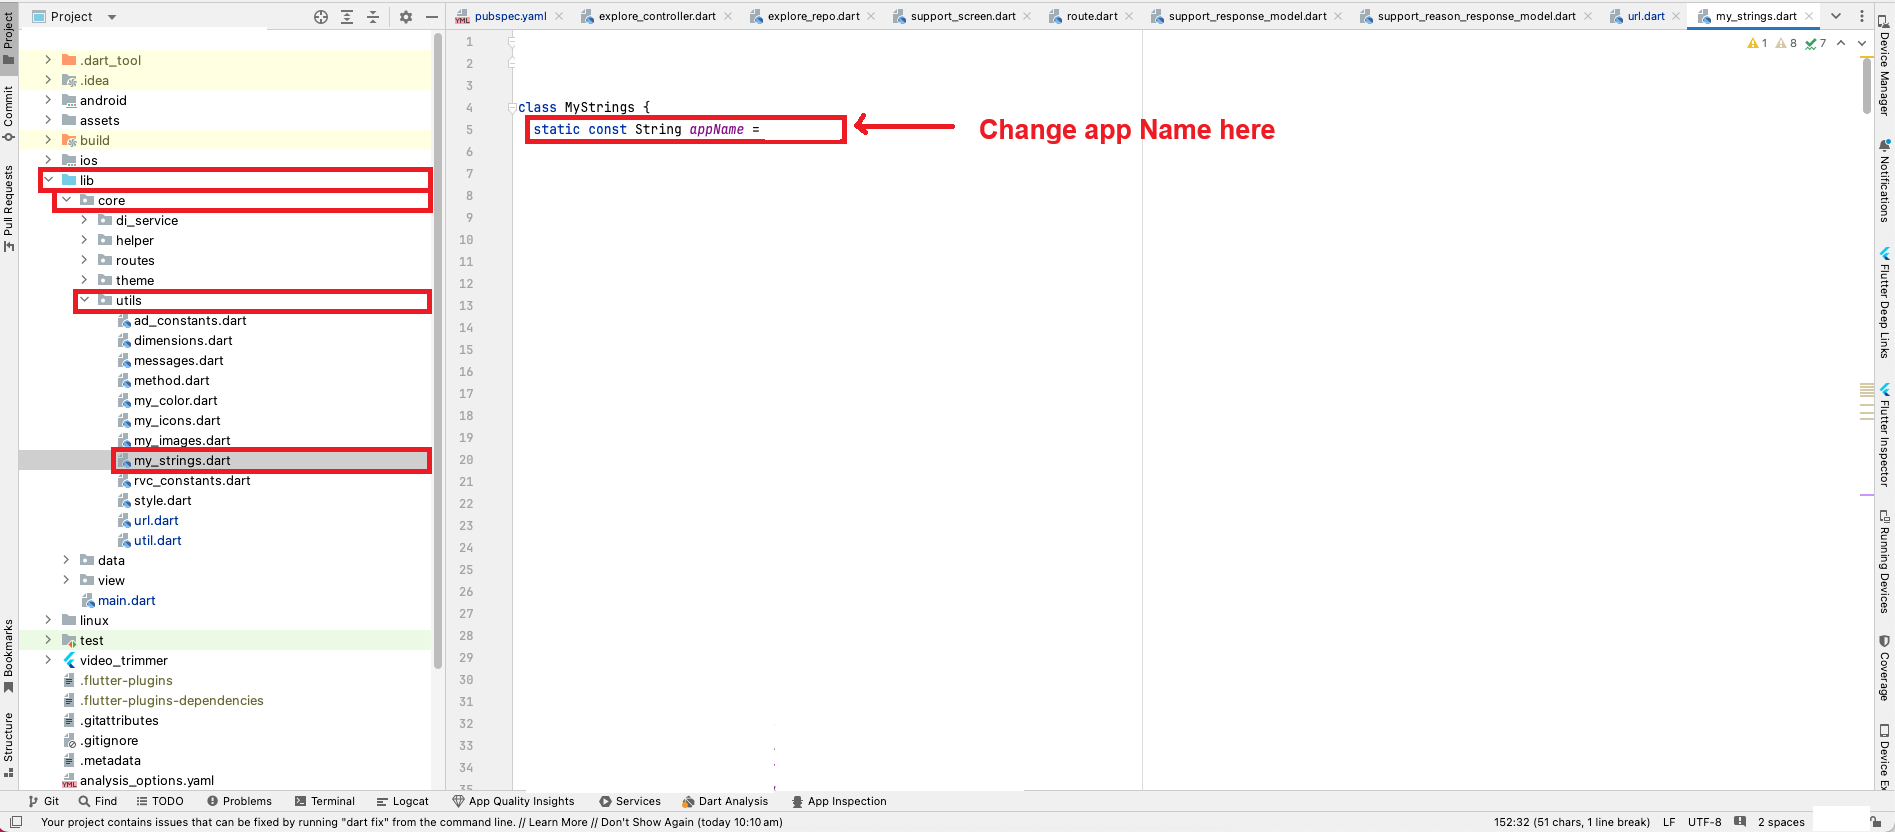
Change App Name
- Navigate to "lib/core/utils/my_strings.dart" and make the changes as depicted in the provided image.
- Android
- Navigate to "android/app/src/main/AndroidManifest.xml" and make the changes as depicted in the provided image.
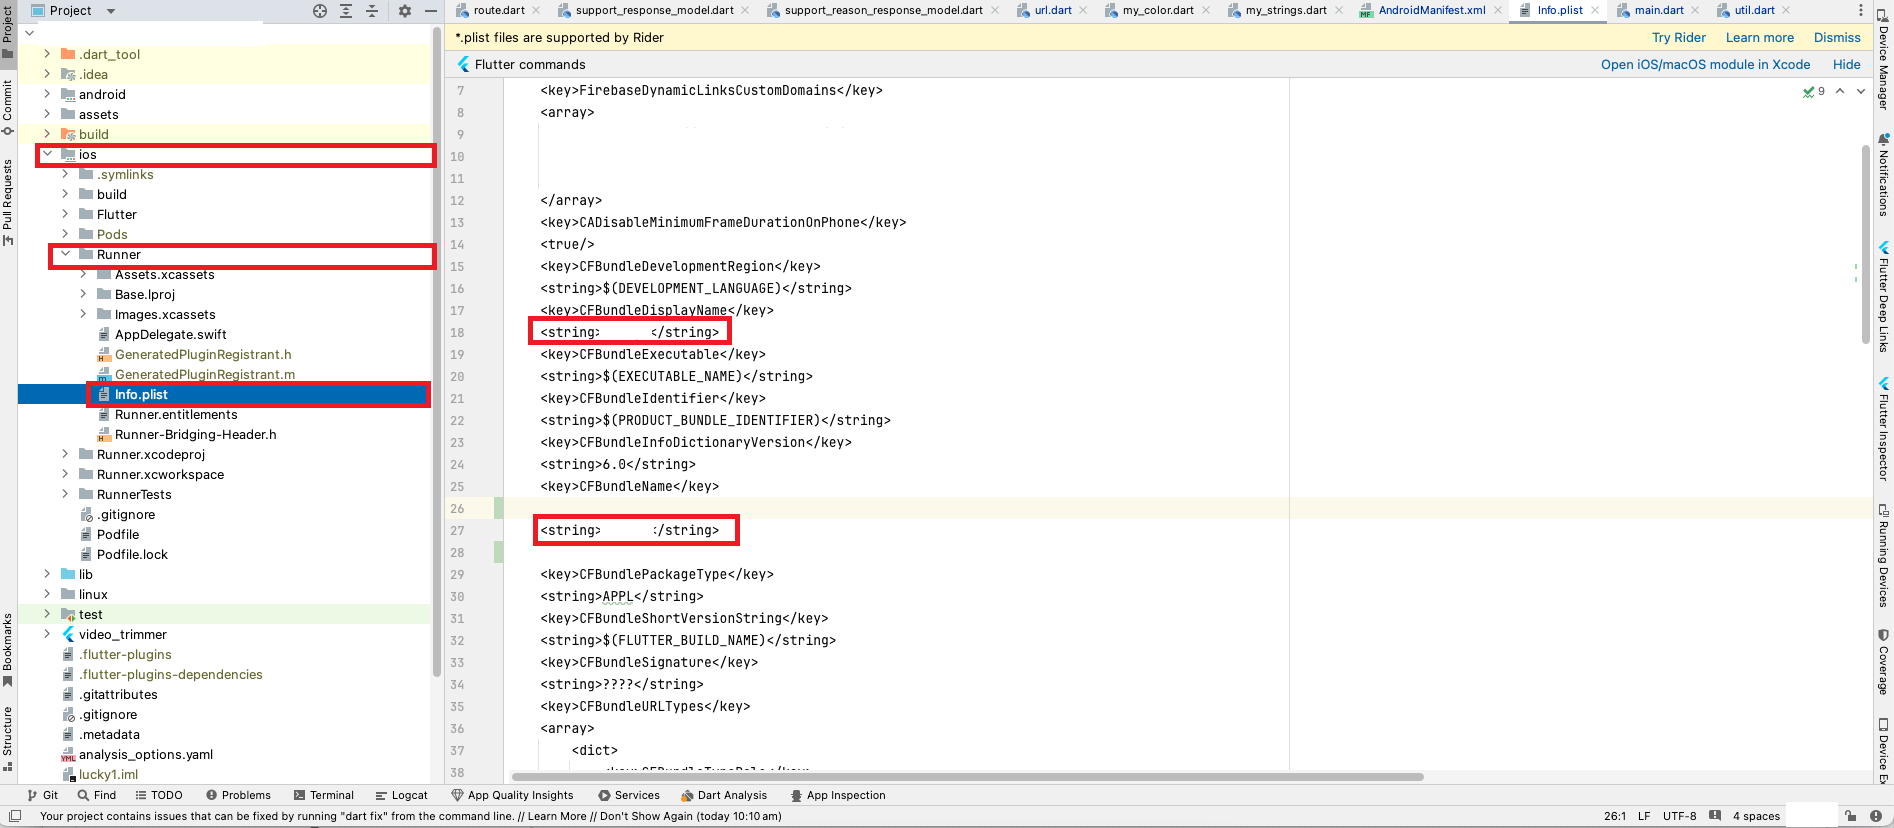
- IOS
- Please right-click on the "iOS" directory, then navigate to "Runner", and select "info.plist". Finally, open the iOS module in Xcode.
Build Debug APK
- To generate APK (Application Package File) for distribution and installation on Android devices, Flutter provides a straightforward method using the "flutter build apk" command. Below, we outline the steps involved in building APK files for Android using Flutter.
- Navigate to your project location.
- Access the build options by following this path: "Build" > "Flutter" > "Build APK".
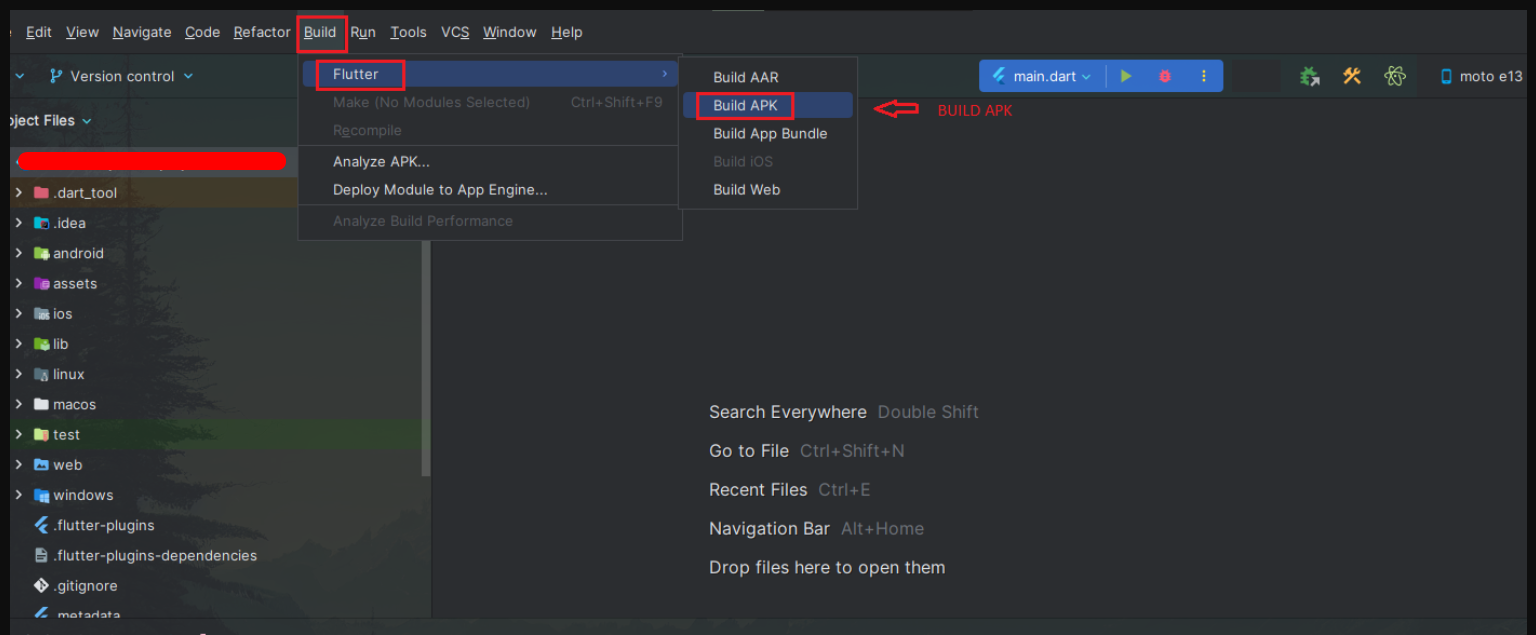
- Execute the following command: "flutter build apk --release", as demonstrated in the image below.
- Once the APK has been successfully generated, it will be automatically saved to the specified destination, as illustrated in the image below.
Release APK

Manage Publish
Android
- You need to publish your app on play store in testing mode (Closed testing).
- Make sure you have added the tester Gmail ids for test the in app purchase (the location is mentioned below under manage releases).
- Upload the app
- After you’ve signed up for a Google Play developer account, you can upload apps to Google Play using your Play Console.
- Create an app
- Go to your Play Console.
- Select all applications. >Create application.
- Select a default language and add a title for your app. Type the name of your app as you want it to appear on Google Play.
- Create your app’s
- Store listing
- Enter details in mandatory field (screenshots, icon, and descriptions etc).
- Manage releases
- Create closed track >Enter track name>Create track
- Create new release>upload your APK
- After that add your testers list under Manage testers and choose this list for testing.
- Add your testers Gmail account under Console > Settings > Licence Testing > Gmail accounts with testing access > Enter account id.

- Content rating questionnaire
- Select your app category > SOCIAL NETWORKING, FORUMS, BLOGS AND UGC SHARING >

Note: you need to choose “yes” for last one option “purchase digital goods”.
IOS
Before publishing the app to the iOS store there are certain things that are required to add. Here is the detailed list of documents that are required while uploading the app to the app store.
- Screenshots: App store requires at most 10 screenshots for two device displays, namely 5.5” and 6.5” display. The resolution of these are 1080 x 1920 px and 1242 x 2688 px.
- Name: Name of the app as seen by users
- Promotional Text: This text will appear above your description on the App Store for customers with devices running iOS 11 or later, and macOS 10.13 or later.
- Support URL : A URL with support information for your app. This URL will be visible on the App Store.
- Marketing URL: A URL with marketing information about your app.
- Keywords: Separate keywords with a comma.
- Privacy Policy URL: A URL containing your app’s privacy policy.
- Terms & Condition URL: A URL containing your app’s terms and condition.
- App Icon: This icon will be used on the App Store and must be in the JPG or PNG format, with a minimum resolution of at least 72 DPI, and in the RGB color space. It must not contain layers or rounded corners.
- Demo Account: The username and password for a full-access account for your app. Include details for additional accounts in the Notes field.
- Custom EULA: If you are adding in app purchases.
Publishing Steps
- In your browser, navigate to Apple’s Developer Portal
- Log in
- Click Identifiers
- Click the “+” in the top right of the screen
- Name the App ID the same as your app
- Make sure the Bundle ID follows the standard naming convention: com.yourcompanyname.yourappname
- Check any App Services the app needs, click Continue
- Verify the services are correct, then click Submit
Create a Bundle Identifier
The bundle identifier is the name of your app, as seen by both the App Store and iOS devices.
- Open a program called KeyChain Access
- In the top left menu, click Certificate Assistant
- Click Request a Certificate From a Certificate Authority…
- User email: Enter your email address
- Common Name: We recommend using the name of the app
- CA email is not actually required
- Check Saved to Disk, click Continue
- Save the Certificate Signing Request for later
Create a Certificate Signing Request
Certificate Signing Requests are used to link your computer to your Apple developer account.
- In your browser, navigate to Apple’s Developer Portal
- Click Certificates
- Click the “+” in the top right of the screen
- Click the App Store Production
- Currently named “App Store and Ad Hoc” under Production
- Click Continue
- Upload the Certificate Signing Request created earlier
- Download the Certificate
- Install the certificate on your computer by double-clicking
- Keep this file somewhere safe
Create an App Store Production Certificate
Code Signing Certificates are used to link iOS apps to your Apple developer account.
- In your browser, navigate to Apple’s Developer Portal
- Log in
- Click Provisioning Profiles
- Click the “+” in the top right of the screen
- Click the App Store Distribution option, click Continue
- Select the Bundle ID created earlier, click Continue
- Select the Certificate created earlier, click Continue
- Make sure the Profile Name follows the standard naming convention: App Name App Store Distribution
- Click Generate
- Download it
- Install the provision profile on your computer by double-clicking
- Keep this file somewhere safe
Create a Production Provisioning Profile
Provisioning Profiles are packaged with iOS apps so user’s devices can install them.
- Start in your browser, navigate to iTunes Connect
- Log in
- Click My Apps
- Click the “+” in the top left of the screen
- Click “New iOS App”
- Bundle ID: choose the one created on Developer Portal
- For convenience, make the SKU match the Bundle ID created earlier
- Click Create to create the first version listing
Create App Store Listing
Reserve a slot in the App Store for your app for users to see.
- Start Xcode
- Open the project or workspace
- Update the version and build numbers
- Open Build Settings
- Make sure All settings is selected
- Scroll to Code Signing
- Use the provisioning profile created earlier
- Use the code signing identity created earlier
- In the top menu, select Generic iOS Device as the build destination if no actual device is connected
- Menu, Project, Archive
- Click Distribute
- Sign in as your apple developer account
- Submit to app store
- Wait for the confirmation
Make the release build
Package the actual binary that users will be uploading to the store.
- Enter all of the information assembled in step 1
- Select the build you wish to tie to the version (Note: This usually appears 10-15 minutes after sending from Xcode)
- Fill in pricing information
- Click Save
- Fit any errors based on the messages that appear and save changes
Fill In Version Information
Users will decide whether or not to install your app based on your store listing.
- Select the release type
- Manual release – after the app is accepted, a Release button will appear
- Automatic release – as soon as the app is accepted, it will be released
- Wait for approval
- This process usually takes 2-3 weeks for a new submission
- If your app was not approved, review the notes in the Resolution Center and make any necessary changes to the app or version information then resubmit
Submit Version for Review
Every app that is submitted to the store has to be reviewed by the Apple team before release.
- If you selected Manual release, click Release your app when ready
- Wait for the green “Ready for Sale” version status (This might take from 1 hour to 1 day after release)
Release
Uploading step.
When submitting a new version of your app, you will only have to repeat steps 6 through 9.