Introduction
- Thank you for choosing the Groot app. We are pleased to have you with us. Enclosed is the documentation to help you set up and launch the app easily. Please read it carefully, as it contains important information. If you need any assistance or have questions, our support team is just a message away.
Extract Project Zip
- All setup is performed using Terminal (SSH).
- Connect to your AWS server using:
ssh ubuntu@YOUR_SERVER_IP
- Upload the backend zip file using WinSCP or SCP.
- Navigate to your project directory and extract:
cd /home/ubuntu/backend
unzip backend.zip -d backend
Create Instance In AWS
- Launch an AWS EC2 Instance.
- Instance Type: t3a.medium
- Operating System: Ubuntu 24.04 LTS
- Enable ports in Security Group:
- 22 – SSH
- 80 – HTTP
- 443 – HTTPS
- Attach key pair and launch the instance.
Setup MariaDB (MySQL)
- Update system packages:
sudo apt update && sudo apt upgrade -y
- Install MariaDB (MySQL compatible):
sudo apt install -y curl software-properties-common
sudo apt install -y mariadb-server mariadb-client
- Start MariaDB:
sudo systemctl start mariadb
- Enable MariaDB Service at Server Startup:
sudo systemctl enable mariadb
- Verify version:
mysql --version
mysql Ver 15.1 Distrib 10.6.22-MariaDB
- Secure the database:
sudo mysql_secure_installation
Setup Nginx
- Install Nginx:
sudo apt install nginx -y
- Check Nginx version:
nginx -v
nginx/1.18.0 (Ubuntu)
- Start and enable Nginx:
sudo systemctl start nginx
sudo systemctl enable nginx
Setup Node.js And PM2
- Update Existing Pacakages
sudo apt update && sudo apt upgrade -y
- Install Required Dependencies:
sudo apt install -y curl ca-certificates build-essential
- Install NVM (Node Version Manager):
curl -o-
            https://raw.githubusercontent.com/nvm-sh/nvm/v0.39.7/install.sh |
            bash
- Reload terminal:
source ~/.bashrc
- Check NVM version:
nvm -v
- Install Node.js version v20.19.4:
nvm install 20.19.4
nvm use 20.19.4
nvm alias default 20.19.4
- Verify Node and npm:
node -v
v20.19.4
npm -v
10.8.2
- Move Node and NPM to /usr/bin:
sudo ln -s ~/.nvm/versions/node/v20.19.4/bin/node /usr/bin/node
sudo ln -s ~/.nvm/versions/node/v20.19.4/bin/npm /usr/bin/npm
- Install PM2 globally:
npm install -g pm2
Setup Database In MariaDB
- Login to MariaDB:
sudo mysql
- Create database and user:
CREATE DATABASE groot;
CREATE USER 'groot_user'@'localhost' IDENTIFIED BY
            'StrongPassword@123';
GRANT ALL PRIVILEGES ON groot.* TO
            'groot_user'@'localhost';
FLUSH PRIVILEGES;
Setup Project In Server
- Navigate to project directory:
cd /home/ubuntu/backend
- Setup and configure the .env file:
mv .env.example .env
- Edit the .env file and update database, server, and app settings.
- Install project dependencies:
npm install
- Notification Setup (Firebase)
- Go to Firebase Console → Project Settings → Service Accounts.
- Click Generate new private key and download the JSON file.
- Upload the downloaded file to the backend config folder:
/home/ubuntu/backend/config
- Rename the downloaded file to firebase.json:
mv firebase-adminsdk-xxxxx.json firebase.json
- Start backend using PM2:
pm2 start index.js --name groot
pm2 save
pm2 startup
- Restart backend after Firebase setup:
pm2 restart groot
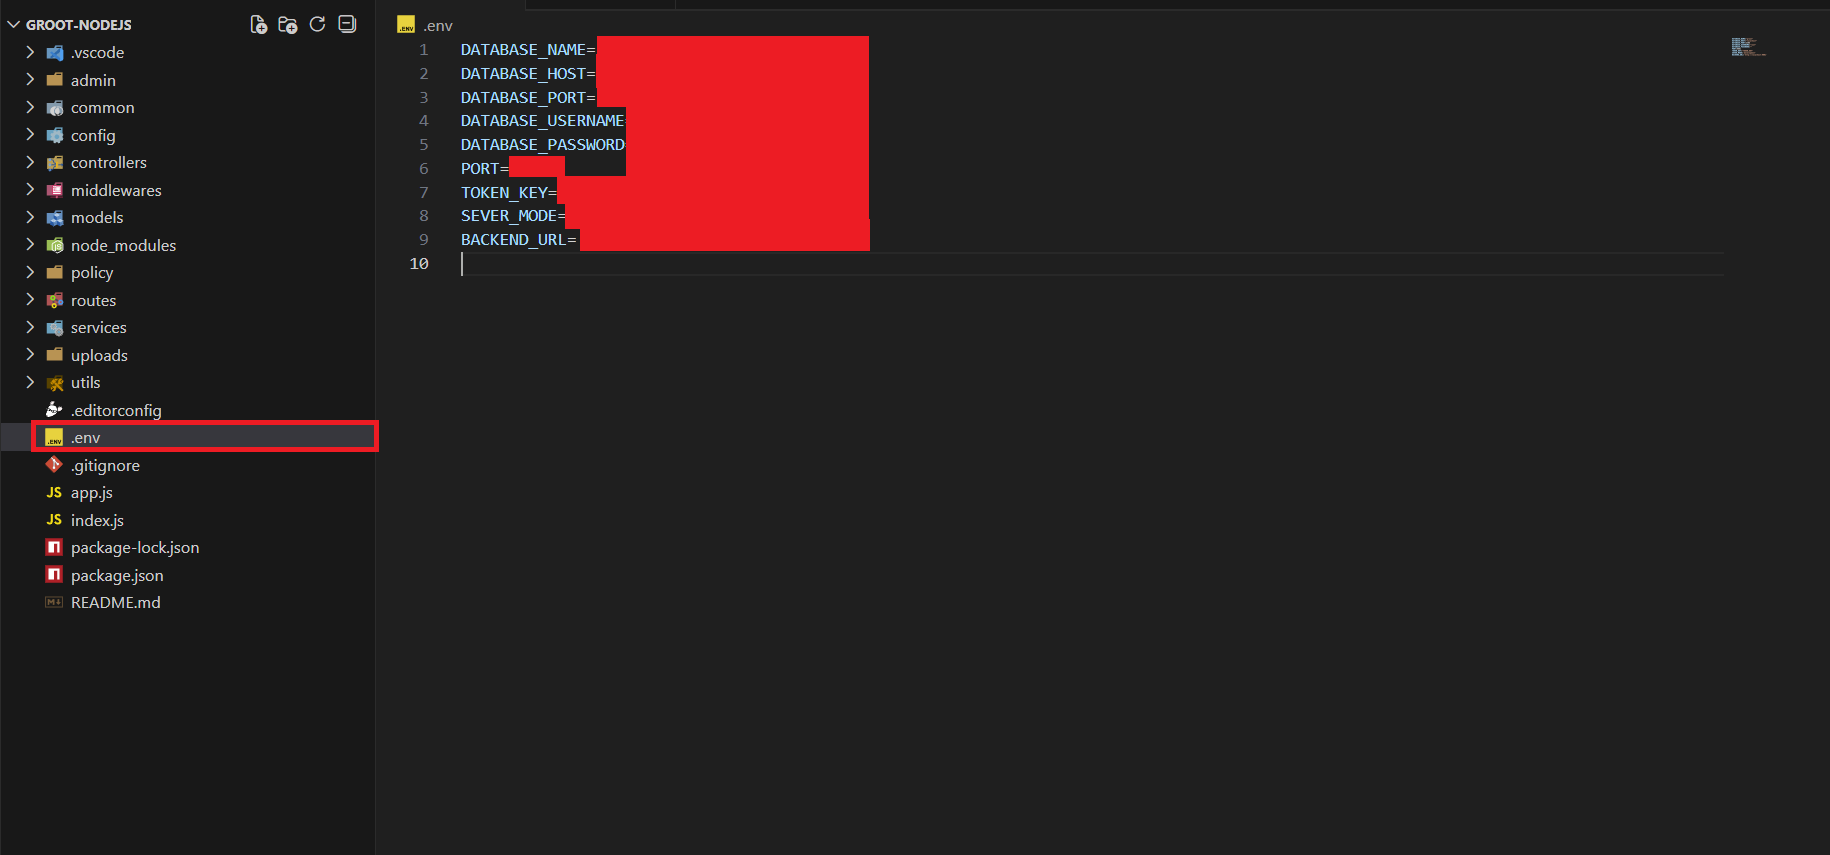
Env file explain
- PORT: The port number where your Node.js project runs. Commonly, 3000 or 5000.
- TOKEN_KEY: A secret key used for JWT encryption and authentication for API requests.
- DATABASE_HOST: The SQL database hostname. Usually set to "localhost" for local development.
- DATABASE_NAME: The name of your SQL database.
- DATABASE_USERNAME: The username required to access your database.
- DATABASE_PORT: The port number for your database. Typically set to 3306 for MySQL/MariaDB.
- DATABASE_PASSWORD: The password associated with your database username.
- BACKEND_URL: The URL of your backend server, which your frontend or other services will connect to.
Configure Nginx Reverse Proxy (Without SSL)
- All steps are performed using Terminal (SSH).
- Create a new Nginx configuration file for your domain:
sudo nano /etc/nginx/sites-available/grootdemo.yourdworld.com
- Paste the following configuration (WITHOUT SSL):
            server {
                listen 80;
                server_name grootdemo.yourdworld.com;

                location / {
                    proxy_pass http://127.0.0.1:3000;
                    proxy_http_version 1.1;

                    proxy_set_header Upgrade $http_upgrade;
                    proxy_set_header Connection "Upgrade";
                    proxy_set_header Host $host;
                    proxy_set_header X-Real-IP $remote_addr;
                    proxy_set_header X-Forwarded-For $proxy_add_x_forwarded_for;
                }

                access_log /var/log/nginx/grootdemo.yourdworld.com.access.log;
                error_log /var/log/nginx/grootdemo.yourdworld.com.error.log;
            }
- Save and close the file:
- Press CTRL + O → press Enter (to save)
- Press CTRL + X (to exit nano)
- Enable the site:
            sudo ln -s /etc/nginx/sites-available/grootdemo.yourdworld.com
            /etc/nginx/sites-enabled/
- Test Nginx configuration:
sudo nginx -t
- Expected output:
          nginx: the configuration file /etc/nginx/nginx.conf syntax is ok
          nginx: configuration file /etc/nginx/nginx.conf test is successful
- If you see the above message, your configuration is valid.
- Restart Nginx:
sudo systemctl restart nginx
- Verify your application is accessible at:
http://grootdemo.yourdworld.com
Install SSL Certificate Using Certbot
- Install Certbot and Nginx plugin:
sudo apt update
sudo apt install certbot python3-certbot-nginx -y
- Generate SSL certificate for your domain:
sudo certbot --nginx -d grootdemo.yourdworld.com
- During installation:
- Select option to redirect HTTP to HTTPS
- Provide email address for renewal notifications
- Certbot will automatically update your Nginx config to:
- Add SSL certificates
- Enable HTTPS (443)
- Redirect HTTP → HTTPS
- Verify SSL auto-renewal:
sudo certbot renew --dry-run
- Final access URL:
https://grootdemo.yourdworld.com
Admin Panel Setup
- Open Admin Code in Vs studio code
- Rename .env.example to .env
- Edit env file in admin
- update backend url to https://grootdemo.yourdworld.com
- install Node modules

npm i
- Create production build:
npm run build
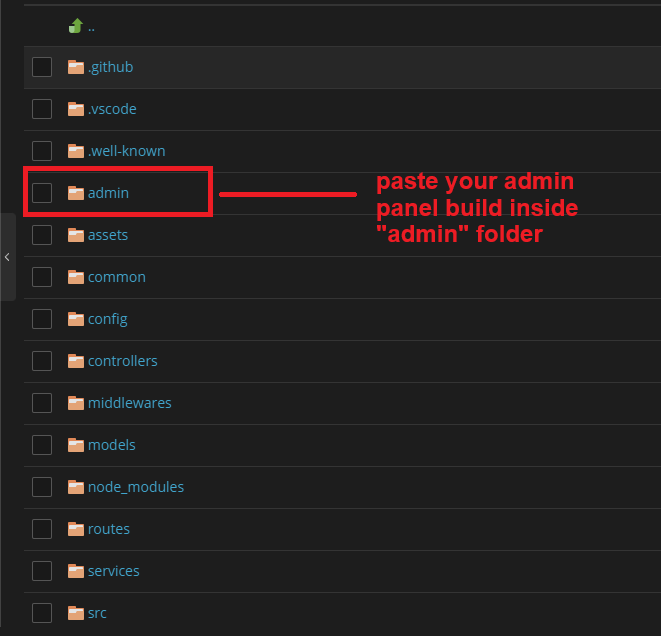
- Upload build files into backend admin directory.
- Access admin panel via configured domain.
SMTP Configuration
- The first step of the process is to create an email account on your hosting package.
- Once you have your email account created, you can proceed with the actual configuration of your Groot website. You need to access your website as administrator and go to SMTP settings from Admin Panel -> Plugin -> SMTP config
-
Edit the following options:
- SMTP Host -mail.example.com (change example.com to your actual domain)
- SMTP Username - Enter the email account created in the previous chapter
- SMTP Password - Enter the password for your email account
- SMTP Port - server port, most used 587 for TLS, and 465 for SSL encryption
- I made the changes above but my website is not sending any emails, what I can do?
- Please test your SMTP credentials at SMTPER, if the same config worked by the test, please contact us.

Ads Configuration
- This plugin allows you to integrate and manage advertisements inside your application.
- To configure your ads, access the admin panel and navigate to Admin Panel → Plugin → Ads Settings.
-
Edit and fill the following fields:
- Enable Ads – Turn ON to activate ads inside the app.
- Banner – Enter your Banner Ad Unit ID.
- Interstitial – Enter your Interstitial Ad Unit ID.
- App Open – Add the Ad Unit ID for App Open ads.
- Native Advanced – Add the Native Advanced Ad Unit ID.
- Rewarded – Enter the Rewarded Ad Unit ID.
- Publisher ID – Enter your Publisher ID from AdMob.
- App ID – Enter your main App ID from AdMob.
-
Make sure:
- You copy each Ad Unit ID exactly as provided in your AdMob dashboard.
- Your app is already added inside AdMob and approved for ad serving.
- You have selected the correct platform (Android / iOS) when copying the IDs.
-
If ads are not showing:
- Check if “Enable Ads” is turned ON.
- Ensure you entered valid AdMob IDs without spaces or extra characters.
- Verify that AdMob is not in test mode for your device or app.
- Review your AdMob dashboard for any policy violations or errors.

Policy Configuration
- This plugin allows you to manage all legal and informational policy pages displayed inside your mobile application.
- To add or update any policy content, log in as an administrator and navigate to: Admin Panel → Plugin → Policy Config
-
Inside the policy settings, you can update the following pages:
- Terms & Conditions – Rules and guidelines for using the app.
- Privacy Policy – How user data is collected, stored, and protected.
- About Us – Information about your company or application.
- Contact Us – Contact details for user support and queries.
- Disclaimer – Legal disclaimer about accuracy and usage of the app.
- How It Works – A simple explanation of how the app functions.
- Each field accepts HTML content. You may add headings, paragraphs, links, lists, and other formatting to improve readability.
-
Dynamic Visibility Inside Mobile App
When you update any policy text here, it will automatically be visible in the mobile app. The app fetches the latest policy content from the server through the API, so you do not need to publish or update the app again. -
If the policy is not updating inside the app:
- Ensure you have saved the updated content.
- Refresh the mobile app or clear the app cache.
- Check your API URL is correct inside your app settings.

Default Category Configuration
- This plugin allows you to manage the default Income and Expense categories that appear inside your mobile application. These categories help users quickly organize their financial transactions.
- To configure or edit the categories, access the admin panel and navigate to: Admin Panel → Plugin → Default Category Plugin
-
Inside the module, you will find two main sections:
- Expense Categories – Default expense types such as Food & Drinks, Transportation, Utility, Shopping, Healthcare, Insurance, Education, Entertainment, Groceries, and more.
- Income Categories – Default income types such as Salary, Business, and Pocket Money.
-
You can customize or extend these categories by clicking the Add Category button.
You may add:
- Category name
- Category type (Income / Expense)
- Category icon or image
- All categories added or modified in the admin panel will automatically appear inside the mobile app. There is no need to publish an app update — changes are synced dynamically through the API.
-
If new categories are not visible in the app:
- Ensure the category is active and saved properly.
- Refresh or restart the mobile app.
- Check if the API URL is correctly configured in the mobile environment.
- Default categories help users track their income and expenses more efficiently, providing a cleaner and more organized experience inside your finance app.

Notification Configuration
- This plugin allows you to create and schedule push notifications for your mobile application users. You can send instant notifications or schedule them for a specific time and date.
- To manage notifications, log in as an administrator and navigate to: Admin Panel → Plugin → Notification Plugin
-
You can configure the following fields when creating a notification:
- Title – The title of the notification shown to the user.
- Message – The body text of the notification.
- Type – When the notification should be sent:
- Now – Sends immediately.
- Today – Schedules for today at the selected time.
- EveryDay – Sends daily at the selected time.
- Custom – Choose a specific date and time.
-
After creating a notification, it will appear in the Scheduled Notifications section.
From here, you can:
- Schedule – Activate or re-schedule the notification.
- Edit – Update the title, message, or timing.
- Delete – Remove the notification.
- All active notifications will automatically be delivered to users through the mobile application. No app update is required — the schedule updates dynamically via the API.
-
If notifications are not delivering:
- Ensure the notification is scheduled and active.
- Check that your mobile app’s push notification service (Firebase / OneSignal) is correctly configured.
- Verify mobile device permissions allow notifications.
- Confirm the selected date/time has not already passed.
- This tool helps keep users engaged by sending reminders, tips, updates, or any other important information directly to their devices.
